Not much going on right now. The walls grew a bit taller but still aren't finished. The next steps are removing plaster in the small room and the remaining wood floor in the big room, finish up the wiring in the big room. Then that's ready for plaster. One room at least...
As far as the bathroo is concerned we need to get the plumbing done quickly. Before the gas and water pipes are in I can't really do any more wiring as I don't want to interfere with the wiring. Once plumbing and wiring are done we are ready for plaster. Yay!
Thursday, May 20, 2010

Saturday, April 3, 2010
Bathroom
The one and only original bathroom was built in 1976. Prior to that, the house had a pump in the front yard and an outhouse in the back. When the POs bought the house, they split one of the back rooms into a bathroom and hallway. The bathroom was long, narrow and ugly, roughly 3.2x1.7m (10'6"x5'6"), featuring grey wall tiles, yellow and brown floors and bright orange paint above. The only heat source consisted of two electric quartz heaters. COmbeined with the shot window it was COLD in there.
The tub was on the right, next to the toilet, the sink across the door, on the left of the window. Left of the door: a huge 150l (not quite 40 gallon) wall mounted electric water heater.
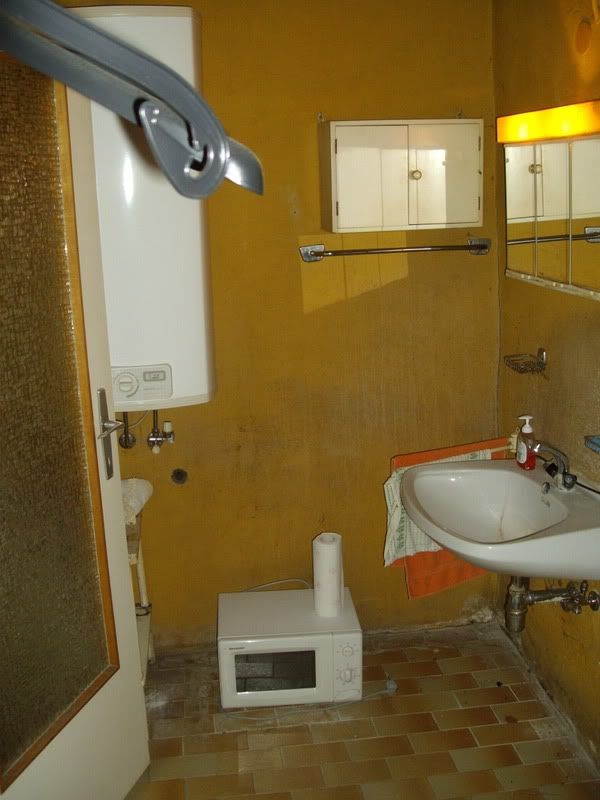
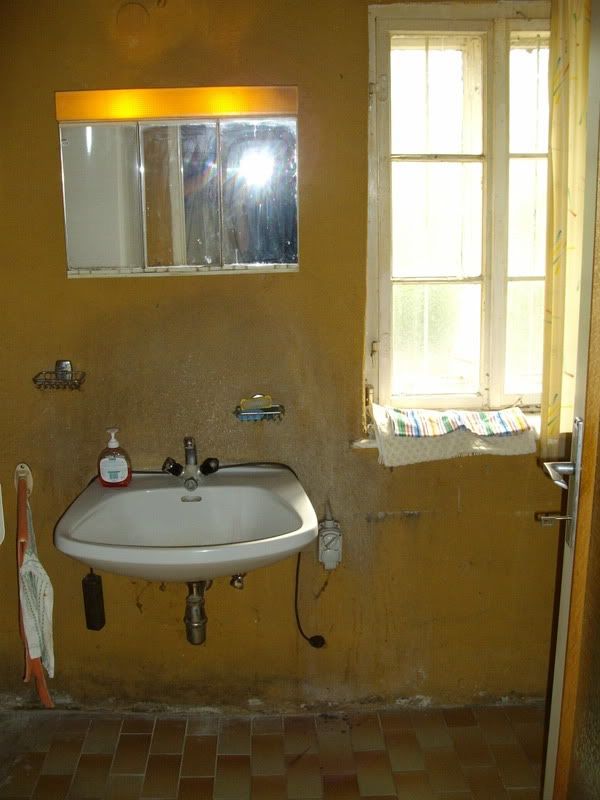
The medicine cabinet with two 25W bulbs was the only light, making the room even creepier at night. In fact the only nice feature is the old (I don't write original, since in this house it's absolutely impossible to tell what might be original, and the ceiling probably isn't as the beams are sawn rather than hewn).
We pretty soon decided to make the bathroom a bit more compact by rotating the tub 90 degrees and closing off a water closet around the current toilet location. That gives us an almost square bathroom and resolves any family quarrels (I mean who likes to be in the tub while someone is sitting on the toilet and vice versa? We're an open family raised in hippie spirit, but that's too much!). A standard tub barely fits the old bathroom, but we'd like a clawfoot or larger modern tub, both of which wouldn't (most clawfoots here are about 5cm longer than modern standard tubs). As soon as we discovered that the wall sits on top of the screed (which has a 5cm step in the hallway making a lovely tripping hazard and is seriously damp) it was clear that it had to go. We expected hollow block bricks, but alas, the wall was built of concrete block with cement mortar. As you can see the mortar was even stronger than the block. Took us two days with a sledge hammer to get rid of it.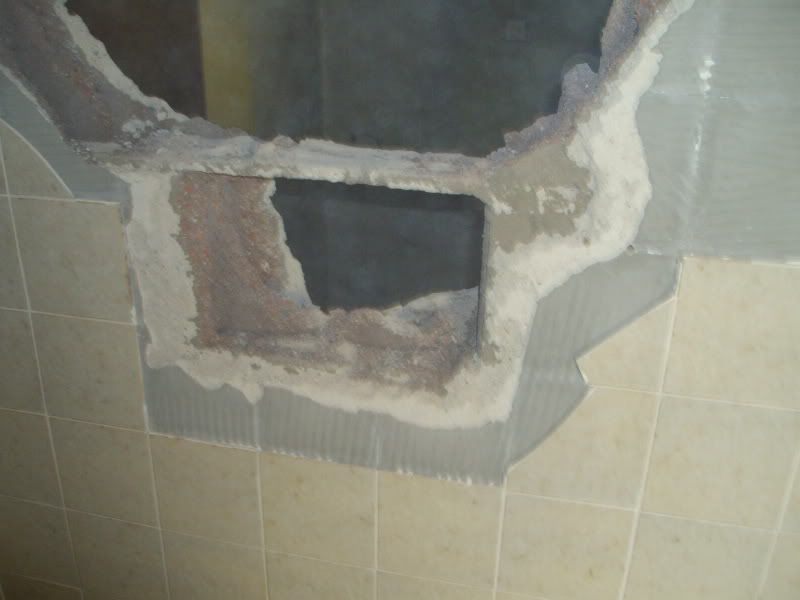 "ThereIfixedit.com" as my brother called it... as we still needed water for the construction, we left the galvanised plumbing in place, the tub feed hanging in mid air.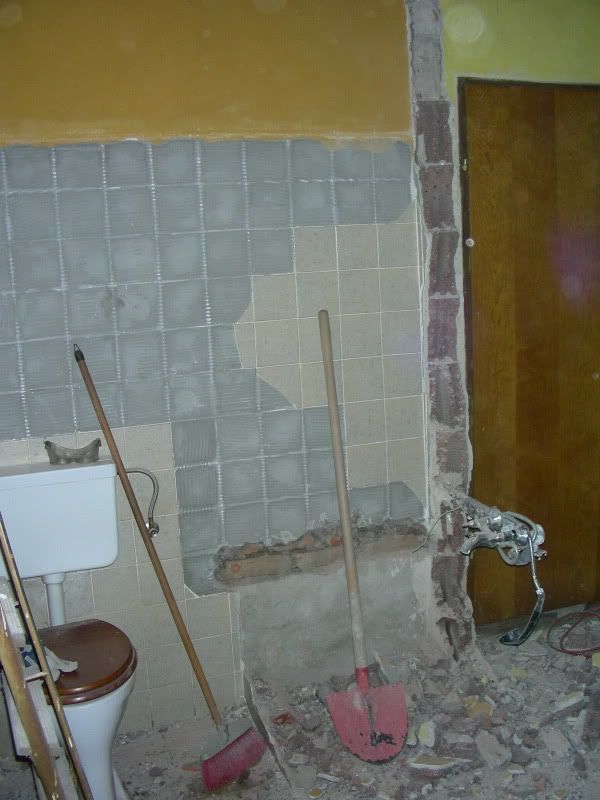
Around Christmas we started the rebuild. First we laid a brick foundation, then tar paper. We didn't get started on the actual walls though because we ran out of time. This week we could finally start laying the aerated concrete block. The first glory shot shows you the approximate layout minus the doors (the blocks just sit there to weight down the tar paper).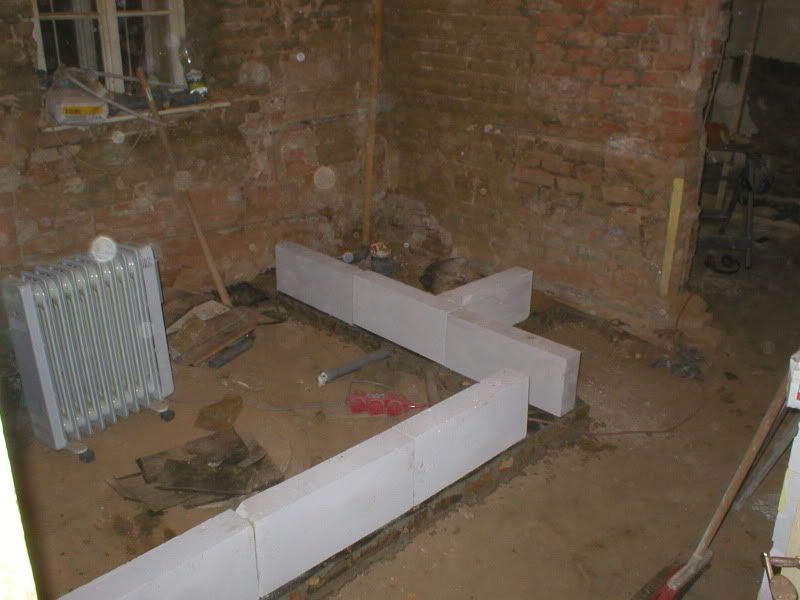 Once we started laying the block, we needed to get the door frames in place as the wall is built around them (were this a brick wall, the frames would be installed after the wall is done, but with those blocks it's easier to put up the frame first). The frames we built after Christmas are solid pine 2x5 to match our salvaged panel doors.
 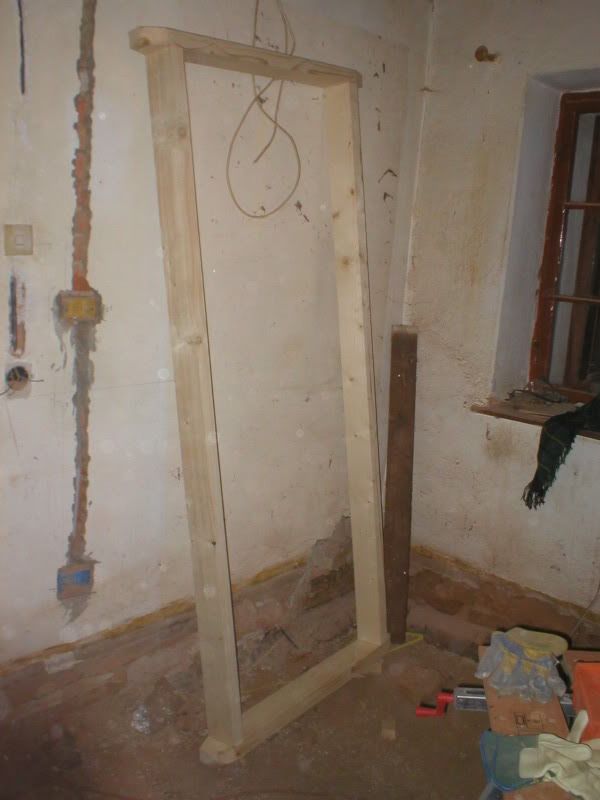 Of course they won't stand on their own, so we needed to get creative again.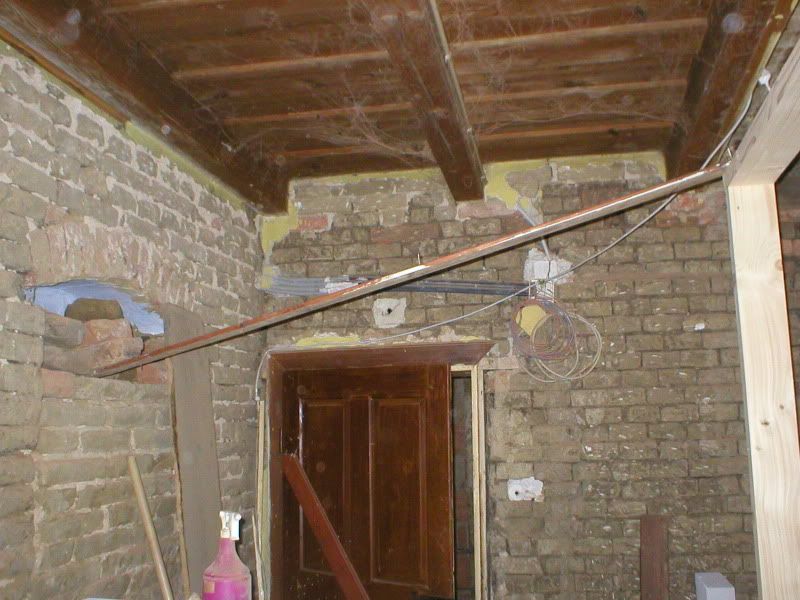
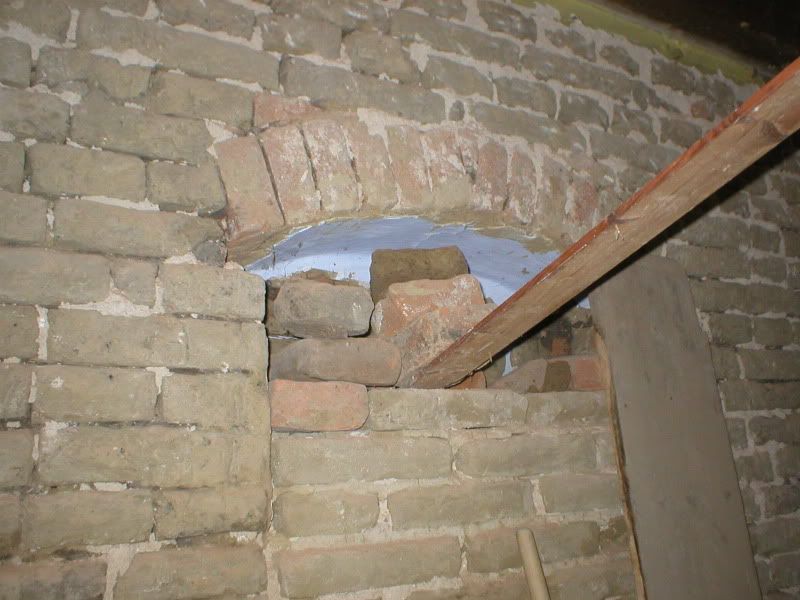 As soon as this was done, the walls realy started going up. Since the block is lightweight and very smooth things should go pretty fast (one block is 60x25x10cm, 24x10x4" and they're mortared using thinset applied with a notched trowel) but since we actually have to build three walls with two door frames the cutting slowed down things considerably. In spite of the name "concrete" the blocks can be cut using a regular wood saw (it goes dull though, so we used an old cheap one that came with the house). With two work days we got about half done as most of the time I was working alone or with very little help. With 1 guy cutting full time and 2 mortaring things would have gone considerably faster. In the bathroom, looking out into the new hallway: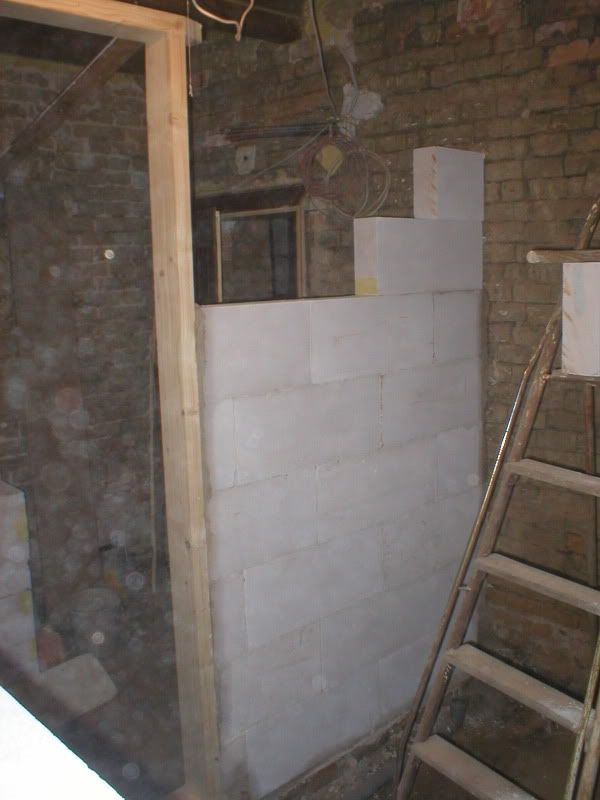
A second plumber gave us a quote for the central heat and plumbing which came in at only half of the first quote. He wants to sell us a Baxi boiler though, and online reviews were seriously bad. Besides, Vaillant gives you a 5 year warranty against scaling if you live in a hard water area, and that's exactly what we need! However, even if a Vaillant boiler increases the bill by about €1000 we'Re still much cheaper than with the first quote. Once the hot and cold water lines and drains are done it's time for subfloors and plaster!
As usual, there are still a few things left before that though, at least the plaster part. The wiring isn't anywhere near done yet and more than half of the door frames are still missing (at least 3 need to be built from scratch and installed and one has to be modified and installed). Once this is done, plaster can go up. Once the plastering is done, the heating pipes and radiators can be installed, followed by the floors. That leaves the 10 dozen other jobs like painting, tile, etc.
The tub was on the right, next to the toilet, the sink across the door, on the left of the window. Left of the door: a huge 150l (not quite 40 gallon) wall mounted electric water heater.
The medicine cabinet with two 25W bulbs was the only light, making the room even creepier at night. In fact the only nice feature is the old (I don't write original, since in this house it's absolutely impossible to tell what might be original, and the ceiling probably isn't as the beams are sawn rather than hewn).
We pretty soon decided to make the bathroom a bit more compact by rotating the tub 90 degrees and closing off a water closet around the current toilet location. That gives us an almost square bathroom and resolves any family quarrels (I mean who likes to be in the tub while someone is sitting on the toilet and vice versa? We're an open family raised in hippie spirit, but that's too much!). A standard tub barely fits the old bathroom, but we'd like a clawfoot or larger modern tub, both of which wouldn't (most clawfoots here are about 5cm longer than modern standard tubs). As soon as we discovered that the wall sits on top of the screed (which has a 5cm step in the hallway making a lovely tripping hazard and is seriously damp) it was clear that it had to go. We expected hollow block bricks, but alas, the wall was built of concrete block with cement mortar. As you can see the mortar was even stronger than the block. Took us two days with a sledge hammer to get rid of it.
"ThereIfixedit.com" as my brother called it... as we still needed water for the construction, we left the galvanised plumbing in place, the tub feed hanging in mid air. Around Christmas we started the rebuild. First we laid a brick foundation, then tar paper. We didn't get started on the actual walls though because we ran out of time. This week we could finally start laying the aerated concrete block. The first glory shot shows you the approximate layout minus the doors (the blocks just sit there to weight down the tar paper).
Once we started laying the block, we needed to get the door frames in place as the wall is built around them (were this a brick wall, the frames would be installed after the wall is done, but with those blocks it's easier to put up the frame first). The frames we built after Christmas are solid pine 2x5 to match our salvaged panel doors. Of course they won't stand on their own, so we needed to get creative again. As soon as this was done, the walls realy started going up. Since the block is lightweight and very smooth things should go pretty fast (one block is 60x25x10cm, 24x10x4" and they're mortared using thinset applied with a notched trowel) but since we actually have to build three walls with two door frames the cutting slowed down things considerably. In spite of the name "concrete" the blocks can be cut using a regular wood saw (it goes dull though, so we used an old cheap one that came with the house). With two work days we got about half done as most of the time I was working alone or with very little help. With 1 guy cutting full time and 2 mortaring things would have gone considerably faster. In the bathroom, looking out into the new hallway: A second plumber gave us a quote for the central heat and plumbing which came in at only half of the first quote. He wants to sell us a Baxi boiler though, and online reviews were seriously bad. Besides, Vaillant gives you a 5 year warranty against scaling if you live in a hard water area, and that's exactly what we need! However, even if a Vaillant boiler increases the bill by about €1000 we'Re still much cheaper than with the first quote. Once the hot and cold water lines and drains are done it's time for subfloors and plaster!
As usual, there are still a few things left before that though, at least the plaster part. The wiring isn't anywhere near done yet and more than half of the door frames are still missing (at least 3 need to be built from scratch and installed and one has to be modified and installed). Once this is done, plaster can go up. Once the plastering is done, the heating pipes and radiators can be installed, followed by the floors. That leaves the 10 dozen other jobs like painting, tile, etc.
Thursday, March 4, 2010
Re-installing a sink and fixing a boiler
The place where we live in Vienna is an old house too, and while we did an extensive renovation in 2004, a few things have remained untouched and need attention every once in a while. That is, the bathroom and the kitchen. The bathroom is still in its full 1978 glory and has only been repainted ever since (the last time in 1998 I think). The tiles were cheap leftovers back when they were bought, only matching in color but not pattern, and we had many pipe leaks in the meantime since they were installed. In fact that means there are now 5 different tile patterns used there, one of which is totally off (light beige instead of brown/green). The kitchen had new-ish white Ikea cabinets fitted in 1987 (they were about 10 years old back then I think, having come from my mom's old apartment, sitting in storage for 2 years after I was born) but other than that and paint... nothing happened. Both rooms are in dire need of a full renovation. The bathroom is likely going to get it after the new whole-house heating system is installed (currently every apartment has it's own gas boiler).
Our combi boiler (a wall-mount unit that is both a central heating boiler and tankless water heater) is as old as the whole bathroom, late 1977 vintage. The manufacturer suggested a likely life span of 15 years for that model. For the last three years we have been losing water from the system and had to refill every couple of weeks sometimes. Our regular plumbing/heating guy who checks the unit every year told us to live with it or get a new boiler. There is one company that bought all spare parts when Junkers dropped support for those dinosaurs. We called them and he confirmed my suspicions - broken expansion vessel - and claimed the boiler wasn't worth the repair.
We are talking about a closed, pump fed pressurised system here. When heated, water expands (like pretty much every other substance) and the presure in the system increases. Since water cannot be compressed (like air in a tire) a rise in water pressure eventually leads to exploding pipes, which is why a pressure relief valve is fitted to every system as an emergency relief feature. In normal operation, the pressure needs to be relieved differently or you ned to refill periodically. This is what the diaphragm expansion vessel is made for. A steel calinder with a rubber membrane, one part filled with water, the other with nitrogen or air. The gas compresses as the water gains pressure and balances the whole system. If the membrane tears from age, the vessel is shot.
A freind suggested simply installing an external expansion vessel. After some research I decided he was right. €40 in materials later and a day of help from my uncle the plumber, the system was up and running again. While he refileld the system he also found a loose connection that dripped. After he retightened that slip nut, the system held pressure perfectly. Now why were two service technicians incapable of finding and stopping that leak?!?
The red vessel next to our boiler (above the bath tub) looks borderline ugly, but it works again! I certainly value heat over looks and even my mom, the main style watchdog in the family, approved!
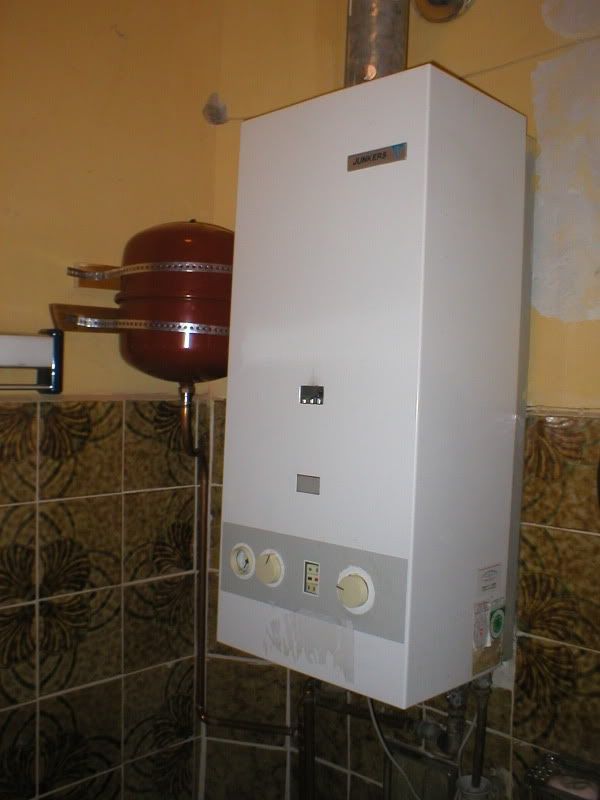
However, our sink that had already been a little loose for a while must have taken a beating during the process and now threatened to fall off the wall. At the time of one of the many plumbing leak repairs (we some lead cold water pipes until 1998) the plumber had to move the sink (which is bolted to the brick wall) up by 10cm to avoid drilling into his new pipe. He drilled several holes and finally claimed "now it should work".
When I took down the sink (close both shutoff valves, disconnect braided hoses from valves to sink, get someone to hold the sink while you're crouching underneath and undo the nuts, pull the sink off the walll including the trap which is only pushed into the drain pipe with a rubber o-ring, thanks heaven not soldered into a lead drain any more) it became soon clear why it hadn't really worked.
A) When my dad redid that bathroom he wanted it done fast and cheap. Thus the plumber friend of his, named Gustl (famous for his dodgy plumbing by now, like solder joints that held merely by chance and fell apart as soon as the pipe was touched or reversing the hot and cold at the boiler, with the result that the radiators took ages to get warm) tiled over the old white tiles. Where they were removed for plumbing work the void was simply filled up with plaster to the surface of the old tiles, eventually resulting in an almost 5cm (2") thick layer of plaster.
The bolts that hold the sink were 150mm (ca. 6") long, half machine thread and half wood screw. That means 5 out of the 7.5 cm supposed to go into the wall were in plaster rather than brick. Very very soft plaster, modern lime-cement mix with a very high perlite content, which is even softer than the cheapest old plaster. You can crumble it away with your fingers.
Furthermore, drilling 14mm diameter holes into the brick and inserting large screws caused both bricks to crack, weakening the hold of the bolts even more. Normally this is prevented by the bond of the bricks and the mortar joints that evenly distribute the pressure of the screw across the wall but in this case there was a deep hole below from some old plumbing, putting the whole stress on one brick.
 This picture shows you the whole sorry mess with most of the plaster removed but the old bolts still in place. Lots of unused old plumbing as well as some new. The white and red stuff is plastic and foam pipe insulation, serving two purposes. First of all it makes sense to keep your hot water lines from heating your walls, then around cold water lines moisture can condensate in summer and cause trouble, and lastly copper needs to be protected from caustic mortar and plaster. The red section is from when we moved the hot water supply to the kitchen (originally exposed on the walls below the ceiling) under the hallway floor. That was in 2004 and we never replaced the plaster and tile to the right of the sink (well, that's behind the washing machine, so who cares...). The two yellow objects at the bottom are the taped shutoff valves, the thing with an old sock is the drain (it stank badly without the trap).
My first attempt was to reseat the bolts by using new plastic wall plugs and repairing the cracked brick, supporting it with plenty of mortar in the hole below. The I squeezed plenty of spackle into the holes, inserted the plugs, plastered the whole section (not bothering with tiles since this is again a temporary job and hidden below the sink/behind the washing machine) waited overnight and re-installed the bolts. Since most of the bolts ended up embedded in plaster I left holes around them and only closed up everything when the bolts were fully screwed into the wall.
First coat of plaster: I used lime plaster because we had a bucket of lime putty and a bag of sand left over from the WC project. When I ran out of lime plaster on the right, I used up a leftover bag of perlite plaster. Finish coat with one hole already filled in:
Once this had cured enough I tried to install the sink, only to find that the bolts were too deep into the wall or too short, depending on perspective. Clearly, a new plan was necessary. First I asked around for 200mm long bolts. "Yeah, they make them, but we don't have any in stock!" was the reply of one of our local plumbers. OTOH he gave me two shiny new 150mm ones for free. Off to the big box store. "Wall bolts M14? We have 80mm and 100mm!" Yeouch! 150mm are too short and they try to sell me 80mm ones? Off to the painting supplies, grab a box of quick-setting concrete (useable for 3 minutes once mixed with water according to the instructions). Pull out old plugs using pliers and an old screwdriver, clean out holes and insert new plugs, flush with the wall surface. Fill holes with concrete rather than plaster. Wait an hour just to make sure. Insert bolts and hang sink. Done!
Just need to caulk where it meets the wall, with the old tiles being laid so bumpy there is a sizeable gap there.
After that experience I don't want to touch any plumbing again soon, at least not without wearing wellingtons (rubber boots)! The serious advantage of electricity (my learned trade) over water and gas is that it absolutely won't come shooting out of the wire and puddle on the floor!
Our combi boiler (a wall-mount unit that is both a central heating boiler and tankless water heater) is as old as the whole bathroom, late 1977 vintage. The manufacturer suggested a likely life span of 15 years for that model. For the last three years we have been losing water from the system and had to refill every couple of weeks sometimes. Our regular plumbing/heating guy who checks the unit every year told us to live with it or get a new boiler. There is one company that bought all spare parts when Junkers dropped support for those dinosaurs. We called them and he confirmed my suspicions - broken expansion vessel - and claimed the boiler wasn't worth the repair.
We are talking about a closed, pump fed pressurised system here. When heated, water expands (like pretty much every other substance) and the presure in the system increases. Since water cannot be compressed (like air in a tire) a rise in water pressure eventually leads to exploding pipes, which is why a pressure relief valve is fitted to every system as an emergency relief feature. In normal operation, the pressure needs to be relieved differently or you ned to refill periodically. This is what the diaphragm expansion vessel is made for. A steel calinder with a rubber membrane, one part filled with water, the other with nitrogen or air. The gas compresses as the water gains pressure and balances the whole system. If the membrane tears from age, the vessel is shot.
A freind suggested simply installing an external expansion vessel. After some research I decided he was right. €40 in materials later and a day of help from my uncle the plumber, the system was up and running again. While he refileld the system he also found a loose connection that dripped. After he retightened that slip nut, the system held pressure perfectly. Now why were two service technicians incapable of finding and stopping that leak?!?
The red vessel next to our boiler (above the bath tub) looks borderline ugly, but it works again! I certainly value heat over looks and even my mom, the main style watchdog in the family, approved!
However, our sink that had already been a little loose for a while must have taken a beating during the process and now threatened to fall off the wall. At the time of one of the many plumbing leak repairs (we some lead cold water pipes until 1998) the plumber had to move the sink (which is bolted to the brick wall) up by 10cm to avoid drilling into his new pipe. He drilled several holes and finally claimed "now it should work".
When I took down the sink (close both shutoff valves, disconnect braided hoses from valves to sink, get someone to hold the sink while you're crouching underneath and undo the nuts, pull the sink off the walll including the trap which is only pushed into the drain pipe with a rubber o-ring, thanks heaven not soldered into a lead drain any more) it became soon clear why it hadn't really worked.
A) When my dad redid that bathroom he wanted it done fast and cheap. Thus the plumber friend of his, named Gustl (famous for his dodgy plumbing by now, like solder joints that held merely by chance and fell apart as soon as the pipe was touched or reversing the hot and cold at the boiler, with the result that the radiators took ages to get warm) tiled over the old white tiles. Where they were removed for plumbing work the void was simply filled up with plaster to the surface of the old tiles, eventually resulting in an almost 5cm (2") thick layer of plaster.
The bolts that hold the sink were 150mm (ca. 6") long, half machine thread and half wood screw. That means 5 out of the 7.5 cm supposed to go into the wall were in plaster rather than brick. Very very soft plaster, modern lime-cement mix with a very high perlite content, which is even softer than the cheapest old plaster. You can crumble it away with your fingers.
Furthermore, drilling 14mm diameter holes into the brick and inserting large screws caused both bricks to crack, weakening the hold of the bolts even more. Normally this is prevented by the bond of the bricks and the mortar joints that evenly distribute the pressure of the screw across the wall but in this case there was a deep hole below from some old plumbing, putting the whole stress on one brick.
 This picture shows you the whole sorry mess with most of the plaster removed but the old bolts still in place. Lots of unused old plumbing as well as some new. The white and red stuff is plastic and foam pipe insulation, serving two purposes. First of all it makes sense to keep your hot water lines from heating your walls, then around cold water lines moisture can condensate in summer and cause trouble, and lastly copper needs to be protected from caustic mortar and plaster. The red section is from when we moved the hot water supply to the kitchen (originally exposed on the walls below the ceiling) under the hallway floor. That was in 2004 and we never replaced the plaster and tile to the right of the sink (well, that's behind the washing machine, so who cares...). The two yellow objects at the bottom are the taped shutoff valves, the thing with an old sock is the drain (it stank badly without the trap).
My first attempt was to reseat the bolts by using new plastic wall plugs and repairing the cracked brick, supporting it with plenty of mortar in the hole below. The I squeezed plenty of spackle into the holes, inserted the plugs, plastered the whole section (not bothering with tiles since this is again a temporary job and hidden below the sink/behind the washing machine) waited overnight and re-installed the bolts. Since most of the bolts ended up embedded in plaster I left holes around them and only closed up everything when the bolts were fully screwed into the wall.
First coat of plaster:
 I used lime plaster because we had a bucket of lime putty and a bag of sand left over from the WC project. When I ran out of lime plaster on the right, I used up a leftover bag of perlite plaster. Finish coat with one hole already filled in:
Once this had cured enough I tried to install the sink, only to find that the bolts were too deep into the wall or too short, depending on perspective. Clearly, a new plan was necessary. First I asked around for 200mm long bolts. "Yeah, they make them, but we don't have any in stock!" was the reply of one of our local plumbers. OTOH he gave me two shiny new 150mm ones for free. Off to the big box store. "Wall bolts M14? We have 80mm and 100mm!" Yeouch! 150mm are too short and they try to sell me 80mm ones? Off to the painting supplies, grab a box of quick-setting concrete (useable for 3 minutes once mixed with water according to the instructions). Pull out old plugs using pliers and an old screwdriver, clean out holes and insert new plugs, flush with the wall surface. Fill holes with concrete rather than plaster. Wait an hour just to make sure. Insert bolts and hang sink. Done!
Just need to caulk where it meets the wall, with the old tiles being laid so bumpy there is a sizeable gap there.
After that experience I don't want to touch any plumbing again soon, at least not without wearing wellingtons (rubber boots)! The serious advantage of electricity (my learned trade) over water and gas is that it absolutely won't come shooting out of the wire and puddle on the floor!
Sunday, February 14, 2010
Garden shed
Long ago, I mentioned fixing up the garden shed to make it liveable during the summer. Electricity was a must, so we wired the shack. It looks a bit industrial, but since there is no heat out there it needs to be outdoor rated (fear of condensating air). 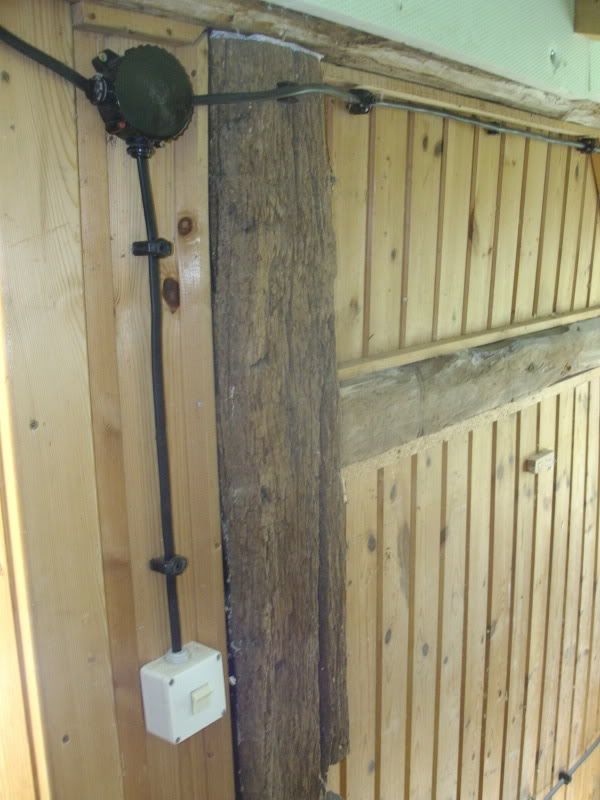
Digging for the feeder from the main house was pretty bad, the ground is hard and incredibly full of roots as well as two sewer pipes that forced us to dig deeper than we had intended to. We did get it done in one afternoon though.
Once we had juice and light out there we could start working on fixing the building up. As I mentioned before, when we bought the house there was a big hole in the roof (as I type this, the hole kinda reminds me of the story I read on some house blog or forum of previous owners who were crackheads and managed to get the attention of the police by launching their kitchen stove through the roof, even though this hole was definitely caused by wet rot and not flying objects) which we had fixed ASAP, but the floor underneath had suffered too.
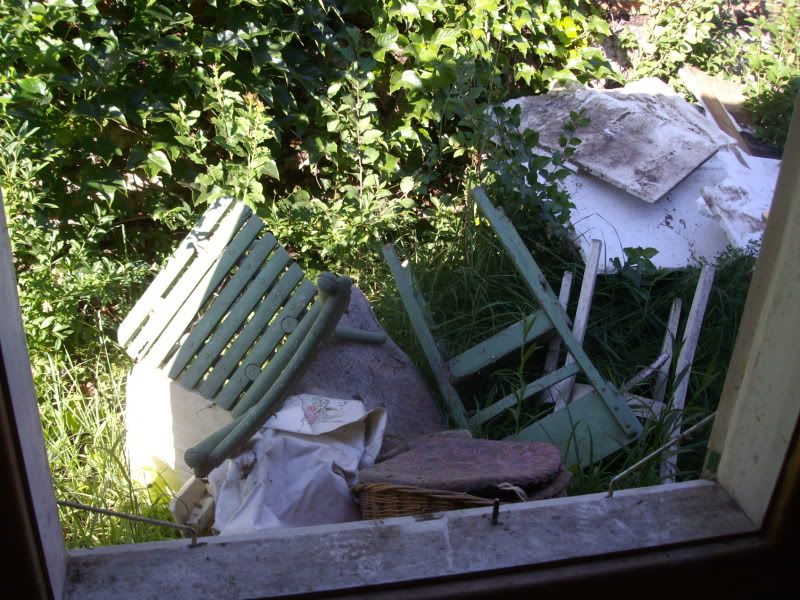
There were several seriously rigged bookshelves, one of which is barely visible at the right hand edge of this picture.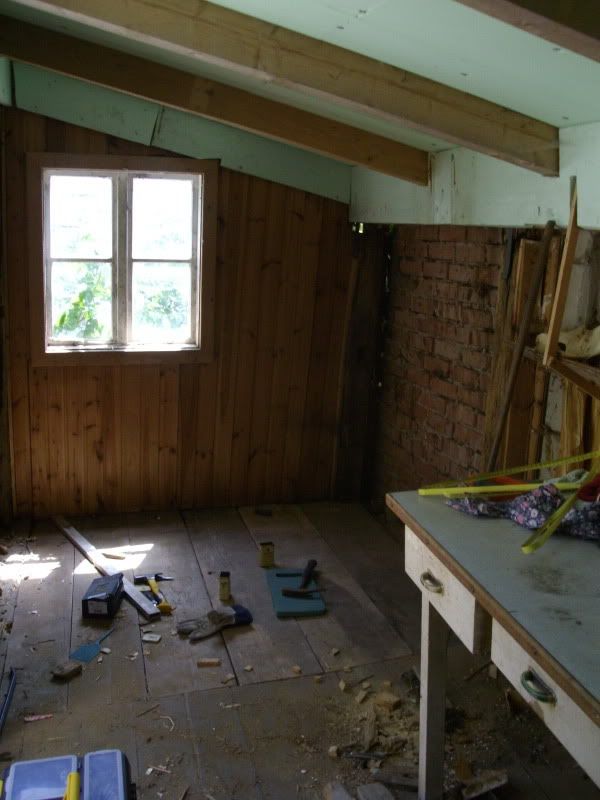 When we first got in there I supported it with a stack of paperbacks, but it was clear it had to go. So we piled the books into boxes, ripped down the shelves (no tools required, 5 minutes of work) and cleared out the whole shack, again piling up lots of trash.
  The shack odd shaped due to the long and narrow garden, 2m long and 4m wide, built along the fence. The fence is actually a tall brick wall which also served as one exterior wall of the shack. This contraption had been built in ca. 1990 using the leftovers of a garden shed, 2/3 of which were just open and 1/3 with a wooden plank rear wall (between the planks and the brick wall there was a 10cm gap). The exposed section of the brick wall had been covered with rigid foam insulation and wallpapered, with paper looking like knotty pine paneling. The remaining third had the sheets of insulation just stuffed in between the brick and plank wall and the plank wall covered with tar paper and pine paneling. This was below the roof leak so we decided to remove the whole shebang. A great idea! Everything was rotted and there were thousands of ants living in the planks and the foam sheets! The planks actually had the soft part of the grain eaten out!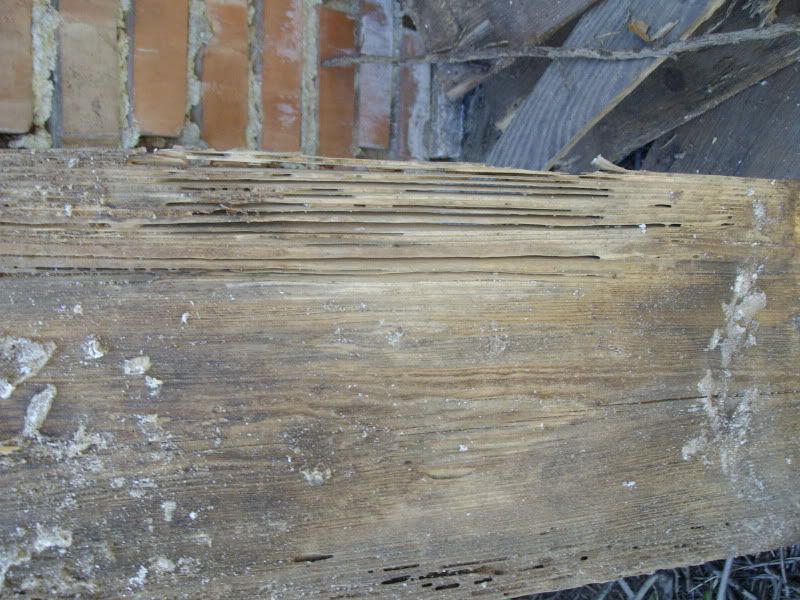
The more we worked on the building, the more clear it became how poor the construction was. There are no foundations at all, the main timbers are rotting away where they met the ground. The floor, some of which is holding the walls up suffered severe and active woodworm damage and will need complete replacement at some point. Furthermore, thre are pretty big holes in all walls (old cat door, poor framing,...). Permanently fixing this is going to be like rebuilding! In the end, my uncle never came to help, so we didn't really need to fix this up too much, but we did replace the worst section of the floor with leftover old boards, so it is in theory useable. Anything beyond is a project for the distant future when the main house is done.
Digging for the feeder from the main house was pretty bad, the ground is hard and incredibly full of roots as well as two sewer pipes that forced us to dig deeper than we had intended to. We did get it done in one afternoon though.
Once we had juice and light out there we could start working on fixing the building up. As I mentioned before, when we bought the house there was a big hole in the roof (as I type this, the hole kinda reminds me of the story I read on some house blog or forum of previous owners who were crackheads and managed to get the attention of the police by launching their kitchen stove through the roof, even though this hole was definitely caused by wet rot and not flying objects) which we had fixed ASAP, but the floor underneath had suffered too.
There were several seriously rigged bookshelves, one of which is barely visible at the right hand edge of this picture.
When we first got in there I supported it with a stack of paperbacks, but it was clear it had to go. So we piled the books into boxes, ripped down the shelves (no tools required, 5 minutes of work) and cleared out the whole shack, again piling up lots of trash. The shack odd shaped due to the long and narrow garden, 2m long and 4m wide, built along the fence. The fence is actually a tall brick wall which also served as one exterior wall of the shack. This contraption had been built in ca. 1990 using the leftovers of a garden shed, 2/3 of which were just open and 1/3 with a wooden plank rear wall (between the planks and the brick wall there was a 10cm gap). The exposed section of the brick wall had been covered with rigid foam insulation and wallpapered, with paper looking like knotty pine paneling. The remaining third had the sheets of insulation just stuffed in between the brick and plank wall and the plank wall covered with tar paper and pine paneling. This was below the roof leak so we decided to remove the whole shebang. A great idea! Everything was rotted and there were thousands of ants living in the planks and the foam sheets! The planks actually had the soft part of the grain eaten out! The more we worked on the building, the more clear it became how poor the construction was. There are no foundations at all, the main timbers are rotting away where they met the ground. The floor, some of which is holding the walls up suffered severe and active woodworm damage and will need complete replacement at some point. Furthermore, thre are pretty big holes in all walls (old cat door, poor framing,...). Permanently fixing this is going to be like rebuilding! In the end, my uncle never came to help, so we didn't really need to fix this up too much, but we did replace the worst section of the floor with leftover old boards, so it is in theory useable. Anything beyond is a project for the distant future when the main house is done.
Damp course
After a lot of discussions and almost hiring a different company, we had a small Vienna based company install a horizontal damp course in all our walls. The process is simple - they have a regular electric chainsaw, fitted with a diamond-coated chain to make it possible to cut mortar (and to some extent brick) which they take to the wall. They cut small sections, up to 1m in width, depending on the shape of the mortar joints. Ours was crumbling, so they cut much smaller sections. Then they push in a sandwich damp course consisting of two layers extra-strong tar paper and a layer of plastic in the middle. To keep the house from settling, they first insert plastic wedges and then fill the cut with mortar. Again, the filling method is very plain. They took an old plaster pump (yeah, such beasts exist - fill the funnel with plaster, point the nozzle and shoot plaster at the wall. Just need to trowel it smooth) and created their own nozzle for narrow cuts by hammering a piece of copper plumbing pipe flat.
They estimated a week, but in the end it took them three weeks to complete the work. Where bricks simply fell out or where they couldn't find straight joints to work with they had to do real masonry repair, which took even more time. However, the main work is charged by wall cross section and not based on time, so the price didn't change. Now we're mainly waiting for the walls to dry out - we were told to wait around 6 months before plaster, which means late spring.
Here you can see a progress shot:
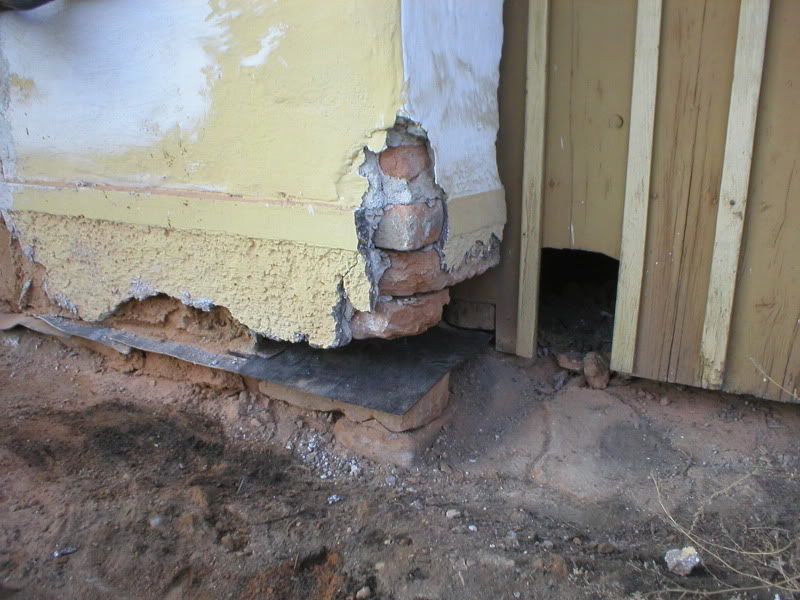
Mostly they cut underneath the floor, that means we don't have to worry about damp-proofing the wall underneath the damp course. The floor membrane will simply extend up to the damp course. The floors are going to be a very low-cement concrete mix, extremely thin (3cm) just to give a clean surface to work with. It is going to be covered with overlapped tar paper. To prevent creating a bath tub which keeps water forever in case of a pipe leak or other event, we intend to build a small gravel-filled sump in one corner of each room covered with felt (to keep the sump from getting filled with silt). The original plans didn't include that, the damp course company guy said overlapping and not connecting the tar paper would be enough, but I'm not convinced.
On top of this we're going to pour the screed in the bathroom and WC and do a traditional wood floor in all other rooms. That means a dirt or slag infill with sleepers and a floating wood floor. Not having it rest directly on the concrete has two major advantages: it makes the floor slightly softer to walk on and it allows us to be less anal about the height of the concrete.
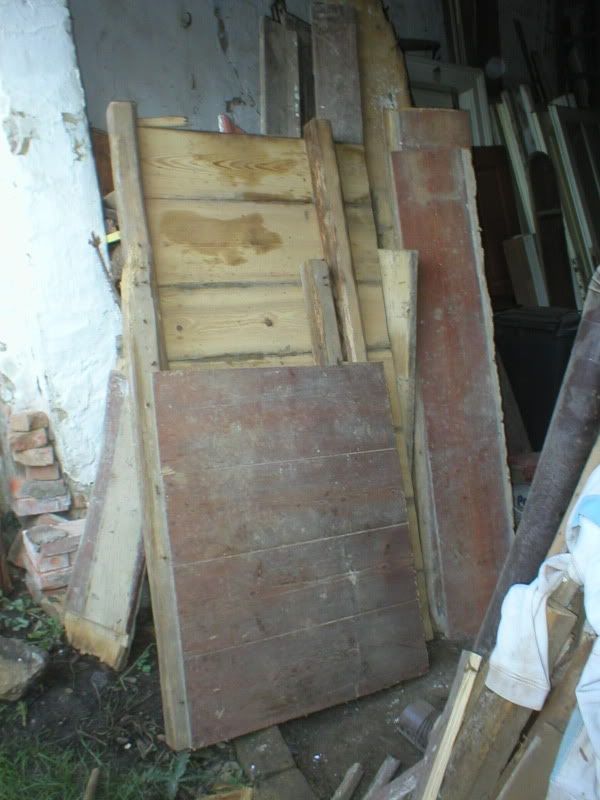
The guys were pretty good at their job, and they only caused me one minor fit of screaming (well, actually not even that, but it could have become one). They just cut two big honking pieces out of the non-rotted section of our plank floor!
The darker piece is the top, the light wood is the bottom of the second piece, including the sleepers the floor used to rest on. I mean we needed to pull this up anyway, but taking a chainsaw to the floor without asking?!?
So far we didn't get any noticeable cracks, but I think they won't be so bad anyway with all the plaster gutted.
PS: I started playing with the HTML code for the embedded pictures a little, we'll see if it worked. I don't have the slightest knowledge of HTML, but I tried to reduce the size of the embedded pics to thumbnails you can click on.
They estimated a week, but in the end it took them three weeks to complete the work. Where bricks simply fell out or where they couldn't find straight joints to work with they had to do real masonry repair, which took even more time. However, the main work is charged by wall cross section and not based on time, so the price didn't change. Now we're mainly waiting for the walls to dry out - we were told to wait around 6 months before plaster, which means late spring.
Here you can see a progress shot:
Mostly they cut underneath the floor, that means we don't have to worry about damp-proofing the wall underneath the damp course. The floor membrane will simply extend up to the damp course. The floors are going to be a very low-cement concrete mix, extremely thin (3cm) just to give a clean surface to work with. It is going to be covered with overlapped tar paper. To prevent creating a bath tub which keeps water forever in case of a pipe leak or other event, we intend to build a small gravel-filled sump in one corner of each room covered with felt (to keep the sump from getting filled with silt). The original plans didn't include that, the damp course company guy said overlapping and not connecting the tar paper would be enough, but I'm not convinced.
On top of this we're going to pour the screed in the bathroom and WC and do a traditional wood floor in all other rooms. That means a dirt or slag infill with sleepers and a floating wood floor. Not having it rest directly on the concrete has two major advantages: it makes the floor slightly softer to walk on and it allows us to be less anal about the height of the concrete.
The guys were pretty good at their job, and they only caused me one minor fit of screaming (well, actually not even that, but it could have become one). They just cut two big honking pieces out of the non-rotted section of our plank floor!
The darker piece is the top, the light wood is the bottom of the second piece, including the sleepers the floor used to rest on. I mean we needed to pull this up anyway, but taking a chainsaw to the floor without asking?!?
So far we didn't get any noticeable cracks, but I think they won't be so bad anyway with all the plaster gutted.
PS: I started playing with the HTML code for the embedded pictures a little, we'll see if it worked. I don't have the slightest knowledge of HTML, but I tried to reduce the size of the embedded pics to thumbnails you can click on.
Friday, February 12, 2010
Still alive
Yes, I am still alive... even though I didn't post for ages.
First a reference to the last post. Actually we don't have much more than 10m2 (about 100 sq. ft.) of flooring, but with what we alredy had and what we might be able to get it'll hopefully enough - or maybe we can do the whole back hall with it. Once we get to it.
Plumber #2 came for an estimate in mid June. In October he sent an e-mail with a few questions which I answered promptly. So far we didn't get anything.
Around the same time, plumber #3 came in for an estimate. In mid-December he called and asked if we needed the work to get done before Christmas which we declined. Nothing from him so far either. We mostly liked that guy, so we still might take his services.
The two biggest changes so far: all floors are out (with the exception of half the big room) and we had the walls cut through (which more or less required removing the floors).
Here is the full fun story:
After endless discussions we got an estimate from the only company in the whole half of the country that hammers corrugated stainless steel sheets into the wall. Most people claimed that this method is perfect for adobe houses and all others will crack the walls. When we had already told them to do the work (only on the phone though, so no problem canceling that) several people told us to call another guy, including my architect uncle, who had him do his own house and is happy with the results some 10 years later. So we did and made an appointment. The guy was very nice (and nowhere near as pushy and sleek as the stainless steel guy) and really seemed to know what he was talking about. He mentioned the obvious fact, that corrugated steel sheets won't really line up and form a proper seal in the corners... and his offer was better than the first one.
All rooms renovated by the previous owners (i.e. back hall, bathroom and small room) as well as the front hall had solid poured concrete floors, tiled in the bathroom, covered with loose roll vinyl in the back hall and small room and bare in the front hall. Apparently the front hall concrete was intended to be a finished floor (*gag*) and pretty high up, no way of putting a finished floor on top, except vinyl or carpet (in fact it was even considerably higher than the floor in both the kitchen and big room). The back hall had a 2" step in the middle of the floor to accomodate an inwards opening door in an otherwise higher floor - talk about a tripping hazard! The back room floor was even worse - almost 6" higher than the higher part of the back hall floor. So all those floors had to go.
The wall between bathroom and back hall was built onto said concrete floor and had to go, with the additional advantage of giving us the chance to enlarge the bathroom by about 6", giving us the chance of rotating the tub 90 degrees and build a separate water closet around the current toilet.
Out came the sledge hammer. The wall put up a serious fight. It had been built in 1976 to split a bedroom into back hall and bathroom and consisted of some odd breeze block, hollow concrete blocks mixed with small brick splinters for volume. Taking it down took us the better part of two days, lots of cursing and a bruised and scratched elbow on my side (wanted to take a big blow with the hammer, moved my arm backwards and hit the wall), nothing serious though.
We ended up with some galvanized plumbing hanging in mid-air *g*
Then we proceeded to gut the plaster as long as we had the floors, they did make cleanup a lot easier. In the small room we gave up - the better part of 3 walls is cement plaster (aka concrete) reinforced with chicken wire. Purists are going to scream here, but let me calm you down! This house is 130 years old (parts perhaps older) and has been altered and renovated so many times it's impossible to tell which parts are original and which aren't. Since creeping damp has always been an issue, plaster was repaired and replaced continuously throughout the house's history and is a mishmash of at least 4 different types.
- mud plaster. Only remains in modest patches in bad shape with the exception of the front hall, where we kept it on 3 walls. The way it was originally done.
- bad lime plaster, crumbling away, perhaps 1930s.
- very hard lime plaster, which unfortunately didn't adhere to the adobe brick and came tumbling down in huge sheets.
- cement plaster, which needs to go since the walls are badly damaged behind and need to dry out.
That means we gutted all plaster with the exception of the two long walls of the front hall (and the tiny one above the back door) and the small room, where we just didn't get off our lazy butts so far to remove the concrete completely.
Then we started to attack the concrete. The most common way to build a floor here (in modern construction) is to pour some kind of concrete, either a slab or a load-bearing ceiling, with insulation, perhaps radiant underfloor heating and another layer of conrete, the screed on top. The screed is usually 5-7.5cm (2-3") thick and never reinforced. The finish floors are laid on top of the screed - tile, carpet or vinyl usually glued, engineered hardwood or laminate installed floating. In older houses with strip foundations, the screed is usually poured directly on the dirt between the load-bearing walls during extensive renovations and that's what we had.
In order to be able to get rid of the debris in wheelbarrows we started with the small room. The screed was unusually thick (roughly 10-15cm/4-6") and hard. Underneath we found plastic, mineral wool insulation (stupid, the soft battens can't take the weight of the concrete) and what we thought dirt. Towards the window, the screed got thicker and thicker, but finally we had it out. Then we wrapped the insulation into the plastic (did you ever work wearing rubber gloves in 30+C weather? The gloves just fill up with sweat!) and hauled it out into the yard. At that time we realized our mistake. The stuff underneath wasn't dirt but tar paper. And underneath the tar paper we found... another screed! This one was worse - while some spots were barely more than 1cm thick and crumbled away, others went up to 20cm (8")! At that point we imitated the PO's handyman: "Hey, we got a hole! Gimme concrete!"
Then we had a gaping hole underneath the door.
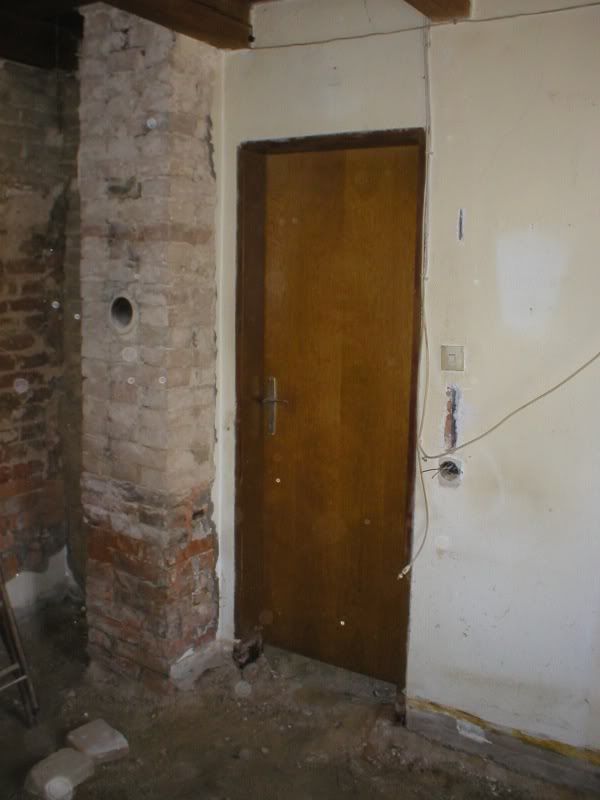
(This was the last g(l)ory shot before we trashed that 1976 hollow core door with aluminum hardware and rusted steel frame).
Removing the water heater in the bathroom we discovered that the bathroom floor sloped in every direction, but NOT towards the floor drain. Ingenious! The bathroom/hall floor went considerably faster, mainly because there was loose sand underneath, which made it much easier to crack the screed. Unfortunately, the screws holding the toilet bowl were completely rusted and didn't move- Our careful attempt to separate it from the floor broke it. Norally I wouldn't mind, a new bowl is close to free, but this one was extra tall, which is €129 new. Oh well...
Because the front hall floor was 2cm higher than all other floors (2cm is the standard thickness for most older flooring) I suspected concrete over an old floor. That wasn't the case though - ca. 10cm screed over dirt. Extremely awful to remove. To make matters worse, I had a cold when we did it and every blow of the hammer transferred directly to my head. Not good. My brothers and my dad (after all, it's a family house and not mine) did a lot of work too though.
For the wall cutting process we needed to remove 2 boards of the kitchen floor, a beautiful wide plank pine floor, one of the main selling points. Unfortunately we find it extremly worn (some of the boards are down to half their thickness) so we remove it altogether and hope to replace it with a salvaged floor. The sleepers in the dirt underneath (we expected 5x8cm/2x3") were a whopping 10x10cm (4x4) but some were soft like bath sponges. Wet rot.
Then we proceeded to remove some floor boards in the big room (less worn wide plank floor). Unfortunately it was completely rotted and woodworm-eaten near the front, so we removed more and more. ABout half the room appears to be shot.
I'm going to dedicate a few more catch-up posts on wall cutting (in full detail), wiring and other small items over the next few days.
First a reference to the last post. Actually we don't have much more than 10m2 (about 100 sq. ft.) of flooring, but with what we alredy had and what we might be able to get it'll hopefully enough - or maybe we can do the whole back hall with it. Once we get to it.
Plumber #2 came for an estimate in mid June. In October he sent an e-mail with a few questions which I answered promptly. So far we didn't get anything.
Around the same time, plumber #3 came in for an estimate. In mid-December he called and asked if we needed the work to get done before Christmas which we declined. Nothing from him so far either. We mostly liked that guy, so we still might take his services.
The two biggest changes so far: all floors are out (with the exception of half the big room) and we had the walls cut through (which more or less required removing the floors).
Here is the full fun story:
After endless discussions we got an estimate from the only company in the whole half of the country that hammers corrugated stainless steel sheets into the wall. Most people claimed that this method is perfect for adobe houses and all others will crack the walls. When we had already told them to do the work (only on the phone though, so no problem canceling that) several people told us to call another guy, including my architect uncle, who had him do his own house and is happy with the results some 10 years later. So we did and made an appointment. The guy was very nice (and nowhere near as pushy and sleek as the stainless steel guy) and really seemed to know what he was talking about. He mentioned the obvious fact, that corrugated steel sheets won't really line up and form a proper seal in the corners... and his offer was better than the first one.
All rooms renovated by the previous owners (i.e. back hall, bathroom and small room) as well as the front hall had solid poured concrete floors, tiled in the bathroom, covered with loose roll vinyl in the back hall and small room and bare in the front hall. Apparently the front hall concrete was intended to be a finished floor (*gag*) and pretty high up, no way of putting a finished floor on top, except vinyl or carpet (in fact it was even considerably higher than the floor in both the kitchen and big room). The back hall had a 2" step in the middle of the floor to accomodate an inwards opening door in an otherwise higher floor - talk about a tripping hazard! The back room floor was even worse - almost 6" higher than the higher part of the back hall floor. So all those floors had to go.
The wall between bathroom and back hall was built onto said concrete floor and had to go, with the additional advantage of giving us the chance to enlarge the bathroom by about 6", giving us the chance of rotating the tub 90 degrees and build a separate water closet around the current toilet.
Out came the sledge hammer. The wall put up a serious fight. It had been built in 1976 to split a bedroom into back hall and bathroom and consisted of some odd breeze block, hollow concrete blocks mixed with small brick splinters for volume. Taking it down took us the better part of two days, lots of cursing and a bruised and scratched elbow on my side (wanted to take a big blow with the hammer, moved my arm backwards and hit the wall), nothing serious though.
We ended up with some galvanized plumbing hanging in mid-air *g*
Then we proceeded to gut the plaster as long as we had the floors, they did make cleanup a lot easier. In the small room we gave up - the better part of 3 walls is cement plaster (aka concrete) reinforced with chicken wire. Purists are going to scream here, but let me calm you down! This house is 130 years old (parts perhaps older) and has been altered and renovated so many times it's impossible to tell which parts are original and which aren't. Since creeping damp has always been an issue, plaster was repaired and replaced continuously throughout the house's history and is a mishmash of at least 4 different types.
- mud plaster. Only remains in modest patches in bad shape with the exception of the front hall, where we kept it on 3 walls. The way it was originally done.
- bad lime plaster, crumbling away, perhaps 1930s.
- very hard lime plaster, which unfortunately didn't adhere to the adobe brick and came tumbling down in huge sheets.
- cement plaster, which needs to go since the walls are badly damaged behind and need to dry out.
That means we gutted all plaster with the exception of the two long walls of the front hall (and the tiny one above the back door) and the small room, where we just didn't get off our lazy butts so far to remove the concrete completely.
Then we started to attack the concrete. The most common way to build a floor here (in modern construction) is to pour some kind of concrete, either a slab or a load-bearing ceiling, with insulation, perhaps radiant underfloor heating and another layer of conrete, the screed on top. The screed is usually 5-7.5cm (2-3") thick and never reinforced. The finish floors are laid on top of the screed - tile, carpet or vinyl usually glued, engineered hardwood or laminate installed floating. In older houses with strip foundations, the screed is usually poured directly on the dirt between the load-bearing walls during extensive renovations and that's what we had.
In order to be able to get rid of the debris in wheelbarrows we started with the small room. The screed was unusually thick (roughly 10-15cm/4-6") and hard. Underneath we found plastic, mineral wool insulation (stupid, the soft battens can't take the weight of the concrete) and what we thought dirt. Towards the window, the screed got thicker and thicker, but finally we had it out. Then we wrapped the insulation into the plastic (did you ever work wearing rubber gloves in 30+C weather? The gloves just fill up with sweat!) and hauled it out into the yard. At that time we realized our mistake. The stuff underneath wasn't dirt but tar paper. And underneath the tar paper we found... another screed! This one was worse - while some spots were barely more than 1cm thick and crumbled away, others went up to 20cm (8")! At that point we imitated the PO's handyman: "Hey, we got a hole! Gimme concrete!"
Then we had a gaping hole underneath the door.
(This was the last g(l)ory shot before we trashed that 1976 hollow core door with aluminum hardware and rusted steel frame).
Removing the water heater in the bathroom we discovered that the bathroom floor sloped in every direction, but NOT towards the floor drain. Ingenious! The bathroom/hall floor went considerably faster, mainly because there was loose sand underneath, which made it much easier to crack the screed. Unfortunately, the screws holding the toilet bowl were completely rusted and didn't move- Our careful attempt to separate it from the floor broke it. Norally I wouldn't mind, a new bowl is close to free, but this one was extra tall, which is €129 new. Oh well...
Because the front hall floor was 2cm higher than all other floors (2cm is the standard thickness for most older flooring) I suspected concrete over an old floor. That wasn't the case though - ca. 10cm screed over dirt. Extremely awful to remove. To make matters worse, I had a cold when we did it and every blow of the hammer transferred directly to my head. Not good. My brothers and my dad (after all, it's a family house and not mine) did a lot of work too though.
For the wall cutting process we needed to remove 2 boards of the kitchen floor, a beautiful wide plank pine floor, one of the main selling points. Unfortunately we find it extremly worn (some of the boards are down to half their thickness) so we remove it altogether and hope to replace it with a salvaged floor. The sleepers in the dirt underneath (we expected 5x8cm/2x3") were a whopping 10x10cm (4x4) but some were soft like bath sponges. Wet rot.
Then we proceeded to remove some floor boards in the big room (less worn wide plank floor). Unfortunately it was completely rotted and woodworm-eaten near the front, so we removed more and more. ABout half the room appears to be shot.
I'm going to dedicate a few more catch-up posts on wall cutting (in full detail), wiring and other small items over the next few days.
Wednesday, May 13, 2009
Score!
Two weeks ago I had a major score salvage-wise. I found about 150 square feet (in real numbers probably 13 sq. m. unless we need to throw away too much laying it) of 1" thick, 12" pine plank flooring, planed on three sides. Originally (i.e. before the morons ripped it out) the boards were glued up to 24" wide planks, almost 15' (4.9m) long! They've been cut into two pieces though. The boards are somewhat worn and at some point they nailed an oak herringbone floor on top of it - using ring shank nails... yuck! That means if we do use the wood we have to flip the boards as the tops are too far gone (ring shank nails seriously crack the wood once you pull them out). The boards are supposed to go into the back hall.
On Monday we took a pile of stuff out to the farm as the plumber was supposed to to some work on the heat system at my grandmother's place and we wanted to check his work. The pine stumps are gone (Mr. Martin managed to line up a backhoe operator who happened to be around and once the stumps were dug out attacked them with a chainsaw).
I started wiring the garden shed, but didn't get done. The worst thing is going to be digging for the feeder. Inside, there's not much going on - a light, a switch and two outlets, everything just screwed to the surface. I guess I'm more than half done and that was just about half an hour of work.
Yesterday my brother and me spent some time digging through the plumber's bid for the central heat. Our best guess: if we do ourselves what we can we get the price down to about half the bid. Besides, he seriously messed up some things - we certainly don't want a radiator that takes up more than half of the exterior wall in the small room for example! Even if we do everything ourselves we need to hire the gas stuff to a licensed plumber, the chimney relining (maybe we can do that ourselves too but not sure, nasty work at any rate and the chimney might need to be rebuilt up in the attic as it curves now) and the boiler installation (a licensed plumber needs to register the new boiler with the gas company).
The kitchen ceiling is likely coming down, we want to have a plaster ceiling there.
On Monday we took a pile of stuff out to the farm as the plumber was supposed to to some work on the heat system at my grandmother's place and we wanted to check his work. The pine stumps are gone (Mr. Martin managed to line up a backhoe operator who happened to be around and once the stumps were dug out attacked them with a chainsaw).
I started wiring the garden shed, but didn't get done. The worst thing is going to be digging for the feeder. Inside, there's not much going on - a light, a switch and two outlets, everything just screwed to the surface. I guess I'm more than half done and that was just about half an hour of work.
Yesterday my brother and me spent some time digging through the plumber's bid for the central heat. Our best guess: if we do ourselves what we can we get the price down to about half the bid. Besides, he seriously messed up some things - we certainly don't want a radiator that takes up more than half of the exterior wall in the small room for example! Even if we do everything ourselves we need to hire the gas stuff to a licensed plumber, the chimney relining (maybe we can do that ourselves too but not sure, nasty work at any rate and the chimney might need to be rebuilt up in the attic as it curves now) and the boiler installation (a licensed plumber needs to register the new boiler with the gas company).
The kitchen ceiling is likely coming down, we want to have a plaster ceiling there.
Subscribe to:
Posts (Atom)