By accident I stumbled over an Italian supplier for electrical parts... fixtures, switches, sockets, cable,... real old style and to my big surprise fairly affordable. In Austria or Germany something like that would easily cost twice that if no more. Now I'm absolutely drooling over that stuff.... I mean, who else still sells surface mount rotary switches made of porcelain, and porcelaine knobs for installing twisted cloth lamp cord on the wall surface?
Go to http://casadellaluce.skizzo3000.it/catalog/ and check that stuff out!
Monday, December 17, 2007
Friday, December 14, 2007
Nothing to report...
I'm in a pre-Christmas coma. Today is my last work day, I took incredible 4 full weeks off. Right no I feel like I'm just walking upright any more by a last straw... I need all my strength to keep my work schedule up. I hope that'll change with a lot of sleep though.
Planning has mostly been restricted to my favourite way ever since I've been a child - daydreaming. Whenever a project is coming up I play it in my head, like a movie, over and over. Doing that, I can identify problems and devise solutions. Besides, it's fun.
Right now I'm fiddling with a few details like electrical wiring. I want to make it looks as old as possible without violating current electrical codes, that will require great amounts of ingenuity. Most rooms will get conduit screwed to the walls and ceiling except for the bathroom and probably my brother's room (he wants "modern" wiring... I guess in turn I'm going to try something in his room... for the last few weeks I've been intrigued by the produtcs of a company named Elektrohaus. They are located in Austria but sell Italian style switches and sockets (both the Italian kind and the German/austrin to fit an Italian wall box). The system is very modular, basically you get a blank face plate and snap in whatever modue you want. A regular box (roughly US switch box size) is 3 modules wide, a light switch is 1 module, an Italian socket as well, a German receptacle is 2 modules. There are bigger boxes too - 4, 6, 7, 8, 9, 12, 14, 16 and 21 modules. Downside: as I mentioned, the boxes are Italian, so you're restricted to use Italian switches and receptacles or rip open the walls. Doesn'tmatter much as long as you stock replacements.
Wednesday, November 7, 2007
Pigsty once again...
The temporarily buried project is moving again... somewhat.
The verandah sounds like a nice idea, but it doesn't cope with what annoys me most about the house: living on the ground, in a moist house without a basement or second floor. I just don't care any more for rotted floor boards, walls that are stained half a foot up from the floor...
So we started to discuss the larger project once again.
The main concerns were that we didn't have the time nor the money. Since I now plan on quitting my current full job to attend university or something again, and prior to that have decent school-like summer holidays, i.e. 2 months. That sets the schedule, and it's extremely tight.
The second problem is the almost non-existant budget. We'll try to do as much as we can ourselves, but some stuff will hae to be hired out, like some of the foundation work, most of the plumbing, building the ceilings, roof framing and decking,...
So now the goal is to get the planning ready as soon as possible to get the drawings to my uncle (family architect). Hopefully he'll sign the plans so we can get a construction permit. Then we can start building.
So now we're deep into the planning stage.
Problems I've run into so far: space restrictions. I want to keep changes to the footprint as small as possible not to waste precious space between the pigs and goats shed. (Quite a nice area for sitting and playing table tennis. That means the hallway and stairs are very constricted - 1m width is pretty narrow and the stairs will end up being fairly steep, so I need to check code about that. Unfortunately construction code doesn't cover specific things like this, so I'd need to check some kind of sub-code, unfortunately I don't know which one... looks like we won't get by without working closely together with an architect.
If I let the stairs turn twice the under stairs closet will get a fairly low ceiling and I wanted to put the boiler there... loks like bad luck.
That's my biggest concern right now.
The second biggest is cost. I know prices of stuff I deal with every day or at least sometimes, like electrical, but bricks, wall construction, lumber, framing,... are pretty much unkown to me. Without knowing these cost factors it's hard to decide on materials and emthods (concrete ceilings vs. wood,...) and this influences measurements... you see it.
TUB!!!
The tub is in!!!
We decided to involve a plumber in that action... he sent two guys who managed to wiggle it into the bathroom. They also replaced the entire drain assembly.
Then I spent a little over an hour with scrubbing sand and lots of elbow grease trying to get it clean. It looked like it hadn't been cleand and used for decades... but I managed to get it clean enough to use. The infrared heater worked too (first when I installed the 50 year old beast it kept tripping the FI (RCD, a main breaker that works like a US GFI)... took me two attempts of taking it apart, finally I found the damaged wire and made it safe again.
Wow, that was a feeling to soak in that tub!
Pictures to follow as soon as I find the cable for my dad's camera or buy a card reader (buying something new, even as cheap as a card reader always feels scary to me).
Monday, October 22, 2007
Clawfoot pain
Ouch, produtive weekend!
On Saturday my dad happened to stumble over a free clawfoot tub for the farm.
The original plans for the bathroom specified a wooden or steel basin which was supposed to serve as a shower and mainly look rustic. It never got installed and when we bought the house we only found a drain and a shower fixture. We always wanted a real tub there, so we started looking for a clawfoot (looks great and saves us from building a surround). My uncle gave one to us for free, but it had a few flaws. The outside was extremely rusty from having sat upside down in a garden for years and the inside was well worn and rough showing some rust stains through the glazing. Refinishing is darn expensive here (let's say it costs you roughly 10 times the price of a cheap new tub) and involves nasty, stinky, toxic chemicals. We had one refinished and it stank for a year. So we never got around to do it and the tub has been sitting on the verandah, covered with a door to serve as a table.
Besides, the entire drain assembly was missing.
Now a block from us in Vienna they're cleaning out an apartment, tons of trashy 70s MDF furniture. However, my dad suddenly noticed one of the guy throwing a bucket of broken glass, porcelaine, bottles and whatever into what looked like a well-kept tub. So he asked the guy what was going to happen with the tub. "Want have?" was the answer... of course!
So on Sunday we planned an extra trip to the farm and started cleaning out the tub. we found: broken dishes, glassware, shelves (MDF and real wood), a sink and countertop (one pice) made of some heavy terrazzo-like material, bottles of liquors, some half full or full, various drugs (asthma drugs for example, but also a lot of stuff we didn't recognize by the names),... oh yeah, almost forgot the huge wallet like waiters use... empty of course.
That part was easy, wearing gloves.
The interior finish was in almost perfect condition give a fingernail sized chip near the drain. Outsideit had a rustic but ok beige paint job. And most of all it had a full drain assembly (only the overflow drain line was cracked from carrying it down the stairs)!
Only downside: two feet were cracked, one still useable, one shot, but the shot one is in the back so wo could always use a brick...
Now we had to get it into the car upside down. Our family car is a Mitsbishi van with wooden storage boxes in the rear. So we had to hoist the tub up about 1m or even more to get it in. Yuck!
Then we drove out to the farm and first did some maintenance, like the last mowing of the year and the first ever with the new mower. Then we hoisted the tub out of the car... it is HEAVY! We decided to put it on the verandah and either wait for more people or call a plumber to get it inside.
Now when I got up today every single muscle in my body SCREAMED... arms, legs, back... no matter how hard you try to lift with your back, at some point it will hit your back. Yeouch!
Friday, October 19, 2007
Sign of life
Just wanted to say I'm still alive... more or less. Never before in my life I had such an exhausting job, so I basically come home at 7 or 7:30 PM and feel close to dead. Subsequently, the weekends are exclusively reserved for some recreation.
I finally need to finish that endless WC poject (hardly even notice the missing paint any more ;-) ) and want to get started on the verandah project around Christmas. I'm severely tempted to put the window into the new wall facing the yard instead of the exterior wall. This will save us from whacking a hole in the brick wall, finding a window that matches in both size and style,... but will take some light (read: a lot, because the yard side is a tight, covered passage). Dunno...
Framing around christmas is going to be nice anyway - I expect temperatures around or below freezing.
However, it's the only chance to get done before next summer since I take 4 weeks off work in late December/early January.
Thursday, August 23, 2007
Dream house continued
The next day (and following weeks) we continued digging through the clutter (when I first read House in Progress it immediately reminded me of this dream) and conquering the house.
We found: a formal dining room, formal salon (both fully furnished, with oriental carpets, chandeliers, beautiful tiled heaters and everything), several bedrooms, some of which looked like they hadn't been touched ever since WWI, and, by all means, a ball room. The giant yard was completely shielded from the neighbors and was mostly lawn with old trees and a swimming pool.
Just incredible...
I remember the dream well enough to draw a plan from memory...
While the house felt absolutely coherent, trying to draw a plan I found out actually the rooms didn't exactly line up... not even the rooms themselves were really coherent. I'll try to draw the plan anyway and post it, pointing out the flaws and inconsistencies.
I did realize the house must have been HUGE in reality. For the main part I got a foot print of AT LEAST 11x21m, probably more, (given the 21m the ball room would only be 5-5 1/2m wide which seems fairly narrow, in the dream it looked more like twice that size).
Wednesday, August 22, 2007
More dreams...
My absolute favorite old house dream ever... couldn't resist sharing that one.
For some reason my family had inherited a farm house that had once been in a small vilage but now in the outskirts of Vienna (Vienna "swallowed" quite a lot of small villages in the 19th and early 20th century). The first time we went to look at it was on a glum, rainy winter day. We were going up a winding street paved with blocks like the real old streets in Vienna untile we came to a tall iron fence with a thick hedge growing behind, completely hiding the lot and house.
The gate revealed a huge lawn area that slightly sloped towards a large yellow farm building with adjacent barn (basically an L-shaped house and barn built to form a rectangle around a yard, pretty typical for the area near the German border where my dad comes from). We first tried to open the large barn door supposedly leading to the yard. The entryway was stuffed with all kinds of trash piled up to the ceiling. No way. So off we were, around the house. On the short side of the L (the long one faced the street) we found an incredible double-decker verandah with big greek revival columns and (on the upper level) a beautiful iron railing. That seemed to be the formal entrance, a double panel door with windows to each side. The door opened inwards. About 3cm. Then it hit the solid resistance of about 2m of piled up boxes.
So that left one last door, a small side door.
It did open and revealed the kitchen. 4 steps leading down into the kitchen, an old sink resting across the banisters. Across the door a huge white kitchen cupboard. To the left: an ancient gas wall heater, a wood fired stove, an equally old gas stove and some low cabinets. To the right, squeezed in between the window and the steps a sink with a no less ancient gas water heater (1930s I guess). In the middle a huge maple farm house table with chairs.
The floor littered with construction debris, sawdust, broken chairs,...
I turned the light switch, nothing.
So we spent about half an hour just tossing trash out into the garden to make the kitchen liveable. While it got darker and darker we ventured into the hallway to find a fuse box or anything. The hall was narrow and long, maybe 2m by 8 or 10m. And like everything it was piled high with clutter. Only a narrow passage was left. To the sides I could see 5 doors, behind me the kitchen door and absolutely unwalkable stairs to the uptstairs. Another door was probably leading to the cellar stairs.
At the end of the narrow passage I found a swinging door leading into a formal foyer, the one with the aforementioned front door. To the right I saw a 2 doors, one probably leading to the yard, the other into the short side of the L. To the left there was one door which as I soon discovered opened into a small room that held a huge ancient fuse box.
I started screwing in fuses in near darkness and was soon rewarded by dim light coming from the old lamp above.
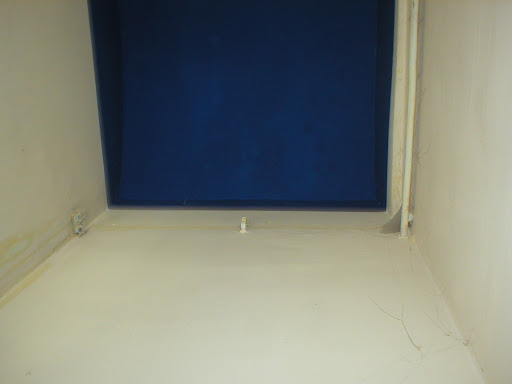
As we now could se something we started to explore further. The doors to the right of the hall led to two living rooms or maybe dining that we absolutely couldn't even set a foot into. The third door revealed a bathroom, with books everywhere. Even in the clawfoot tub. Wonderful dark blue tile and white fixtures, everything looked like it hadn't been touched for decades. Nor cleaned for that matter ;-)
The doors to the left led to two equally cluttered bed rooms.
At this point we decided to call it a day and continue later, which is also what I'll do now.
For some reason my family had inherited a farm house that had once been in a small vilage but now in the outskirts of Vienna (Vienna "swallowed" quite a lot of small villages in the 19th and early 20th century). The first time we went to look at it was on a glum, rainy winter day. We were going up a winding street paved with blocks like the real old streets in Vienna untile we came to a tall iron fence with a thick hedge growing behind, completely hiding the lot and house.
The gate revealed a huge lawn area that slightly sloped towards a large yellow farm building with adjacent barn (basically an L-shaped house and barn built to form a rectangle around a yard, pretty typical for the area near the German border where my dad comes from). We first tried to open the large barn door supposedly leading to the yard. The entryway was stuffed with all kinds of trash piled up to the ceiling. No way. So off we were, around the house. On the short side of the L (the long one faced the street) we found an incredible double-decker verandah with big greek revival columns and (on the upper level) a beautiful iron railing. That seemed to be the formal entrance, a double panel door with windows to each side. The door opened inwards. About 3cm. Then it hit the solid resistance of about 2m of piled up boxes.
So that left one last door, a small side door.
It did open and revealed the kitchen. 4 steps leading down into the kitchen, an old sink resting across the banisters. Across the door a huge white kitchen cupboard. To the left: an ancient gas wall heater, a wood fired stove, an equally old gas stove and some low cabinets. To the right, squeezed in between the window and the steps a sink with a no less ancient gas water heater (1930s I guess). In the middle a huge maple farm house table with chairs.
The floor littered with construction debris, sawdust, broken chairs,...
I turned the light switch, nothing.
So we spent about half an hour just tossing trash out into the garden to make the kitchen liveable. While it got darker and darker we ventured into the hallway to find a fuse box or anything. The hall was narrow and long, maybe 2m by 8 or 10m. And like everything it was piled high with clutter. Only a narrow passage was left. To the sides I could see 5 doors, behind me the kitchen door and absolutely unwalkable stairs to the uptstairs. Another door was probably leading to the cellar stairs.
At the end of the narrow passage I found a swinging door leading into a formal foyer, the one with the aforementioned front door. To the right I saw a 2 doors, one probably leading to the yard, the other into the short side of the L. To the left there was one door which as I soon discovered opened into a small room that held a huge ancient fuse box.
I started screwing in fuses in near darkness and was soon rewarded by dim light coming from the old lamp above.
As we now could se something we started to explore further. The doors to the right of the hall led to two living rooms or maybe dining that we absolutely couldn't even set a foot into. The third door revealed a bathroom, with books everywhere. Even in the clawfoot tub. Wonderful dark blue tile and white fixtures, everything looked like it hadn't been touched for decades. Nor cleaned for that matter ;-)
The doors to the left led to two equally cluttered bed rooms.
At this point we decided to call it a day and continue later, which is also what I'll do now.
Tuesday, August 21, 2007
OT: old house dreams
Like many people who are into old houses I often dream about fancy buildings. All of them have been more or less derelict and the one last night was no exception. Of course it was weird as dreams can be.
I was somewhere in Africa and looking down some kind of hill towards two large houses that absolutely looked like they came directly out of 1900 Vienna's downtown. Heavily ornamented stucco facades with lots of exposed brick from failed stucco. Windows with hardly any paint left on them. The one to the left was even worse, the front yard was overgrown with 2m high shrubbery and the house looked empty, but the front door stood open and a black kid, about 10 or 12 years old went in as I watched. The one to the right had at least a recently mowed grass area in the front and the windows looked clean. This was my target, seemingly a hotel. I walked in and checked out the entire building, cellar to attic like I wanted to buy it. Some good bones like incredible herringbone parquet floors but also a lot of remuddling (cheap tile, wood paneling from the 70s,...). And all the time I kept being surprised all this looked so much like Vienna...
It was weird. In the beginning I felt like I was watching a TV documentary about some foreign country and the poverty there, and the next moment I was in there, checking out one of the houses.
It definitely wasn't the worst house I ever dreamed of though... several were already partially collapsed.
Just wanted to share that with any potential readers (if I actually have any ;-) )
Monday, August 20, 2007
More verandah options and ideas
We're one step closer to the next project.
In my last post I mentioned the wall dilemma. My dad pretty much ended it asking: "Why not take OSB, caulk the seams and paint it?"
Sounds like a pretty good temporary solution to me.
The plastering work is going to be hired out, so that leaves the electrical work, wall, painting and floor to me.
Oh yeah, and door and window frame.
Target is to get it done and liveable before next summer (i.e. by the end of June). Maybe I can do some work during this fall and I'm definitely going to take 3 weeks off over Christmas. It'll be cold then, but MAYBE we already managed to enclose the space enough by then.
Thursday, August 16, 2007
I decided to do one more post with the long promised work in progress pictures from Vienna.
Before scraping off the old paint I was prepared to patch some minor plaster damage, like this:

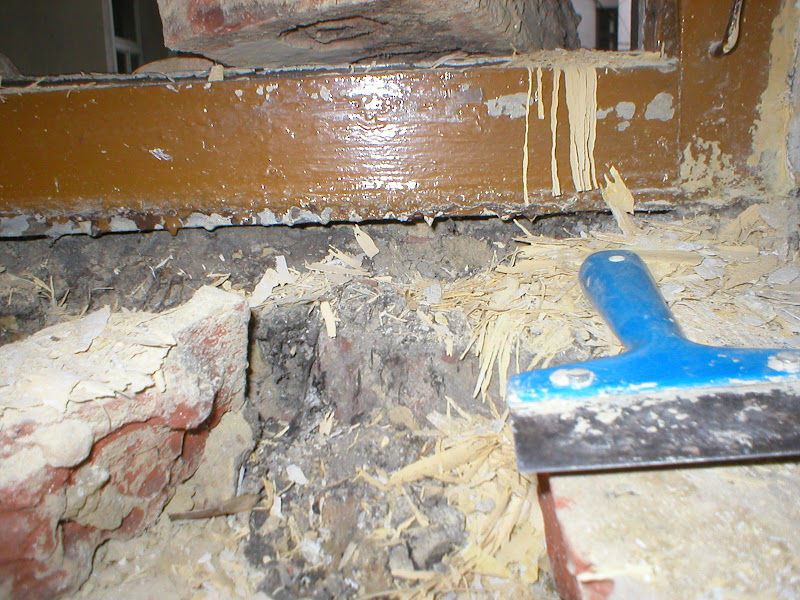
What I didn't expect were things like this.
After gently tapping some plaster with the handle of a screw driver I was confronted with a not so nice view.
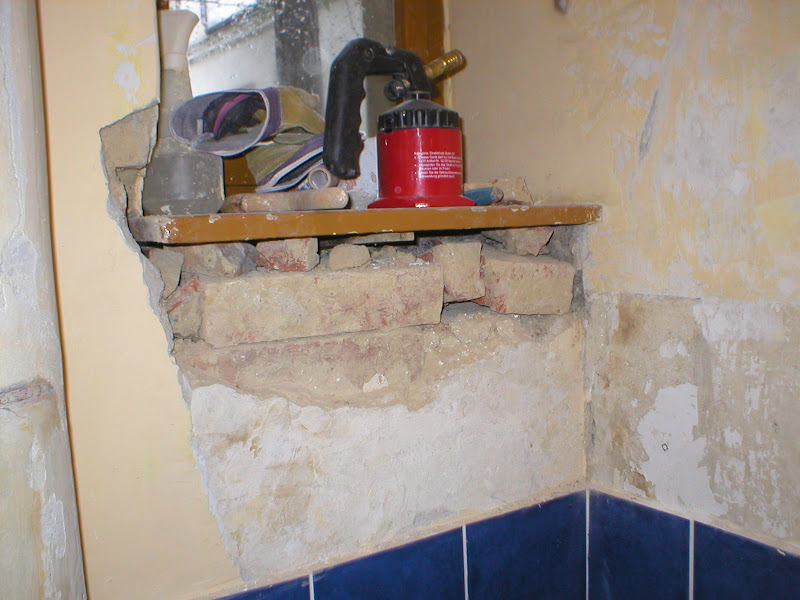
So, I was in for some masonry work AND plastering.
You can see the hole continued even under the window frame...
Masonry is not black magic though, so soon after it looked like this:

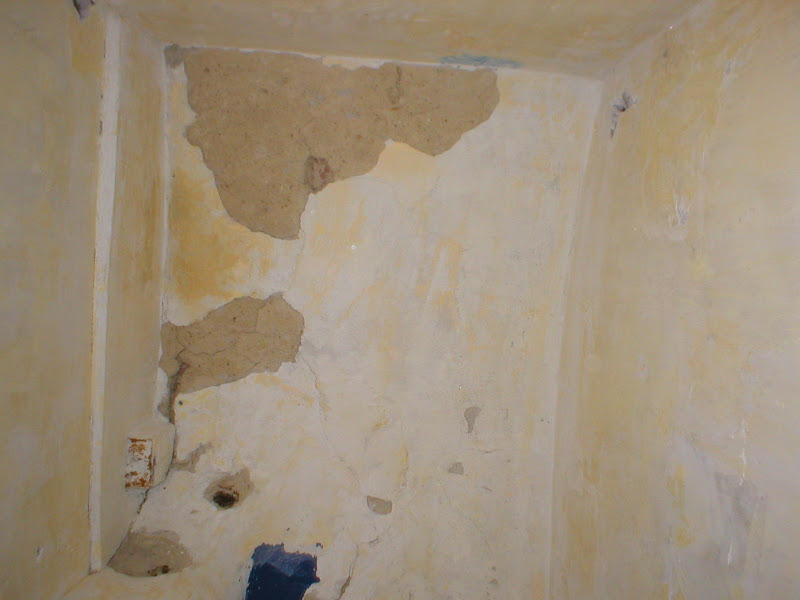
The ceiling didn't look good either... but in the end this was all I had to patch instead of tearing down the whole ceiling.
The bottom 1 1/2 m were once painted a freakin' wild color...
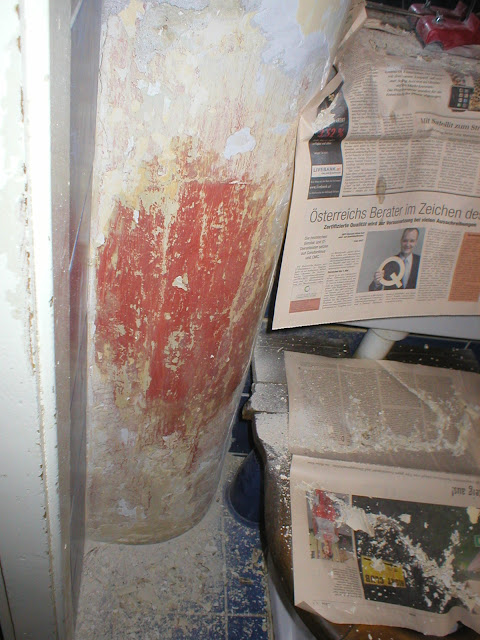
All this is now gone, I patched the plaster and me and my dad painted the walls. Painting in this tiny cubicle in 35 degree C and 80% humidity weather was an incredible experience, even though I wore nothing more than a bathing suit I was soaking wet within minutes.
Still on the To Do List: paint the door, trim and window, replace light switch and fixture, reattach toilet paper holder.
No idea when I might get to do this... actually my GF who first HATED being in a construction zone now insists this can wait until fall because right now she feels we need to make best use of our summer railway ticket (one €50 ticket that allows you to travel the entire country from July to the first week of September) and work is absolutely eating me up and probably will continue to do so until at least September (or until I quit that job...)
Before scraping off the old paint I was prepared to patch some minor plaster damage, like this:
What I didn't expect were things like this.
After gently tapping some plaster with the handle of a screw driver I was confronted with a not so nice view.
So, I was in for some masonry work AND plastering.
You can see the hole continued even under the window frame...
Masonry is not black magic though, so soon after it looked like this:
The ceiling didn't look good either... but in the end this was all I had to patch instead of tearing down the whole ceiling.
The bottom 1 1/2 m were once painted a freakin' wild color...
All this is now gone, I patched the plaster and me and my dad painted the walls. Painting in this tiny cubicle in 35 degree C and 80% humidity weather was an incredible experience, even though I wore nothing more than a bathing suit I was soaking wet within minutes.
Still on the To Do List: paint the door, trim and window, replace light switch and fixture, reattach toilet paper holder.
No idea when I might get to do this... actually my GF who first HATED being in a construction zone now insists this can wait until fall because right now she feels we need to make best use of our summer railway ticket (one €50 ticket that allows you to travel the entire country from July to the first week of September) and work is absolutely eating me up and probably will continue to do so until at least September (or until I quit that job...)
No news...
The WC project hasn't seen any progress except for paint, which was a story in itself. We used Moltoflott, a brand I really used to love because it was easy to work with, gave absolutely no streaks, brush marks or anything and 2 coats ccovered perfectly. In this case though I was severely disappointed - there were ugly brush marks and the 4th coat still doesn't cover perfectly. Guess some small spots will get a 5th coat... *grrr*
The pigsty project is most definitely on hold too, both for financial and time reasons. My new job keeps me busy at roughly 50 hours a week, that's way out of check. It's even illegal... but who's going to complain about a well-paying job in todays economic situation?
We most definitely need more space though... I spend a lot of time with my girlfriend out there and it's an absolute PITA if you have to sleep with your girlfriend and your teenage brothers in one room...
So we decided we'll probably close in the porch. We have no idea what purpose that area served originally, now it is mostly a covered sitting area with 3 solid brick walls and one side open to the yard. So basically we need to put up a stud wall facing the yard, whack down all damaged plaster, add some wiring (currently there is a light switch in one corner, one single outlet and a bare bulb dangling from wires coming out of the wall. The wiring was done in 1998 by a retired railway guy and is of questionable quality. Then we need to get some kind of heat in there (probably a gas line and a small stove that vents through the outside wall), hack in a window, replaster, insulate the ceiling, paint and do something about the floor (currently dirty unfinished wide pine planks probably also dating from 1998).
I already had a look for old windows and got offered some, though it'll probably take a good day to dig through the huge stack and get matching parts, and we'll have to build a frame.
The big questions right now are: what are we going to use for the walls and the ceiling?
Standard and probably fastest would be steel studs and drywall. Most luxurious would be wood framing and plaster&lath. Way too much work. Personally I'm leaning towards wood studs and Heraklith, magnesite bonded wood shavings, 2.5cm thick and fairly solid, has to be skim coated with plaster and is real solid.
And what kind of heat?
Beforehand, an electric space heater would be the easiest way to go, but power is expensive and prices are rising. The gas stove I mentioned above adds the money for the plumber. Or use a wood stove. That would most likely need a chimney...
Last but not least: when are we going to do this?
Sunday, July 1, 2007
Finally.... before pics at least
Now the long promised pictures!
I started with this lovely view... note the different paint where once the central heating pipes were...
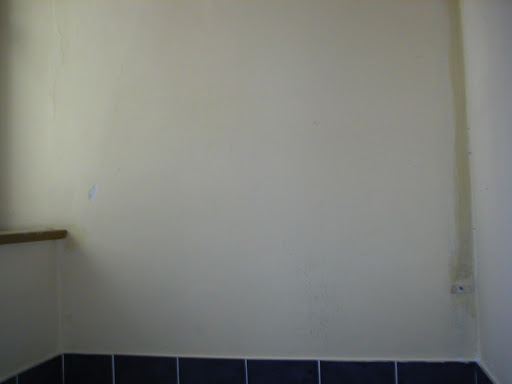
A few remnants of the old pipes are still on the walls, 3 years after we disconnected them... (the pipe in the picture is the last piece of the old hot water pipe from the combi boiler in the bathroom to the kitchen sink, close to 20m long).
Note the beautiful 1980s IKEA lamp holder and open electrical box that sticks out from the wall... the wall is only 5cm (2") solid gypsum board and when my dad set that box (which is 5cm deep) he didn't want to make a hole all through the wall so he just let it stick out... has been that way for 30 years now...)
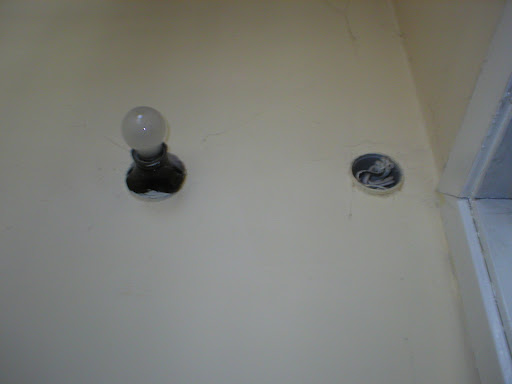
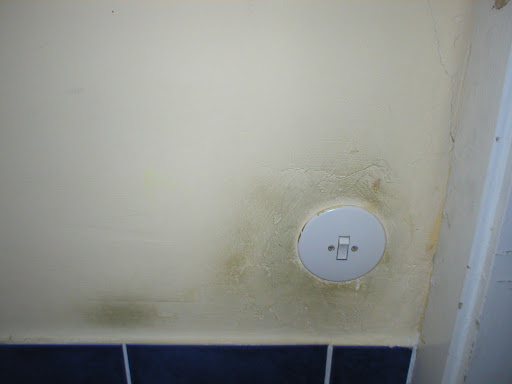
The dirt accumulation around the light switch ain't pretty either...
Now let's hope those pictures actually work... I tried Picasa for the first time today and let#s just say it was the last time, I'm back to Photobucket.
I started with this lovely view... note the different paint where once the central heating pipes were...
A few remnants of the old pipes are still on the walls, 3 years after we disconnected them... (the pipe in the picture is the last piece of the old hot water pipe from the combi boiler in the bathroom to the kitchen sink, close to 20m long).
Note the beautiful 1980s IKEA lamp holder and open electrical box that sticks out from the wall... the wall is only 5cm (2") solid gypsum board and when my dad set that box (which is 5cm deep) he didn't want to make a hole all through the wall so he just let it stick out... has been that way for 30 years now...)
The dirt accumulation around the light switch ain't pretty either...
Now let's hope those pictures actually work... I tried Picasa for the first time today and let#s just say it was the last time, I'm back to Photobucket.
Wednesday, June 20, 2007
Sorry, still no pictures... but the project has progressed a little. While fixing the aforementioned plaster holes I realized the main waste stack was wet near the ceiling and the plaster smelled moldy... not good. Either the stack itself leaks or there's a leak where the stack passes through the roof. Anyway, it's a job for professionals.
Besides one floor above the ceiling plaster in the WC collapsed last week because of old water damage... and after looking closely at ours I realized the entire vaulted brick ceiling needs to be replastered. Not a nice job...
So after fixing all holes in the wall we're waiting for the plumber to show up. After the waste stack problem is solved we can replaster everything else/ have it done if we find a good mason. Then I can do some fine-tuning on the plaster and paint. Oh yeah, and the door and window need to be stripped and repainted.
Monday, May 14, 2007
Vienna side project...
As I promised after almost a full month a small project from the family apartment in Vienna. It is... painting the water closet!
Seemed like a small and harmless project when I started it yesterday... wet and scrape off the old distemper, remove some old oil paint, patch small plaster holes and repaint.
Well... it perfectly prove the well-known old-house laws. Let's say I have some brick-laying to do on the exterior wall... expect pictures tonight.
For those who never heard the old-house laws:
1) Everything takes far longer than expected.
2) Everything gets more expensive than expected (well, not much in that case, thankfully!)
3) Every simple project causes at least one side-project that is dicovered during work.
Tuesday, April 17, 2007
Phew... way too long without posting!
I started working full time the first time in my life after finishing school, that doesn't leave me with much time to spare. Besides I sit in front of a computer 8 hours a day doing electrical planning, so I don't really care for more computer time in the evenings.
This fact also probably delayed the project for years since I don't have anywhere as much holiday time as I used to have during my school days (Austrian summer holidays are full nine weeks!).
Oh well... back to the topic. We plan to have some serious grading issues in the garden fixed this year. It is so uneven it's close to useless, the old stairs made of granite pavers were never built properly (spacing is absolutely unnatural to walk on) and are starting to sag BADLY, posing a tripping hazard.
Besides, one part of the garden solpes towards the house.
Last thing, the wood storage shed is falling apart and the roof pitch is way too low. Let's just say brick walls that have stinging nettles growing out of them aren't good...
Sooo... we will have a caterpillar there for all the regrading, have a retaining wall built to even out the upper section and partially rebuild the wood shed.
While we have the big machines already there we'll have the soil around the pigs stables dug out down to the foundations, insulate everything below grade and install french drains. That should get the first floor into much better shape. If we go badly overboard we might have the foundations for the addition poured while we already have the concrete equipment (given we do a concrete retaining wall).
And of course there are many small side projects... like redoing the stucco on the entire rear part of the facade (can be postponed for a few years), refinishing and installing the clawfoot tub, install a new door handle in the bathroom (the 'old' one failed after only 8 years, the grub screw that holds the inner and outer side of the handle together stripped out, so every time you try to close the door from inside you rip out the handle), painting my grandmother's bedroom (has old plaster damage from a chimney leak that was already there when we bought the place, damage was repaired but never repainted) and hallway (same reason, only the old paint was all flaking too, roughly a dozen layers of limewash) and install a new kitchen floor. The old one installed by my aunt is rustic bricks. First, they were never intended to be pavers and suck up all moisture. Second they're extremely uneven... even with generous shims the refrigerator sways from side to side and the door closes by itself.
We're torn between installing real old cut stone flooring (Kehlheimer Platten), salvaged tile (not sure if we have enough of that for all projects), salvaged oak plank flooring and new pine planks. The first would probably be the most durable and historically correct but might be a lot of work (those beasts are 30x30cm, 1'x1' and more than an inch/2.5cm thick). The tile would be easier and might be accurate too, though those tiles were far more common in the city. However, I definitely want to have enough of that for the pigsty hallway and bathroom, so I'm hesitant to use it for the kitchen. The third option would turn into a LOT of work, since the floor is pretty shot (screw holes all over, worn beyond belief) and the room is so small you can hardly use a drum sander, but a drum sander with 24 grit paper would probably be the only thing that is able to deal with that floor. Besides we got about 16m2 of that stuff (probably just enough for one upstairs room in the pigsty) and the kitchen is like 6m2, leaving us with useless leftovers.
Leaves us with the new pine... definitely the least durable and most expensive, since we need to actually buy that stuff.
I dunno... I still prefer the stone.
The easter weekend I took a few pictures that I'll try to post.
Monday, March 5, 2007
Visions and ideas...
Wow, third post today!
The general idea is to turn the not-so-old outbuilding into liveable space that looks like roughly 1910 construction, a somewhat upscale rural home with some elements that were fancied in the city back then.
I've always been into salvage (as a school kid I started browsing every dumpster for useful stuff, mostly electrical). At the age of 18 I had a huge project - helping my parents turn two apartments into one huge and in the process doing a more or less full restoration on both. That got me towards architectural salvage - I no longer only looked for electrical stuff but for doors, wooden flooring,...
When my grandmother bought that house in 2005 I had a place to use all that salvage... and the idea to create a beautiful house, my dream house, out of a ruin was born.
The basic concept: add a full second floor, hallway, stairs and tiny bathroom, topped with a gable roof.
So that involves: clean out everything, take down roof, store tiles somewhere as well as reuseable (i.e. not rotted) lumber, take down second floor walls and ceilings. Dig a trench all around the building down to the foundations to isolate against moisture and add French drains. Dig and pour foundations or slab for addition after running all new electrical service, water, sewer line, water and gas.
Dig out the interior 1-2' deep and backfill with coarse gravel to prevent any moisture seeping up.
Tear new openings for doors and windows. The existing door is too narrow, IIRC it's about 80cm (31 1/2") and I'd like to widen it to a (rough standard in 1910) 92cm (36"). The first floor windows are practically non-existant, so new openings have to be made. Since there won't be much wall above the future windows anyway at that point it won't be a problem.
Build all new walls for addition and second floor. We're not yet settled whether we want brick like the original building or wood frame - most likely depends on the cost. Brick offers cheaper material but is more labor intense, wood frame is MUCH more expensinve in materials but will go up a lot faster. Wood frame also poses the problem of how to finish the interior - plaster and lath would be the only original finish, but adds the cost of the lath. Chicken wire just isn't going to do it on a wall... brick could be plastered directly.
An option would be Heraklit board, basically coarse wood shavings pressed with concrete. Comes in 1" or 2" thick boards and can be plastered over with just a finish coat unlike brick that needs two coats. However, that stuff is expensive too.
Put on new roof framing and tiles.
Pour slab or screed in hallway and bathroom.
Add new first floor ceiling - don't know yet at what point this is going to happen and what that ceiling is going to look like - wood would be perfect.
Add second floor interior walls - we're thinking of turning it in two smallish rooms (roughly 140 square feet each) and a tiny hallway. Next problem: what to build them of? Brick would need steel I-beams below and above and be pretty substantial. That's the way it was done in the 1913 building where I'm sitting right now.
Or wood framing... expensive (wood is about the most expensive building material here)... and what to cover it with (like the exterior walls).
I hope that about covers the rough work... oh yeah, forgot the chimney. Since I don't think the extremely crooked gas heating system of the main house (basically they added a pump and heat exchanger to a standard gas water tank to run a central heating system!) is capable of supplying another house I intend to get an alternative heat source. I already bought a wood/coal fired boiler off Ebay, but that turned out to have several severe flaws, thankfully we managed to back out since the seller hadn't disclosed damage.
The biggest problem of all: such a boiler needs someone to throw in fresh coal every few hours. That's ok while we're there, but we mostly only spend the weekends there if at all, so plenty of time for the pipes and radiators to freeze and burst.
So right now it looks like we'll get a gas fired combi boiler (small wall mount unit containing a central heating boiler and tankless water heater). That can be put on a thermostat and kep everything above freezing.
Finish work... I already scrounged enough panel doors for the entire house, 4 of them match, the others don't. Can't really do much about that... but hey, it adds character.
Frames and trim will mostly have to be built new.
Floors are ok too... the hallway and bath will get salvaged floor tile. The second floor will get a wide plank pine floor in the hallway and one room, the other will get tongue & groove oak flooring (4" planks).
Only the large downstairs room (storage and work shop) will get new pine T&G.
The bathroom will be tiny... so there won't be that much detail. A walk-in shower with tiled walls, a floor drain and IKEA shower curtain, high tank toilet and a cheap wall-mount sink, if I get lucky with vintage fixtures.
Windows: we're intending to use salvaged old windows. My uncle is an architect and has a huge old farm nearby where he stacked an entire room full with old windows. I guess we'll continue the old scheme of casements, two sashes each with upper lights.
Electrical: since at least the first floor is built VERY sturdy I want to go with surface mount conduit. Otherwise I'd have to trench all the walls... and I think I mentioned how hard the concrete is. Besides... it looks so 1920s.
Only my future bedroom will get a special treat I don't know yet how to realize... maybe run it on low voltage (24V)... I salvaged 1900 wiring, twisted cloth cord on glass insulators, with rotary switches made of porcelaine and brass... unlike US knob&tube that kind of wiring was not concealed inside the walls (not really an option with solid brick walls anyway) but run exposed on the walls!
I guess that should give you some ideas of what I'm planning to do...
When I manage I'll post pictures of all my salvage (most of it hasn't yet made it's way out to the pigsty but still resides in our basement in Vienna or the stuff that can't stand moisture in my bedroom), details of the pigsty as it stands now, inspiration from other houses as well as some plans I slapped together in Autocad.
Pictures...
I promised pictures and here they are...
First an outside view as I first saw it.

The open space in the middle used to house the manure pile... I guess it was more like a pit judging from what the neighbors still have. The PO had it filled up (mostly with plaster from the renovation I discovered upon digging up roots of evil stinging nettles that had invaded everything... you dig into 4" of topsoil and the get bricks and plaster chunks). The white part of the house was once painted blue but that faded away... and that's about all that will be left when we're done. Note the outdoor light switch for the inside light (to the right of the door)...
Next one... view from above. Here you can see how the grade slopes and the house constantly gets wet when it rains...
The windows are tiny and have to be replaced - they're made of something that looks like concrete.

Now the inside...
You can see how much crap there was... the only good things are the trash can and the windows - actually the old storm windows for the kitchen. The trash can hides the refrigerator and range. As well as the falling plaster *sigh*
Oh, and in the corner you can see the weeds I mentioned in the previous post...

Not visible: the severe hole in the ceiling (to the left of the photographer) and the sloping ceiling in general...
The floor is concrete with something like an 8" slope towards the door to ensure runoff of whatever got there... remember, they actually kept pigs there.
Welcome!
Well, that's my very first attempt at blogging, specifically house blogging, after reading several blogs for years.
I guess first I have to clarify one thing: the house I'm talking about here is mostly fantasy yet and probably won't be built for at least a few months, if not a full year. So I can't guarantee frequent updates and merely think of this blog as a place to collect ideas and some pictures of pieces I already gathered.
Now to the house itself...
My family owns a (very) small farm house in Northern Austria, just 400m from the Czech border and pretty close to Slovakia. The house itself has 3 rooms, 2 bathrooms and a kitchen. That's pretty small for a family of 7. SO already when the house was bought there were plans to extend it. The first thoughts involoved finishing the attic, but that would require a complete new roof over the entire house, basically turning everything into a huge war zone. That simply involves too much work and is too expensive.
So eventually we turned our attention towards the outbuildings. There are two of them, one probably once house goats, is tiny, damp and doesn't have much natural light.
And then there's the old pigs stables or whatever you want to call it... and that's what this is all about.
Built in 1971 this stands as a rectangle with a small bumpout for the outhouse (yes, that's right, that house didn't have indoor plumbing until 1997!), built of concrete and brick.
The foundations and walls maybe 3 feet above the floor are concrete. And not the usual farmer's mix (1 sack cement, 10 sacks sand) but real full-blown air raid shelter grade concrete. How I found out? I whacked that thing with a heavy sledge hammer just for fun and all I saw was a white mark on the surface.
Above it's double wyth brick, going back to single on the second floor.
It's more than half built into the hill, so the ground on the rear side is on second floor level.
That, in cinjunction with absolutely no gutters makes for severe moisture problems.
The second floor is merely an attic - maybe five feet at the entrance and 8" on the other side. In dry words unuseable. The floor is wood, severely sagging because the joists were cheap wood and undersized to even support their own weigth... and from severe roof leaks it has a huge hole.
The roof itself is a tile roof. Same cheap and undersized lumber as the ceiling, and waaaaay too flat. Besides, they never replaced broken tiles. So now, the wood is partially rotted, sagging and the roof leaked severely. When I first walked in during rain I stopped counting at the 10th leak.
First thing we did was buy 100 used tiles for half the price of new ones and I spent an afternoon on the roof replacing tiles since the roofer refused to go up there. That got it more or less waterproof for the time being.
The first floor still has the old stalls inside, solid brick half walls and wooden doors with huge bolts, a clay watering trough in every stall. When we got the house it was mostly used for storage - leftover bricks, tiles, the garden hose, old ironware, bags of plaster (that was useless because it had gotten moist), rotted doors and windows, bales of straw, dried weeds of unknown origin (and incredible amounts of them (the plants must have been up to 6' tall and one of the stalls was filled up to at least 3' with that stuff) and other trash.
We tried to get rid of some of the trash and put in lawn furniture, lawn mower and all that stuff.
Oh, I forgot two things in there... a working 1970s refrigerator we've been using extensively as a secondary and a brand new never used 1960s or 1970s electric range we don't have a real use for - in the kitchen we have a gas range we prefer by far.
How I can tell it was never used? The burners still have stickers on them...
The attic is even worse... almost only wood scraps, either rotted from moisture or eaten by powder post beetles. The only remotely useful thing might be a roll of tar paper. Yeah, and two replacement asbestos shingles for the roof of the main house (about 1/4 of the main house was covered in asbestos at some point, we won't touch it since it holds up noticeably better than the tile roof even though it's FUGLY).
There were also empty fertilizer bags galore, and by all means broken window glass and roof tiles!
We scrapped the tiles but decided to keep the larger pieces of wavy glass.
There's no running water, the drain goes straight to where the manure pile once was (the bottom of the outhouse just opens into that hole too, but the hole is no longer there) and the electricity is pathetic - merely an extension cord buried in the ground - it's a miracle that thing never crumbled away and shorted out. Inside there is a single receptacle and a 40W bulb above the door.
The attic doesn't have electricity at all - well, on the other hand, it doesn't even have a door, so what can you expect...
Wow, that's a monster post... Pictures to follow in the next post where I'm going to talk about our visions and plans.
Subscribe to:
Comments (Atom)