Old Austrian ceilings are usually rather complex.
The load-bearing layer is the usual plaster&lath setup with heavy timbers as joists (and I mean HUGE, the ones in my bedroom are something like 18 by 28 cm or 7x11"!). On top of it there is a board-and-batten subfloor. The battens are designed to keep the layer above from falling down, that is the sound insulation. The easiest way of reducing sound transmission through a ceiling is sheer weight and the old-timers knew that. So they simply shoveled 10 cm+ (4") of sand, clay, broken mortar, bricks and other construction debris on top of the lower subfloor. In this dirt fill they embedded sleepers (2x3s) for either the second subfloor (in case of herringbone) or the finished floor (planks).
The old mix weighs around a tonne per cubic metre and did a decent job. Modern alternatives are often MUCH lighter (200-300 kg) and much worse. The best option in terms of weight would have been clay but that is expensive and needs to dry for a loooong time. Therefore after lengthy negotiations we chose Liapor Fit, which is double-fired clay granulate.
The battens in this room were partially damaged, put on crooked right from the beginning plus there were some splits and knots in the floor that allowed the old fill to fall down into the joist space. We requested the floor to be covered with paper or felt to prevent this but the contractor refused to do that. His guys did take some old boards and nailed them over the worst holes (after we told them) and filled some other gaps with *gasp* expanding foam. Then they built the subfloor.
Yesterday I worked on the wiring for the ceiling light one floor below and the instant I touched the cable I was showered with Liapor! Upon closer inspection we also discovered a nice sink hole above! That means there's a substantial hole (or in fact there are probably several as I found at least two sink holes) through which the nice new stuff can disappear!
On the plus side today the painters showed up to remove the leftover old distemper and skim the walls. Tomorrow they're supposed to shellac the water stains and skim another time. Then it's on to painting!
Monday, March 25, 2013
Progress
We spent Easter hurrying to complete a bunch of details since our mason promised to start plastering if we finished. So we spent the better part of two days scraping loose mortar/plaster out of brick joints in the front room and wired both the small bedroom and the last missing outlet in the front room.
With that done, the mason could finally plaster the front room! The first room that looks like a room again! Whoooooppppeeee!
This
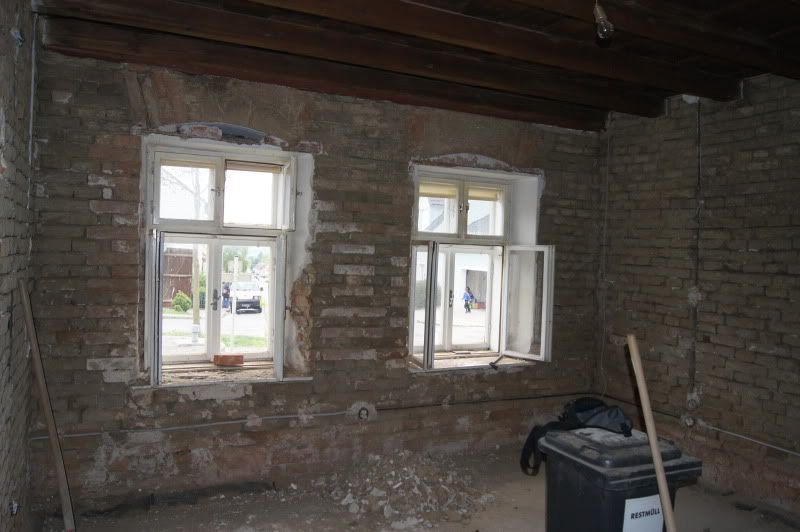 became this
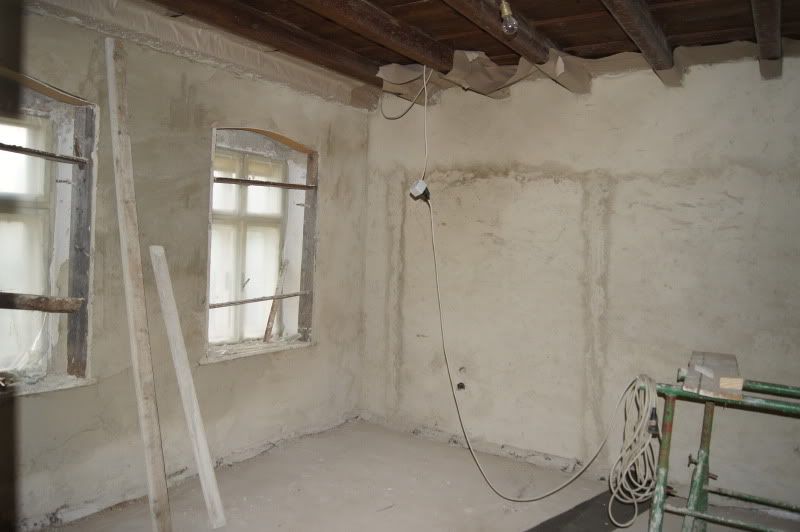
PS: I just realised that I'd never finished this post, probably because I found posting pictures too annoying. So I decided to post it with just these two pictures. The second picture is just a "during", taken before the finish coat was applied.
With that done, the mason could finally plaster the front room! The first room that looks like a room again! Whoooooppppeeee!
This
became thisPS: I just realised that I'd never finished this post, probably because I found posting pictures too annoying. So I decided to post it with just these two pictures. The second picture is just a "during", taken before the finish coat was applied.
Saturday, March 23, 2013
Again, a loooooong time has passed without updates. The flat I mentioned in the last post is mainly done, except the owner now wants to install central heating (great idea to replace the boiler just after we finished tiling the kitchen!). Only she didn't have time and energy to deal with plumbers, so the place is still sitting empty and half-finished (and half-full of old crap still).
In September work started at my home. We were scheduled to switch from combi boilers in every flat to a central wood pellet boiler in the cellar, which involved a stainless steel liner in an old chimney (inlcuding grinding out the flue to enlarge it), running big pipes in abandoned flues and just about trashing all the bathrooms, replacing the sleek combi boilers with pumps, meters, heat exchangers and plenty of exposed copper and PVC pipework - and of course plenty of rewiring, as the bloody boiler requires 3-phase 400 V power! The installation went on well into November and the hot water supply STILL doesn't work properly - the plumbers have to change some menu settings and replace a relay in every flat.
On Dec. 21 we had our little personal apocalypse when the top floor flat burned out and the firefighters flooded all three flats below. All my personal belongings (except for the mattress and some other minor items) were saved, but the plaster ceiling suffered and the oak herringbone parquet had standing water overnight, even though we used every bucket and tub we could find in the house. After MUCH debate with the insurance company, the floor was taken out to dry. Currently, the new subfloor is in and we are trying to finish some while-we-are-at-it wiring before the painters come in on Monday to scrape the old paint and skim-coat the walls and ceiling. Then it's on to painting and re-installing the floor. I'm still not sure how much I trust the contractors and what I'll let them do.
I also rewired parts of my cousin's flat (below ours), pretty much in the nick of time to prevent another fire. Some of the wiring was 100 years old and completely brittle. A note of caution to everybody: flush halogen fixtures are a sure way to fry the wiring inside the ceiling, especially (but not only) if it's old! And bare wires in a wooden (plaster and lath) ceiling are a sure recipe for disaster!
Progress at the farm has been minimal. We did get the WC tiled and mostly finished (only missing sink and door plus some painting), the better part of the bathroom is tiled, the bath is in (but not tiled yet) and two floors are done.
I removed the floor from the last post again, you can read all the gory details here:
https://www.wavyglass.org/viewtopic.php?f=7&t=60
We also installed a new larch floor in the small bedroom. This one had been stored in the house for months, so it worked fine. It still needs to be finished though.
Wednesday, June 6, 2012
Floored
Last time I showed you pictures of our beautiful new wood floor in the hallway. We left proper expansion gaps around the perimeter when we installed the floor but as the wood had been stored outdoors we didn't expect it to expand much anyway. WRONG!
The next time we got there, the 15mm gap between one wall and the floor had shrunk to zero and the floor was buckled. So far we haven't done anything about it. We could try to cut the floor where it hits the wall using the MultiTool (Fein Multimaster knockoff) but the boards are screwed in place and I'm not sure if the screws allow for enough movement to stop the buckling and creaking once we cut the board. The only other option is redoing everything.
Right now I'm working on something completely different. A close friend's mom asked me to help her renovate a 1960 flat. The last people moved in there when it was built and moved out feet first. Needless to say there is some updating to be done. They did occasionally re-paper the rooms (including the ceilings) but always in very old-fashioned patterns. The rooms have 10x10cm parquet tile (probably solid oak), the bathroom is tiled, the kitchen, hall and WC have/had dark green vinyl. Instant depression!
The bathroom was redone in 1971 (we found leftover tiles in a box wrapped in newspaper) and looks it - rose patterned tiles and a bath worn almost through the glazing down to the cast iron plus dripping taps and drain on the sink. The only light was provided by an 18W fluorescent batten with completely yellowed plastic cover.
The WC was even worse - dusty pink PVC tiles and yellow wall paint never(!) repainted in 50 years.
We also replaced or fixed about half the wiring in order to bring it up to modern standards and make it safe. However, heating is a disaster. There were two gas stoves, one of which was removed because it scared my friend's mom. The larger of the two bedrooms has/had an electric storage heater, a solid tiled monstrosity. Yesterday I discovered that the boss started to rip it apart and quit when she found it to be lined with asbestos. Told her that right from the beginning *sigh*
Saturday, April 7, 2012
Hibernation is over
Winter was brutally cold, inside temperatures were only slightly above freezing. The two coal stoves improved things a little, but not much. During the X-mas break I did some wiring but not much else. In February we started on the floors but like everything it took us much longer than expected.
We started with concrete slab over pea gravel 10cm (4") below our desired floor level. The slab was of course cold and not perfectly dry (most likely condensation). Now of course we asked around what to do with that floor. If you know experts you can probably guess the result. We got at least as many different answers as questions. One guy recommended plastic and mineral wool, another highly recommended sealing the floor with tar paper and some eco-friendly insulation on top, the third recommended putting down rigid foam insulation and maintaining an air space below the floor and the fourth guy told us just to keep an air space.
Now if there's something I know then it's that mineral wool and moisture don't mix, so there's no way on earth I'd put it underneath a floor! Option 1 out. Option 2 had a serious flaw: the tar paper was supposed to be sealed with heat using a big propane burner. Can't exactly do that once the central heating pipes are down! *sigh* Then we seriously considered the rigid foam especially as we could get it for free. However, having grown up with solid packed floors we were worried that wood floors on sleepers without any solid fill underneath would sound hollow underfoot and make a lot of noise. In classic construction (pre-WWII) the floors are multi-layer. First there's the actual load-bearing subfloor nailed on top of the joists. Then there's a 4" sand or dirt fill in which 2x3 sleepers rest. The finished floor is nailed to the sleepers, so it rests both on the sleepers and the dirt fill, there aren't any cavities.
Eventually we decided on our own method and hope it won't cause any trouble. First we put down heavy landscape felt as the concrete was fairly rough. Then we topped it off with the heaviest plastic we could find to waterproof the whole thing. The sleepers are supported by blocks of wood with thin scraps of cork underneath. You can see we really wanted to make sure the plastic won't get damaged!
Then we filled the whole space underneath the floor with perlite.
The biggest trouble spot was near the main door. The wall next to the camera is load-bearing and triple wythe brick, i.e. nearly 60cm thick. The brickwork continues under the door. Unfortunately it's higher than the slab and extremely uneven, so we had to cut and shim the living crap out of the sleepers there.

Now the real fun started! Things you'd actually see! For the back hall I wanted to use salvaged oak planks. A good 10 years ago I happened to pass a dumpster nearby and saw some kind of flooring. Of course I got curious and had a closer look! Turned out to be a mix of 8 and 9cm wide T&G oak planks, most of them nearly 2.5m (8') long, others about half that. The boards were in fairly bad shape, but I hoped they could be saved. Apparently the original floor had huge gaps and was extremely worn and splintery, so someone decided to screw down large sheets of 5mm pressboard and install vinyl. Some boards had a screw every 10cm. Maybe half the boards were in terrible shape, dull grey, deeply worn and splintering along the edges, but we discovered that they could in fact be planed down to good and beautiful wood. So I started removing the screws and old nails as well as cleaning up the tongues and grooves.
This does look bad, doesn't it?

The first thing we realised was that we had considerably fewer boards than I'd estimated earlier. Back when we found them I thought we had about 18sq.m., while in fact it was closer to 6, barely enough for the small hallway. Trouble really started as we began installation. The tongues and grooves didn't really fit and I had to use considerably brute force to get the boards together without huge gaps (emphasis on huge, I did get some gaps anyway).

Once we got out of the narrow section in front of the WC to the long part of the hall things quickly went from bad to worse. We discovered that the boards weren't exactly the same width (a few mm off) and some of the longer ones had nasty curves in them. Around the second or third long course we discovered big gaps that would only keep adding up as we progressed.

At that point I really started to wonder if we should continue or give up. After a lot of thinking we decided to rip out what we'd already installed and buy a new floor. It's a pity, I'm sure the wood itself would have looked terrific once sanded and oiled, but the boards were such a poor fit it wouldn't have been worth the hassle. Initially I wanted to go to the next larger town and buy wood in the big box store because they usually have anything you need in stock but then I decided to give a local lumberyard a call because it was much closer (6km rather than 25) and they most likely had better quality wood than the DIY store. They had nice larch t&g flooring in stock for a decent price and we got there barely in time to pick it up. I'm not sure if I've mentioned this before, but store opening hours are extremely restricted in most Central European countries. Supermarkets, DIY stores and other large chains are usually open from 8 or 9 AM to 7:30 or 8 PM Mon-Fri and 8 or 9 AM to 6 PM on Saturdays, closed on Sundays (ANYTHING is closed on Sundays except mini-markets in railway stations and airports). Stores that mostly cater to professionals are usually open 7 AM to 5 PM with a 2 hour lunch break around noon, Friday afternoon closed, Saturday too. If they're in a rural region Wednesday afternoons are usually closed too. So, we barely made it there until 5 and picked up our new flooring. 19 11cm wide 4m long and 18mm thick Siberian larch planks.
The large part of the room is 3.35m x 1.72m (the latter being the median as one wall is angled) so we had two options - buy 3m planks and piece them together or buy 4m planks and have some leftovers. Since we heat with wood we decided to get 4m.
Installing the new floor went considerably smoother, but it was still very time consuming. We worked until 11 that night and got the large part almost done, except for the boards right next to the angled wall. Finishing the two little "alcoves" took us another 3 hours though.
Here you can see the weird shape of this room. At the far end the gap between the last board and the wall on the right is almost non-existant but near the door it's already fairly wide.
On the other side of the room it's more than a full board.


And now the completed result!
We still need to sand or scrape the floor a little as the boards aren't perfectly the same thickness and then we have to oil the floor of course.


Once we finished installing the floor I immediately started on the next room putting down the felt and plastic. At that point I stopped because we wanted to go home and my muscles were extremely sore. Hopefully next time we can get the floor done in there which would give us one nearly finished room (minus door trim, painting and installing switches and outlets).
Oh, and still no decision on the tile... *sigh*
I like this floor tile but it's 20x20cm and doesn't go too well with 15x15cm wall tiles.

We might go for black and white 15x15 floor tile (think chess board) and white wall tile. I did manage to find black 15cm wide trim pieces for a decent price but unfortunately in what appears to be a small tile store at the other end of the country. In Vienna we can only get 2.5x20 and 5x20 border tiles. Then of course there's my personal favourite, replica art-nouveau tile in all colours of the rainbow but that's insanely expensive. Last time I asked it was €144/sq. m. Plain white 15x15 or 20x20 at the DIY store is €5.99. Even Villeroy&Boch tiles don't really go beyond €100.
We started with concrete slab over pea gravel 10cm (4") below our desired floor level. The slab was of course cold and not perfectly dry (most likely condensation). Now of course we asked around what to do with that floor. If you know experts you can probably guess the result. We got at least as many different answers as questions. One guy recommended plastic and mineral wool, another highly recommended sealing the floor with tar paper and some eco-friendly insulation on top, the third recommended putting down rigid foam insulation and maintaining an air space below the floor and the fourth guy told us just to keep an air space.
Now if there's something I know then it's that mineral wool and moisture don't mix, so there's no way on earth I'd put it underneath a floor! Option 1 out. Option 2 had a serious flaw: the tar paper was supposed to be sealed with heat using a big propane burner. Can't exactly do that once the central heating pipes are down! *sigh* Then we seriously considered the rigid foam especially as we could get it for free. However, having grown up with solid packed floors we were worried that wood floors on sleepers without any solid fill underneath would sound hollow underfoot and make a lot of noise. In classic construction (pre-WWII) the floors are multi-layer. First there's the actual load-bearing subfloor nailed on top of the joists. Then there's a 4" sand or dirt fill in which 2x3 sleepers rest. The finished floor is nailed to the sleepers, so it rests both on the sleepers and the dirt fill, there aren't any cavities.
Eventually we decided on our own method and hope it won't cause any trouble. First we put down heavy landscape felt as the concrete was fairly rough. Then we topped it off with the heaviest plastic we could find to waterproof the whole thing. The sleepers are supported by blocks of wood with thin scraps of cork underneath. You can see we really wanted to make sure the plastic won't get damaged!
Then we filled the whole space underneath the floor with perlite.
The biggest trouble spot was near the main door. The wall next to the camera is load-bearing and triple wythe brick, i.e. nearly 60cm thick. The brickwork continues under the door. Unfortunately it's higher than the slab and extremely uneven, so we had to cut and shim the living crap out of the sleepers there.
Now the real fun started! Things you'd actually see! For the back hall I wanted to use salvaged oak planks. A good 10 years ago I happened to pass a dumpster nearby and saw some kind of flooring. Of course I got curious and had a closer look! Turned out to be a mix of 8 and 9cm wide T&G oak planks, most of them nearly 2.5m (8') long, others about half that. The boards were in fairly bad shape, but I hoped they could be saved. Apparently the original floor had huge gaps and was extremely worn and splintery, so someone decided to screw down large sheets of 5mm pressboard and install vinyl. Some boards had a screw every 10cm. Maybe half the boards were in terrible shape, dull grey, deeply worn and splintering along the edges, but we discovered that they could in fact be planed down to good and beautiful wood. So I started removing the screws and old nails as well as cleaning up the tongues and grooves.
This does look bad, doesn't it?
The first thing we realised was that we had considerably fewer boards than I'd estimated earlier. Back when we found them I thought we had about 18sq.m., while in fact it was closer to 6, barely enough for the small hallway. Trouble really started as we began installation. The tongues and grooves didn't really fit and I had to use considerably brute force to get the boards together without huge gaps (emphasis on huge, I did get some gaps anyway).
Once we got out of the narrow section in front of the WC to the long part of the hall things quickly went from bad to worse. We discovered that the boards weren't exactly the same width (a few mm off) and some of the longer ones had nasty curves in them. Around the second or third long course we discovered big gaps that would only keep adding up as we progressed.
At that point I really started to wonder if we should continue or give up. After a lot of thinking we decided to rip out what we'd already installed and buy a new floor. It's a pity, I'm sure the wood itself would have looked terrific once sanded and oiled, but the boards were such a poor fit it wouldn't have been worth the hassle. Initially I wanted to go to the next larger town and buy wood in the big box store because they usually have anything you need in stock but then I decided to give a local lumberyard a call because it was much closer (6km rather than 25) and they most likely had better quality wood than the DIY store. They had nice larch t&g flooring in stock for a decent price and we got there barely in time to pick it up. I'm not sure if I've mentioned this before, but store opening hours are extremely restricted in most Central European countries. Supermarkets, DIY stores and other large chains are usually open from 8 or 9 AM to 7:30 or 8 PM Mon-Fri and 8 or 9 AM to 6 PM on Saturdays, closed on Sundays (ANYTHING is closed on Sundays except mini-markets in railway stations and airports). Stores that mostly cater to professionals are usually open 7 AM to 5 PM with a 2 hour lunch break around noon, Friday afternoon closed, Saturday too. If they're in a rural region Wednesday afternoons are usually closed too. So, we barely made it there until 5 and picked up our new flooring. 19 11cm wide 4m long and 18mm thick Siberian larch planks.
The large part of the room is 3.35m x 1.72m (the latter being the median as one wall is angled) so we had two options - buy 3m planks and piece them together or buy 4m planks and have some leftovers. Since we heat with wood we decided to get 4m.
Installing the new floor went considerably smoother, but it was still very time consuming. We worked until 11 that night and got the large part almost done, except for the boards right next to the angled wall. Finishing the two little "alcoves" took us another 3 hours though.
Here you can see the weird shape of this room. At the far end the gap between the last board and the wall on the right is almost non-existant but near the door it's already fairly wide.
On the other side of the room it's more than a full board.
And now the completed result!
We still need to sand or scrape the floor a little as the boards aren't perfectly the same thickness and then we have to oil the floor of course.
Once we finished installing the floor I immediately started on the next room putting down the felt and plastic. At that point I stopped because we wanted to go home and my muscles were extremely sore. Hopefully next time we can get the floor done in there which would give us one nearly finished room (minus door trim, painting and installing switches and outlets).
Oh, and still no decision on the tile... *sigh*
I like this floor tile but it's 20x20cm and doesn't go too well with 15x15cm wall tiles.
We might go for black and white 15x15 floor tile (think chess board) and white wall tile. I did manage to find black 15cm wide trim pieces for a decent price but unfortunately in what appears to be a small tile store at the other end of the country. In Vienna we can only get 2.5x20 and 5x20 border tiles. Then of course there's my personal favourite, replica art-nouveau tile in all colours of the rainbow but that's insanely expensive. Last time I asked it was €144/sq. m. Plain white 15x15 or 20x20 at the DIY store is €5.99. Even Villeroy&Boch tiles don't really go beyond €100.
Saturday, December 3, 2011
Big Update
Ok... it's been a long time again, I know. Plastering is more or less finished (except for the finish coat of clay in the hall which we'll be doing ourselves rather than hiring it out because we don't really trust our mason/plasterer to make it look the way we want. Basically the base coat is fairly rough and uneven and we want to keep that bumpy look, just applying a very thin final layer to smooth out the walls without making them flat and even.
Two new windows are in. Unfortunately I'm less than impressed - we hired a Czech carpenter who didn't speak more than three words of German (basically hello, good bye and problem) with the help of a local interpreter. We showed him EXACTLY what we wanted, hardware, casement profiles, hinges,... only to have him mess up everything. Had we ordered wooden double glazed units for a modern home they'd be fine - but as we asked for exact replicas of old windows they're flat-out garbage. My parents didn't have the time to start fighting though, and they are paying for the renovation... but I'm still VERY annoyed. At least we now have decent windows everywhere (even though the bathroom window might have to be replaced at some point, but I spent a considerable amount of time fixing any rot and repainting it, so it should be good for a few more years at least).
The whole experience really got me wishing to learn some decent carpentry and build my own doors and windows. I guess the first thing to do is getting LOTS of practice doing mortise and tenon joints with basic tools (saw, chisel and drill).
The last thing I did was whitewashing the back bedroom and hallway, but both will need at least one more coat.
Two weeks ago, the plumber ran all the copper plumbing for the new central heating system (the first the house ever had!) and installed the radiators. BIG progress! The pipes are run between the concrete slab and the finished floor, so we couldn't do anything before that was done.
There are still a few big tasks though. The most daunting one seems to be waterproofing the floor slab and bottom part of the walls. The damp-proof course doesn't exactly run at the same height throughout the house. In some (most) spots it's below the finished floor level, in some up to 4" above though. In those spots we need to cut off the membrane that sticks out of the wall, waterproof the section of wall below as well as the floor and patch the plaster (currently, all walls are only plastered down to the damp-proof course).
Then of course we need to get insulation and flooring down. We want to do wood floors in most rooms, tile in the bathroom and stone in the front hall. I did devise a few tile schemes, but we're still discussing them in the family... the original idea was salvaged tile, white squares for the walls and white octogons with square blue inlays on the floor. However, that setup would BEG for a clawfoot tub and my mom doesn't want one - she wants a decent shower, and certainly no curtains. That means modern tub with folding shower wall. The second scheme I devised was more 1930s/50s with light blue or turquoise wall tiles, black trim around the top and bottom and a mosaic floor. This has the advantage of being possible using plain 4" square tiles that are fairly affordable. Another floor option was black and white checkerboard as my dad was afraid mosaic would be difficult to install. Then there's a third option, white wall tile with a dark blue profiled border around the top and a black (or blue) and white floor. Again, this can be done using standard tiles, in this case even big box store tiles. We're all much too busy with work/school/university, so no decisions have been made.
I'd love to get the heat running this year, but unfortunately I don't think that is going to happen. We don't have a boiler yet, and I don't really want to get the boiler installed before we got done with all the dusty work, including floor sanding. Otherwise we'd have to get the boiler cleaned every few months or even weeks.
Monday, July 11, 2011
Plaster and paint
Well.. I had an update half-finished, then the Firefox tab got reloaded and everything was gone. Given how annoying it is to embed pictures in Blogger, especially if you're as HTML-illiterate as I am I don't know when I'll get around to showing you some pictures.
A brief summary: the small back bedroom and the large front room are plastered and finally ressemble rooms again!
All other rooms are waiting for loose ends to be tied up before they can get plastered, such as installing a WC window, fixing the kitchen ceiling, having the plumber install the gas lines and finish the plumbing... oh and the kitchen door frame needs to be installed, the front door needs to be replaced,...
Last week I felt completely burnt out from university exam season so I didn't do much. We fixed the roof of the pigs stable (the one with the purlins resting on nails driven into the ends of the rafters) because the lowermost purlin was completely rotted and had come loose. Incredible but true, this was a DIY project that went perfectly smooth and took just as long as we'd expected! Take down the tiles (as we were told hand-made concrete tiles, at least 50 years old), rip off the damaged pieces of wood and nail up a new purlin (spare found in the attic). Replace the tiles, done!
Still looks slightly odd (saggy), but it should last a few years until we completely replace the roof. Actually we should replace a few tiles too.
On Thursday I decided to take up another necessary but unplanned easy task, repainting the street-side windows. The old ochre and beige paint job was flaking off in huge sheets and looked absolutely dismal. I spent a few hours scraping off any loose paint, sanding and then slapping up a coat of dark green paint. Next I plan to spackle, sand and apply a second coat. I'm incredibly impressed with the Osmo paint I used, it's even better than their white paint! Not much of a smell, easy to apply and covers very nicely!
Oh, and of course I also need to reglaze the windows and paint over the fresh putty once it's ready. I'd love to try different kinds of glazing compount, but that seems to be a US phenomenon. Around here you can get natural linseed oil putty, beige linseed oil putty and brown linseed oil putty. That's it!
Ideally I'd do the reglazing in winter (linseed oil putty tends to crinkle when exposed to direct sunlight as it sets) but I don't think I'd want to leave the windows with up to 3/4 of the glazing missing for so long.
On Friday I started to trench the walls for the gas lines. Our plumber is very affordable (he runs a rural one-man operation) but the downside is he tells us to do most things ourselves. We installed all the drains (ok, that's easy, our drain pipes aren't glued but just stuck together using bells and o-rings but still it requires some creativity) and did all the trenching. The only thing he did so far was cutting, bending and soldering the copper pipes.
I used an angle grinder with a diamond blade to score the walls. It makes the actual chiseling easier and keeps the trench sides cleaner, but it's incredibly dusty work! I started with the doors closed, but had to stop less than midway because you couldn't see anything! I continued with both front and back door open, that was bearable. At least I finally found a decent respirator mask that seals properly around the nose so I can wear goggles without having them fog up every few seconds. While marking for the cuts I discovered that the ceiling slopes considerably towards the front door, at least 5cm. I'm not 100% sure, but I think the old concrete floor sloped too, so it seems to have been done on purpose (only I don't have the slightest idea WHAT purpose!). I definitely know some older houses where the hall slopes considerably, maybe because they're built into a hill or something. It can't really be for water runoff since the front door usually has quite a tall threshold.
We also completely redesigned the kitchen using the old 60s cabinetry. The sink will be replaced with a double sink with drainboard (the old one was a double without drainboard) and a dishwasher instead of the narrow cabinet that used to reside next to the sink. The stove moves in next to the dishwasher where the large hutch used to be. The hutch in turn moves sideways in front of the door we bricked up. That puts the stove close to the sink and away from the door. Even makes running the gas lines a bit easier. The refrigerator will go in next to the table where the old electric stove was, rather than in the back hall on the other side of the door we bricked up. The upper cabinet that used to threaten people's heads and necks when sitting on the bench will move across the room above the sink where it's useful for dishes and other stuff and won't likely cause any injury. The way it used to hang I couldn't sit down on the bench unless I slumped over the table because the back of my head would hit the cabinet if I leaned back!
Next: finish the trenches for the gas lines (I guess we're about halfway done), finish painting the windows, get a carpenter to build a WC window, install it, get a frame for the new front door and replace the old one...
Subscribe to:
Posts (Atom)