So after day 1 ended quite successfully, things quickly started to go downhill. I decided to spend the following night on the couch in the living room (which did cause some discussions with my brothers who wanted to watch TV in the morning while I wanted to sleep in but that was settled peacefully). Mostly I ignored the painters until they packed up. Any tidyness had gone down the drain. White paint smears on everything they had touched with their dirty hands (inner window brass handles, my wood mobile I forgot to take off,...), paint drips on about everything (exterior sill, stool,...). Especially funny as one inner is painted red.
We decided not to complain (well my parents did, I would have made a big fuss) but try to remove any excess paint. Oh, and the painters told us one of them (who usually stays at the shop and paints casements) was sick so they weren't sure how long it'd take them to finish. Oh, and they left the blue paint again!
That was Tuesday. Wednesday was a public holiday and COLD. Believe me, it makes a HUGE difference whether there's one pane of glass between you and the freezing outdoors or two! While the heat was running it wasn't that bad, but as soon as the thermostat went into night temp setting it got cold fast.
Thursday they promised to get the casements by 2:30PM. They arrived more than half an hour early and started to unload the casements. Guess what? The WC window was sparkling white! We told them to take it right back, this time WITH the can of blue paint. Another day with only one toilet... while the window was tarped this one was quite uncomfortably cold, so we didn't use it.
First thing we saw was them traing to figure out which window went where. I mean my mom had TOLD them to label each casement since none of them actually match! No, they knew better (they did label them but couldn't make any sense of the labels when they came back).
Then they noticed one broken pane in the bay window and broke another one there trying to hang a casement.
First highlight of the day was when they walked into the living room where my brothers were watching TV and wanted to rehang the windows. The guy had to come within 2 feet of the window to realise none were missing (since they never painted those!)!!!
Second one was even better, I'll try to give you as accurate a translation of their German dialogue as possible.
"What's up?" (muttered)
"Another problem!"
"What's it?"
"Doesn't go all the way in!" (too much paint on the hinges, he was already cleaning them with a screwdriver before the discussion started)
"Then do something!"
"I already AM!"
Perhaps it doesn't really show that well in writing, but it was hilarious! Those painters most definitely weren't the brightest bulbs in the pack!
Also note that I was mildly pissed to find they had replaced one slightly cracked pane of original wavy glass (happened when I cleaned it, for no apparent reason) with new smooth glass without asking... ah well, even if I had complained they wouldn't have understood.
Then they tried to call the glass shop for the two broken panes... no answer. So Friday became a pretty unlikely done date. In the end they returned the WC window (finally blue!) on Friday (maybe we should have told them you need to thin that brand of acrylic paint to avoid brush marks... it looks pretty bad but at least it's blue now) and the two broken ones on Tuesday. *sigh*
Oh and about the hardware I painstakingly cleaned before they started... some of it had paint smeared on again (accidentally) whereas they painstakingly removed and stripped all the ugly new aluminum hardware on some of the windows...
That experience kind of supports my sarcastic theory that in Austria only those flat out too stupid for secondary education take up the trades. Not too promising...
Friday, January 14, 2011

Tuesday, December 7, 2010
Fun with painters - survived day 1!
Today the painters arrived bright and early at 8AM: Thanks heaven my mom managed to keep them busy in the kitchen and a few other rooms till 10 when I had to get up anyway. Big kudos to her for that!
All windows have the outer casements out for painting and the frames received their first coat of paint inside and out. Where the old and new paint meet it looks terrible - the crisp fresh white paint makes the yellowed, chipped and lord knows what else old white paint look even mor terrible! Unfortunately the inners are a complete strip and repaint job and that's a tough (and dusty) decision in a room filled with electronics, vinyl records, 3.5" floppy disks, cassette tapes,...
My bedroom window frame has a few considerable holes which they didn't bother to patch, I hope they do that tomorrow. If not... one more thing on the list of complaints.
We told them to paint the inside of the WC window blue to match the frame (and repaint that too since it's already part of the quote) since I painted the frame like 7 years ago, we even supplied the paint... which they promptly left when they took off with the casements in two. The frame isn't painted either.
When I came home from university I found my oriantal rug grey instead of red, blue and pink - dust and dirty shoes. Near the window it had been covered with paper which was covered with paint chips. Oh, and they TAPED plastic to my curtains! No real idea what that was supposed to do anyway, it neither reaches down to the floor nor up to the ceiling. Pretty pointless! They didn't cover my desk either (as I had specifically requested to protect my vintage reel tape recorder and computer).
To sum it up, it would bee too much to say I'm pissed off, but I'm definitely annoyed. They left the kitchen floor covered with paint chips too btw!
One thing I most definitely know now: Don't EVER believe anyone telling you that single glazed windows are just as good as single glazed windows with storms and storms are only wasted money! These aren't fancy thermopane windows, just two panes of ordinary glass with roughly 6" of dead air space in between, but there's a huge difference! It's getting COLD in here with only single glazed windows!
All windows have the outer casements out for painting and the frames received their first coat of paint inside and out. Where the old and new paint meet it looks terrible - the crisp fresh white paint makes the yellowed, chipped and lord knows what else old white paint look even mor terrible! Unfortunately the inners are a complete strip and repaint job and that's a tough (and dusty) decision in a room filled with electronics, vinyl records, 3.5" floppy disks, cassette tapes,...
My bedroom window frame has a few considerable holes which they didn't bother to patch, I hope they do that tomorrow. If not... one more thing on the list of complaints.
We told them to paint the inside of the WC window blue to match the frame (and repaint that too since it's already part of the quote) since I painted the frame like 7 years ago, we even supplied the paint... which they promptly left when they took off with the casements in two. The frame isn't painted either.
When I came home from university I found my oriantal rug grey instead of red, blue and pink - dust and dirty shoes. Near the window it had been covered with paper which was covered with paint chips. Oh, and they TAPED plastic to my curtains! No real idea what that was supposed to do anyway, it neither reaches down to the floor nor up to the ceiling. Pretty pointless! They didn't cover my desk either (as I had specifically requested to protect my vintage reel tape recorder and computer).
To sum it up, it would bee too much to say I'm pissed off, but I'm definitely annoyed. They left the kitchen floor covered with paint chips too btw!
One thing I most definitely know now: Don't EVER believe anyone telling you that single glazed windows are just as good as single glazed windows with storms and storms are only wasted money! These aren't fancy thermopane windows, just two panes of ordinary glass with roughly 6" of dead air space in between, but there's a huge difference! It's getting COLD in here with only single glazed windows!
Sunday, December 5, 2010
Prep and paint fun
As I mentioned in my last post we're having the window painted in 4 apartments and the stairway. The apartments have "Kastenfenster" which means two casements built into one extra-thick frame, like with permanent storms. The stairway was always meant to be unheated and thus only received single-glazed casements. Of course the very day they were taken out for painting we had the first day of snow. And they couldn't even tarp the opening because the frames had been painted inside and out. So Wednesday morning we had snow on the interior stairs. Thankfully they're terrazzo so no damage done. It was awfully slippery though.
Nice view, isn't it? (the night after I took the picture it started to snow).
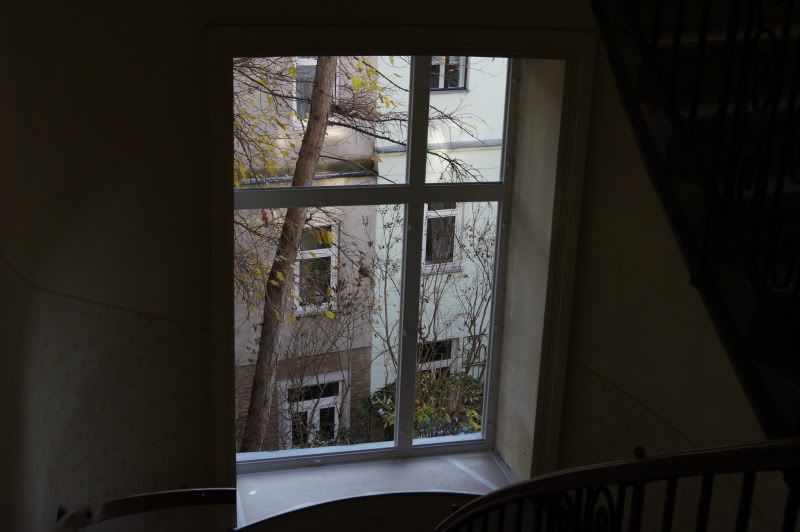 Then the painters tried to rig up a tarp held in place inside of the frame held in place with pieces of trim, but that didn't last too long, the wind ripped it to shreds the following night. Ah well... now they're done.
Tomorrow they're scheduled to start on our apartment, which means the chaos is really going to invade our living space. The last weekends have been spent with frantic furniture moving (for example my brother had set up his drum set in front of the window) and general tidying up - for two reasons: a) we don't want the painters to think we're complete messies (and need to give them space for setting up ladders) and b) we don't want too much dust on our stuff, so we tried to store away as much as we could - anything that doesn't get dusty in the first place won't have to be cleaned afterwards.
Another pressing job is cleaning up the hardware. When those windows were last painted ca. 1990 those incredibly incompetent morons were too f*ing lazy to mask the brass handles, so they just painted them white!
Unfortunately no one complained back then (I was 5 or 6, had I been older and more experienced I think I'd have make them lick off the paint!), so now we're stuck doing it ourselves. Removing the handles and cooking them sounds like a good idea... until you realise that they can't be removed. The brass handles have steel spindles like door knobs. Only there is no second knob with a set screw... the spindles were simply hammered flat on the outside to stay in place forever! (I once saw a window being completely trashed on a replacement job that's how I know... and yes, vinyl replacements are just as poupalr here as they are in the US).
My first attempt was scraping using something that won't scratch the brass. My eyes fell on an old geometry triangle with nice sharp plastic edges. It worked, at least to some extent. Where the paint was too thick; I still needed a metal scraper. Once the paint is removed, you're faced with very uneven and partially removed patina, so the brass needs to be polished (it was supposed to be polished every few weeks anyway, beautiful patina wasn't something for early 20th century housewives).
Our front windows (we have four of them) are tripartition casements with opening transoms. That makes 6 inner windows and 6 outers. With two handles each. That makes 12 handles per set, 24 per window. I don't need to do the inners (they won't be painted anytime soon) but it's still 36 handles (one window is sheltered enough it doesn't need to be painted, besides there's a large-ish balcony in front of it so we can paint it ourselves). I got my bedroom completely done last weekend and the "salon" stripped (but not polished) yesterday.
I tried the heat gun too, but mostly it just gummed up the paint instead of loosening it, so I went back to cold and dry scraping. I might try some 000 steel wool for cleanup today (my parent's bedroom window still has to be done).
You might ask yourself why I strip the hardware before the windows are repainted if I alreay suspect it might get painted over again... well a) stripping the hardware tends to damage the paint around the handles too. b) I absolutely don't want the painters to have ANY excuse for painting the hadware again! ("But it was painted, we thought it was supposed to be like that!") - they already DID slap on another coat on one window in our neighbor's apartment. So no, I absolutely don't trust them.
Now for some fun: about half an hour of hard work took this
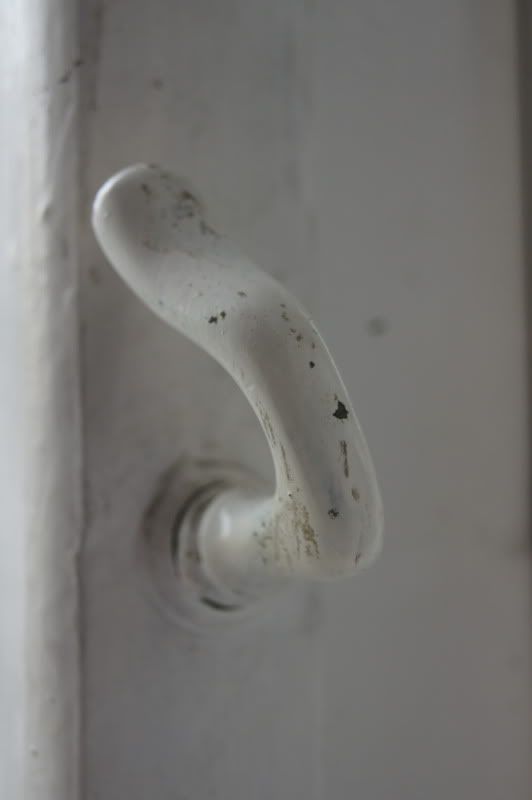
to this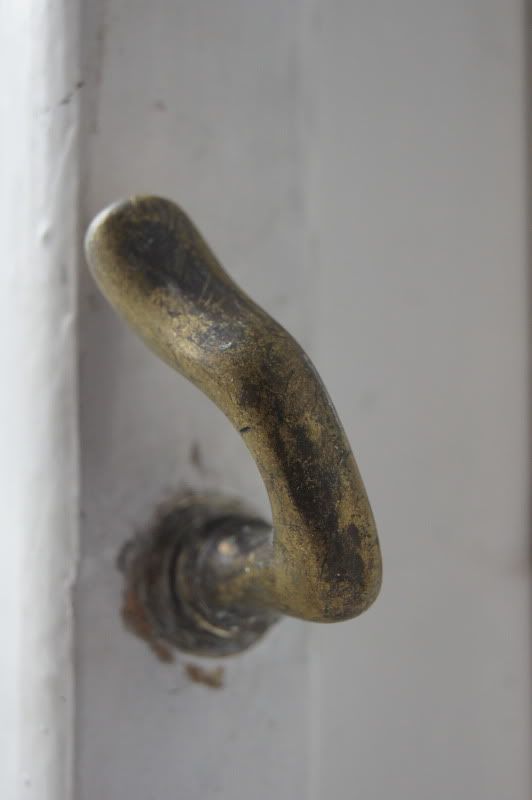
to this: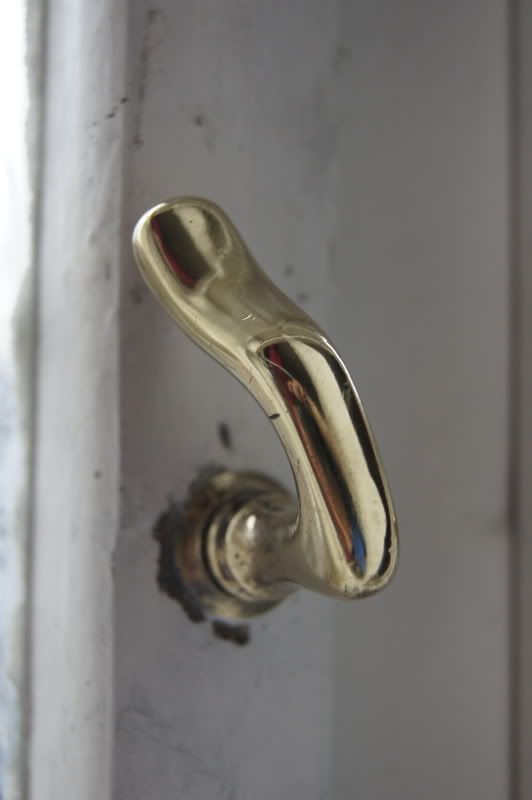
Much better, isn't it? (I'm talking about the handle, not Blogger formatting which keeps driving me up the wall...)
Nice view, isn't it? (the night after I took the picture it started to snow).
Then the painters tried to rig up a tarp held in place inside of the frame held in place with pieces of trim, but that didn't last too long, the wind ripped it to shreds the following night. Ah well... now they're done.Tomorrow they're scheduled to start on our apartment, which means the chaos is really going to invade our living space. The last weekends have been spent with frantic furniture moving (for example my brother had set up his drum set in front of the window) and general tidying up - for two reasons: a) we don't want the painters to think we're complete messies (and need to give them space for setting up ladders) and b) we don't want too much dust on our stuff, so we tried to store away as much as we could - anything that doesn't get dusty in the first place won't have to be cleaned afterwards.
Another pressing job is cleaning up the hardware. When those windows were last painted ca. 1990 those incredibly incompetent morons were too f*ing lazy to mask the brass handles, so they just painted them white!
Unfortunately no one complained back then (I was 5 or 6, had I been older and more experienced I think I'd have make them lick off the paint!), so now we're stuck doing it ourselves. Removing the handles and cooking them sounds like a good idea... until you realise that they can't be removed. The brass handles have steel spindles like door knobs. Only there is no second knob with a set screw... the spindles were simply hammered flat on the outside to stay in place forever! (I once saw a window being completely trashed on a replacement job that's how I know... and yes, vinyl replacements are just as poupalr here as they are in the US).
My first attempt was scraping using something that won't scratch the brass. My eyes fell on an old geometry triangle with nice sharp plastic edges. It worked, at least to some extent. Where the paint was too thick; I still needed a metal scraper. Once the paint is removed, you're faced with very uneven and partially removed patina, so the brass needs to be polished (it was supposed to be polished every few weeks anyway, beautiful patina wasn't something for early 20th century housewives).
Our front windows (we have four of them) are tripartition casements with opening transoms. That makes 6 inner windows and 6 outers. With two handles each. That makes 12 handles per set, 24 per window. I don't need to do the inners (they won't be painted anytime soon) but it's still 36 handles (one window is sheltered enough it doesn't need to be painted, besides there's a large-ish balcony in front of it so we can paint it ourselves). I got my bedroom completely done last weekend and the "salon" stripped (but not polished) yesterday.
I tried the heat gun too, but mostly it just gummed up the paint instead of loosening it, so I went back to cold and dry scraping. I might try some 000 steel wool for cleanup today (my parent's bedroom window still has to be done).
You might ask yourself why I strip the hardware before the windows are repainted if I alreay suspect it might get painted over again... well a) stripping the hardware tends to damage the paint around the handles too. b) I absolutely don't want the painters to have ANY excuse for painting the hadware again! ("But it was painted, we thought it was supposed to be like that!") - they already DID slap on another coat on one window in our neighbor's apartment. So no, I absolutely don't trust them.
Now for some fun: about half an hour of hard work took this
to this
to this:
Much better, isn't it? (I'm talking about the handle, not Blogger formatting which keeps driving me up the wall...)
Tuesday, November 23, 2010
Haaahaaaa...
Did I mention first week of November? The second week passed... and the only visible sign of progress? A few slaps of whitewash on the walls. I assume they were painted to provide some contrast for a level line yet to come. Now that's what I call real progress!
We did get to move some reclaimed wood flooring from Vienna up into the attic, as we need to empty out the wood shed in Vienna soon. It's in the way when construction for the new wood pellet storage room starts.
On a tangent: the wood shed contains: reclaimed oak flooring, reclaimed sleepers from said flooring (ranging from the usual 2x3s to real sturdy 2x6s), reclaimed subflooring and bunches of oak and beech herringbone parquet sticks (solid 1" thick wood). The beech is a total loss, it has been something like C grade to begin with, improperly milled tongues and grooves and everything, and wood-broring insects had their share of it too (sometimes invisible until you sand the floor). It's going to end up as firewood. Everything else will need a different place to store.
After carrying a bunch of floor boards up into the attic and stacking them onto the floor I reached for one of the low collar ties to get up. Only the collar tie didn't want me to do that - it simply broke. Rot of some kind. Great. A 3x4 that breaks like a toothpick.
Last Wednesday I could have slept in... if it hadn't been for a phone call at 7AM. It just kept ringing and ringing for more than a minute until Is tumbled out of bed to answer it.
"This is XY, we want to deliver the dumpster today!"
"Great, and what am I supposed to do now? Our mason ordered the dumpster, I didn't!"
"That's the only phone number I've got!"
"Alright, I don't have the slightest idea but I think the mason mentioned he wanted it in the driveway. Just put it there."
"Alright, we'll try to finde the address!"
"The house is real easy to find!" (this is what I was actually saying, what I was THINKING at that very moment was more like "How the f*ck could anyone possibly be dumb enough not to find THAT house?!? Let alone a local!")
"We'll try."
Then I went back to bed and slept until 10. At least it's a sign of progress... *sigh*
On a lighter note, in early december the outside of our windows in Vienna will be painted (at least those that need it, I already did a few myself). Of course early december is about the most stupid time to do something like that in a climate with high risk of frost in winter, but the guy in charge claims that for some financial voodoo reasons the money need sto be spent this year. Ah well... at least it finally gets done.
Other than that I'm currently pretty much out of commission from a bad cold.
We did get to move some reclaimed wood flooring from Vienna up into the attic, as we need to empty out the wood shed in Vienna soon. It's in the way when construction for the new wood pellet storage room starts.
On a tangent: the wood shed contains: reclaimed oak flooring, reclaimed sleepers from said flooring (ranging from the usual 2x3s to real sturdy 2x6s), reclaimed subflooring and bunches of oak and beech herringbone parquet sticks (solid 1" thick wood). The beech is a total loss, it has been something like C grade to begin with, improperly milled tongues and grooves and everything, and wood-broring insects had their share of it too (sometimes invisible until you sand the floor). It's going to end up as firewood. Everything else will need a different place to store.
After carrying a bunch of floor boards up into the attic and stacking them onto the floor I reached for one of the low collar ties to get up. Only the collar tie didn't want me to do that - it simply broke. Rot of some kind. Great. A 3x4 that breaks like a toothpick.
Last Wednesday I could have slept in... if it hadn't been for a phone call at 7AM. It just kept ringing and ringing for more than a minute until Is tumbled out of bed to answer it.
"This is XY, we want to deliver the dumpster today!"
"Great, and what am I supposed to do now? Our mason ordered the dumpster, I didn't!"
"That's the only phone number I've got!"
"Alright, I don't have the slightest idea but I think the mason mentioned he wanted it in the driveway. Just put it there."
"Alright, we'll try to finde the address!"
"The house is real easy to find!" (this is what I was actually saying, what I was THINKING at that very moment was more like "How the f*ck could anyone possibly be dumb enough not to find THAT house?!? Let alone a local!")
"We'll try."
Then I went back to bed and slept until 10. At least it's a sign of progress... *sigh*
On a lighter note, in early december the outside of our windows in Vienna will be painted (at least those that need it, I already did a few myself). Of course early december is about the most stupid time to do something like that in a climate with high risk of frost in winter, but the guy in charge claims that for some financial voodoo reasons the money need sto be spent this year. Ah well... at least it finally gets done.
Other than that I'm currently pretty much out of commission from a bad cold.
Tuesday, October 26, 2010
Phew...
Last Sunday was spent cleaning out the house again... well actually we moved all our tools and materials as well as the remaining 3 pieces of furniture into the front room. It looks a bit crowded now, especially with two big piles of debris on the floor (mostly broken adobe bricks and mud mortar, result of moving a doorway).
The first week of November our mason/concrete guy is going to fix one pretty bad wall and then pour a base slab of 2" concrete (non-reinforced) in all rooms except the front room. That means we finally get a sturdy, level floor to work on! Yay! Currently the whole house has dirt floors that are just soft enough to swallow ladder feet and nowhere near level or flat.
We also want to getsome estimates on several replacement casements or repair of the existing ones (the bathroom outers/storms are in seriously bad shape, probably served their time). In fact except for the two front windows seem to need more or less extensive wood repair (this opinion is likely to change as soon as we start to actually work on the front windows, they always look the worse the closer you look). Of course every single window needs to be reglazed, likely stripped and repainted. Currently not even the oolours match... the inside is mostly white with two reddish-browns strewn in, the exterior is a two-tone ochre-brown scheme (fugly!) on the front windows and reddish-brown on the side windows.
The next important step is getting the plumber to finish the plumbing and lay all gas pipes. Once they're in the wiring can be finished, two more door frames built and installed and we're ready for plaster!!! Then it's really going to look like a house again!
At least in some rooms that is. the original kitchen ceiling needs extensive repairs before we can close up anything there.
You can't imagine how happy I am now, expecting some real visible progress soon!
The first week of November our mason/concrete guy is going to fix one pretty bad wall and then pour a base slab of 2" concrete (non-reinforced) in all rooms except the front room. That means we finally get a sturdy, level floor to work on! Yay! Currently the whole house has dirt floors that are just soft enough to swallow ladder feet and nowhere near level or flat.
We also want to getsome estimates on several replacement casements or repair of the existing ones (the bathroom outers/storms are in seriously bad shape, probably served their time). In fact except for the two front windows seem to need more or less extensive wood repair (this opinion is likely to change as soon as we start to actually work on the front windows, they always look the worse the closer you look). Of course every single window needs to be reglazed, likely stripped and repainted. Currently not even the oolours match... the inside is mostly white with two reddish-browns strewn in, the exterior is a two-tone ochre-brown scheme (fugly!) on the front windows and reddish-brown on the side windows.
The next important step is getting the plumber to finish the plumbing and lay all gas pipes. Once they're in the wiring can be finished, two more door frames built and installed and we're ready for plaster!!! Then it's really going to look like a house again!
At least in some rooms that is. the original kitchen ceiling needs extensive repairs before we can close up anything there.
You can't imagine how happy I am now, expecting some real visible progress soon!
Friday, September 24, 2010
July was mostly spent traveling and relaxing, but August saw some serious work getting done. Unfortunately it was mostly restricted to tasks where it's really hard to see progress. In order to raise the door frames to a useful level we had to install new lintels. Installing those properly is a very time-consuming process, but we got it done.
In addition to that, the plumber finally got started on the hot and cold water lines. By now they should be done I hope, with the exception of the exterior hose connection which will have to run on top of the concrete subfloor. The drains need to be done too, the plumber apparently expected us to do that ourselves (we got started since we had intended to lay concrete much earlier, so we needed all drains in the floor done). He wanted to do some fancy PVC system, but we insisted on copper since every manufacturer of plastic pipes has his own patented system - what if you want to add onto the plumbing or repair 20 years down the road and the company no longer exists? Copper pipe ist standardised in the whole metric part of the globe and fittings will likely be around for quite a while.
Now for some pictures.
The original cold water line came up from the cellar in the back hall, next to the door leading into the kitchen. There is a good 1m of dirt between the cellar ceiling and the hall floor at that point. The water meter sits in a niche on the side of the cellar. What the original plumbers did in 1976 was to simply hammer the pipe down through the dirt until it bottomed out into the cellar. Unfortunately, at a later point, the cellar was partially rebuilt (that specific section now has a vaulted brick ceiling instead of being dug into the clay, an ancient way of building cellars that occasionally collapse), and the niche now has a concrete lintel above. So far this isn't really a problem, we could unscrew the old pipe from above, pull it out and use to hole to get the new copper pipe down. Unfortunately, there is more to the pipe than it seems. Before it goes through the lintel it bends twice and has a horizontal section. That makes it impossible to get out without digging deep down in the hall. After 25cm of rock hard clay we ditched that idea and decided to drill down into the cellar in the bathroom where it is much easier to get to.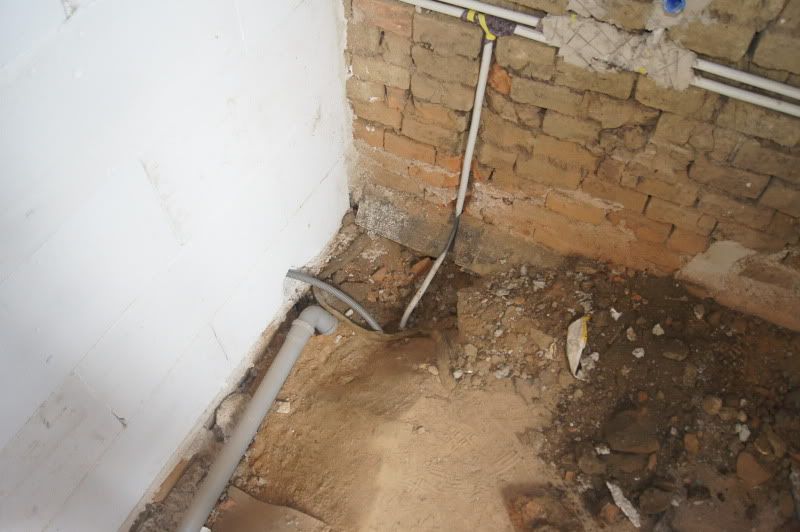
As you can see while we were at it we also installed conduit for a future light in the cellar.
So far there is none. Seriously!
The spot you're looking at is just below the tub, near the drain. All this is going to be covered with concrete, waterproofing and insulation, so technically this isn't really part of the bathroom (important because of the electric code).
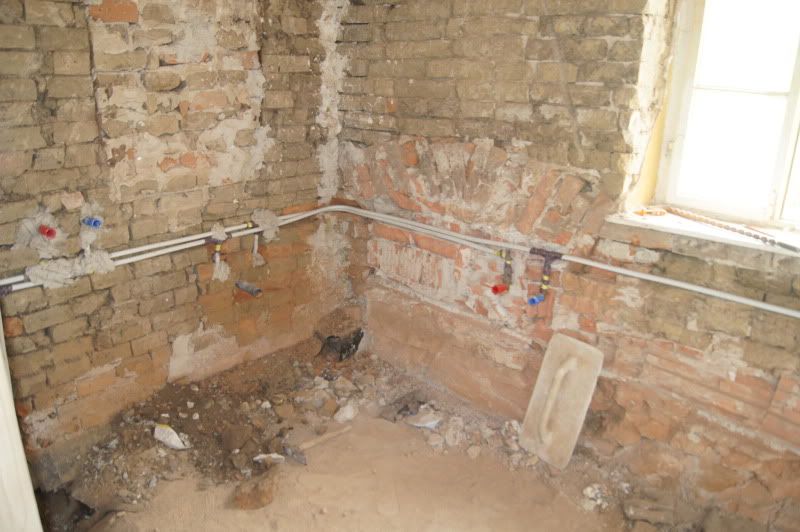
All other plumbing is in too, sink, washing machine, toilet and small sink in the WC.

Oh, and of course the first final door frame and door got installed (even though it's not done so far)!
Unfortunately it seems like I forgot to take a picture of that! Will be corrected the next time I get out there, promised!
In addition to that, the plumber finally got started on the hot and cold water lines. By now they should be done I hope, with the exception of the exterior hose connection which will have to run on top of the concrete subfloor. The drains need to be done too, the plumber apparently expected us to do that ourselves (we got started since we had intended to lay concrete much earlier, so we needed all drains in the floor done). He wanted to do some fancy PVC system, but we insisted on copper since every manufacturer of plastic pipes has his own patented system - what if you want to add onto the plumbing or repair 20 years down the road and the company no longer exists? Copper pipe ist standardised in the whole metric part of the globe and fittings will likely be around for quite a while.
Now for some pictures.
The original cold water line came up from the cellar in the back hall, next to the door leading into the kitchen. There is a good 1m of dirt between the cellar ceiling and the hall floor at that point. The water meter sits in a niche on the side of the cellar. What the original plumbers did in 1976 was to simply hammer the pipe down through the dirt until it bottomed out into the cellar. Unfortunately, at a later point, the cellar was partially rebuilt (that specific section now has a vaulted brick ceiling instead of being dug into the clay, an ancient way of building cellars that occasionally collapse), and the niche now has a concrete lintel above. So far this isn't really a problem, we could unscrew the old pipe from above, pull it out and use to hole to get the new copper pipe down. Unfortunately, there is more to the pipe than it seems. Before it goes through the lintel it bends twice and has a horizontal section. That makes it impossible to get out without digging deep down in the hall. After 25cm of rock hard clay we ditched that idea and decided to drill down into the cellar in the bathroom where it is much easier to get to.
As you can see while we were at it we also installed conduit for a future light in the cellar.
So far there is none. Seriously!
The spot you're looking at is just below the tub, near the drain. All this is going to be covered with concrete, waterproofing and insulation, so technically this isn't really part of the bathroom (important because of the electric code).
All other plumbing is in too, sink, washing machine, toilet and small sink in the WC.
Oh, and of course the first final door frame and door got installed (even though it's not done so far)!
Unfortunately it seems like I forgot to take a picture of that! Will be corrected the next time I get out there, promised!
Thursday, May 27, 2010
Progress and destruction
The walls grew again. And yes, they still aren't done! Typical 80% project I guess. The top section requires endless cuts which slow down things badly. Besides, the saw was dull again and after my dad tried to resharpen it with a file it didn't cut straight any more (in fact it never did, it was already bent when we found it, it was an awfully cheap saw from the PO who left it outside to rust) so things went from bad to worse. Given that you mortar those blocks using thinset cuts need to be pretty precise - you can't have large joints with that mucky stuff. Now try to make precise cuts using such a bad saw! Hours and hours went by and I got more and more annoyed.
Eventually I decided to take a break and do something else. What could be better for getting rid of frustration than some good old fashioned destruction? So I grabbed the electric hammer and chipped away at the cement plaster in the small room which needs to go - it's seriously bumpy, the surface is rough (apparently they couldn't be bothered using a finish coat, so they just troweled the base coat which is pretty coarse) and I don't care for scraping my skin when I happen to brush along a wall.
The wall across the door is the worst. The clay bricks disintegrate (actually some animals built burrows in there as though it were soil!) and the wall is moist. Cement plaster is awfully close to waterproof, so any moisture that got into the walls prior to the damp-proof course install was trapped. Probably that was actually the original intent, keep the room dry (it actually worked, this room never had any real musty smell), but apparently the 1970s construction guys didn't realise that this would ruin the walls - some of the clay bricks just crumble away. This will need extensive brickwork repair. On this wall the plaster is reinforced with chicken wire which makes demolition even harder. I did get the whole bottom section cleared out which is all I can do before the first stage of brick repair. Apparently the wall was in bad shape even before it was covered up with cement as the bottom was covered with a layer of upright bricks (I guess the front of the original clay bricks had just crumbled away). Whoever did that overdid it though and made the bottom part of the wall protrude - that's why the plaster job is so terrible here. The original walls seem to have been as flat, plumb and level as any old house gets, but subsequent "repairs" made them look like random field stone walls. On one hand I actually like that bumpy look, on the other hand I think it might be handier to get the walls closer to their original state again. The patches didn't hold up anyway, the cement plaster pulled them down in a death grip.
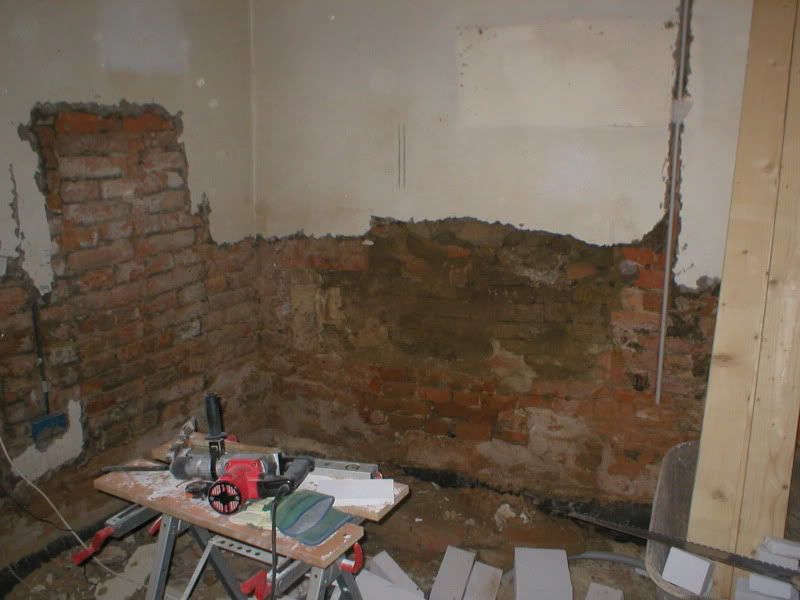
The exterior wall (left) has already been repaired or rebuilt using real brick so it didn't suffer any real damage, it just needs to dry out. We were told by several people that there had been a second entrance on that wall but opinions on the exact location differed. The bathroom window has already been ruled out, while it doesn't appear to be original it definitely wasn't a door - there is original adobe brickwork below. The small room seemed more likely for several reasons. A) if the back two rooms were once a separate "apartment" this would likely have been the kitchen and an entrance into the kitchen makes more sense than into the living/bedroom. B) The window is squeezed into a corner which looks really odd - however, if there were a door next to it it would look perfectly normal! C) the side alley slopes towards the street. The bathroom is above grade, whereas the small room is pretty much at grade level. Whacking down the plaster confirmed my suspicions.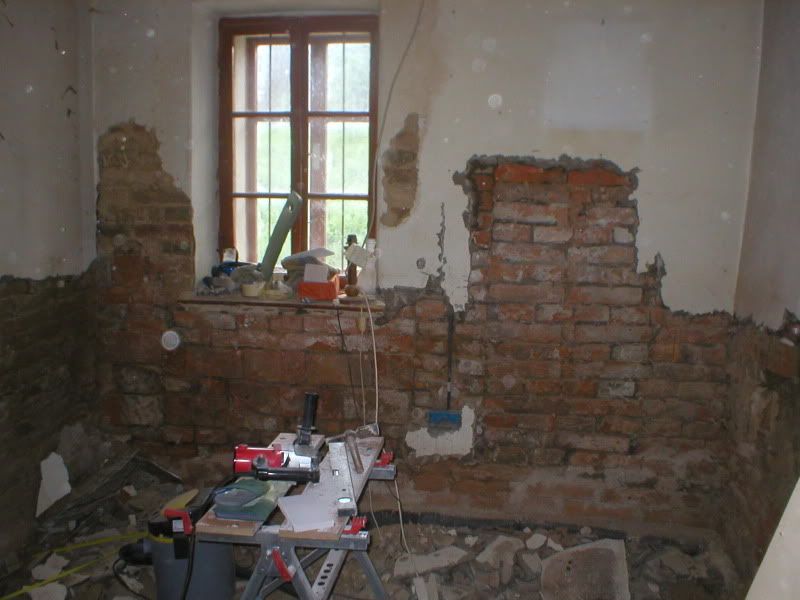
You can see a straight joint run vertically to the right of that outlet box. It's weird to see how that outlet would be perfectly centred between the door and window if there were a door, even though the door can't have been there any more when the socket was installed!
Where the exterior wall meets the bathroom wall on the right the plaster had a big crack ever since the damp-proof course was installed. Now I know why. When I got close to that wall the leverage of the hard plaster made that interior wall move! Basically it's no longer connected to the exterior wall and pretty wobbly. While the bathroom side of the adobe bricks still looks pretty good, this side suffered and is crumbling. More masonry repair! Worst case we can still take down that section of wall (it's not load-bearing) and rebuild it.
Next to the window you can see some discoloured plaster. This is where they left the older lime plaster in place. Now for some odd reason moisture condensates on this part of the wall in winter (and only on this section) and of course stains the surface. Seeing this actually got us to remove the entire plaster here (for the purists who cringe at reading that (I definitely would if I did without any background info): NONE of the plaster in this room was original! The lime plaster is probably 1930s or something like that and the cement plaster is 1976. We are going to replace all this plaster, either with lime or clay plaster, so in the end it's going to be more original than before).
Pretty early on I suddenly saw the chisel fall and hit the floor. Initially I suspected a faulty SDS+ chuck but in fact the chisel had snapped right off! The break is perfectly smooth, almost like a saw cut and I suspect a production fault (this wasn't exactly a quality tool). Getting the broken chisel out just by gravity (i.e. releasing the chuck holding the machine upside down) didn't work, so I put it aside and used the other hammer, a dirt cheap Chinese Hitachi ripoff (in fact I think they bought the rights for a 1970s design and just kept building it forever, these things are heavy but lack a few core features - they are not designed for continuous operation, so you have to hold the trigger all the time and you can't lock the chisel - you can turn off the motor but the chisel will twist on its own so you occasionally have to bring it back into the ideal operating position which is annoying). When I finally called it a day I took the good Bosch hammer to a nicer place (my grandmother's house across the street) where I could sit down and surgically remove the chisel remnants under good light. I ended up pushing two small flat screwdrivers into the grooves of the bit, then squeezing them together (needle nose pliers were too big to get in there).
The next day we went back to the wall. We could actually borrow a proper saw designed for that purpose (with very big, hardened teeth) which sped up things considerably. We are ALMOST done.
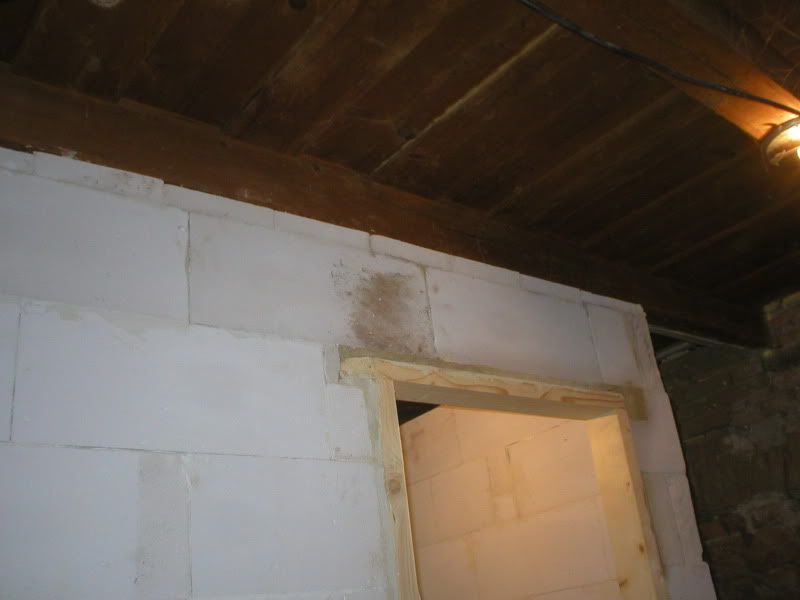 This section between hallway and bathroom (looking through the doorway into the bathroom) is done.
The section above the WC door is almost done, the two top right blocks are cut to size but not yet mortared. That's about 5-10 minutes of work though.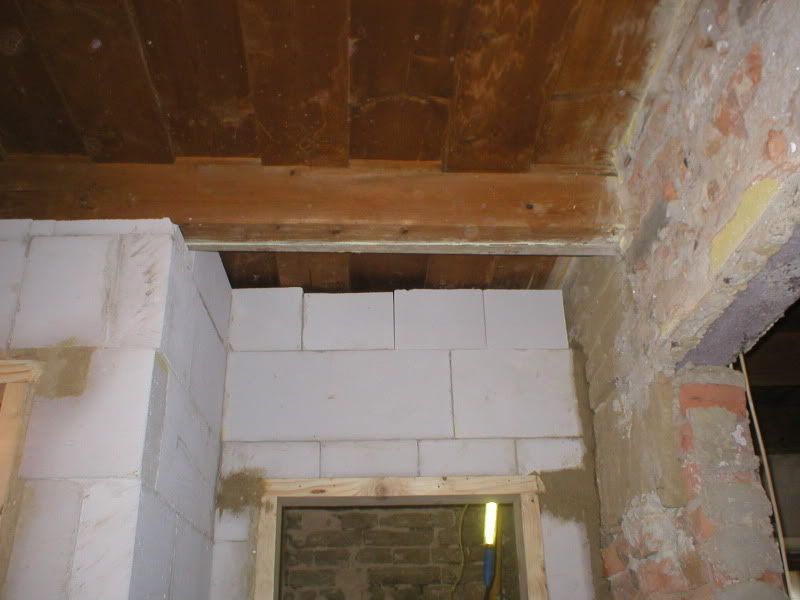
Between the bathroom and WC there are another 2 blocks missing that need to be cut but in total we'Re very close to getting done. We still need to tie up some loose ends on the drains, but then the concrete subfloor can go in! (right now the whole house has dirt floors except for a leftover section of plank flooring in the big room).
Then it's time for plumbing and wiring!
Looking into the bathroom:
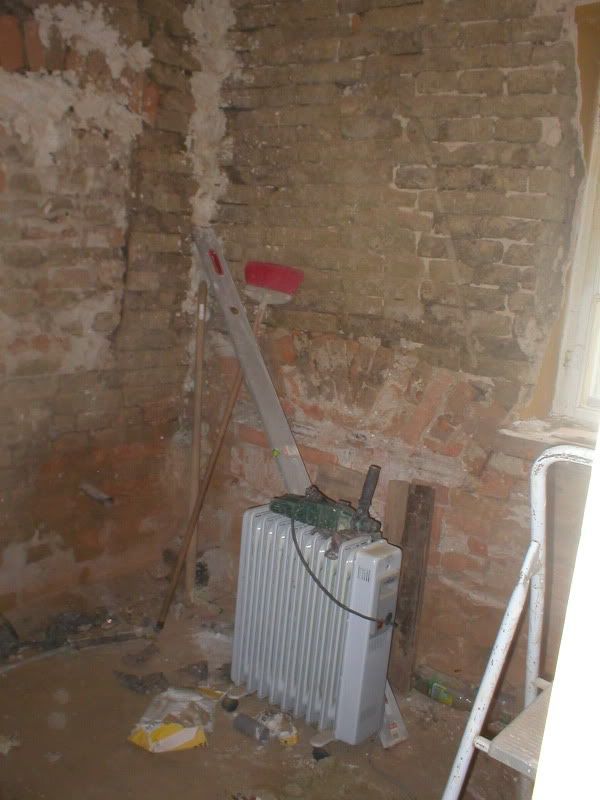
The window can be seen at the far right side of the picture. Tub is going in along the left-hand wall, sink between tub and window. Before any of that can happen a lot of work has to be done.
Eventually I decided to take a break and do something else. What could be better for getting rid of frustration than some good old fashioned destruction? So I grabbed the electric hammer and chipped away at the cement plaster in the small room which needs to go - it's seriously bumpy, the surface is rough (apparently they couldn't be bothered using a finish coat, so they just troweled the base coat which is pretty coarse) and I don't care for scraping my skin when I happen to brush along a wall.
The wall across the door is the worst. The clay bricks disintegrate (actually some animals built burrows in there as though it were soil!) and the wall is moist. Cement plaster is awfully close to waterproof, so any moisture that got into the walls prior to the damp-proof course install was trapped. Probably that was actually the original intent, keep the room dry (it actually worked, this room never had any real musty smell), but apparently the 1970s construction guys didn't realise that this would ruin the walls - some of the clay bricks just crumble away. This will need extensive brickwork repair. On this wall the plaster is reinforced with chicken wire which makes demolition even harder. I did get the whole bottom section cleared out which is all I can do before the first stage of brick repair. Apparently the wall was in bad shape even before it was covered up with cement as the bottom was covered with a layer of upright bricks (I guess the front of the original clay bricks had just crumbled away). Whoever did that overdid it though and made the bottom part of the wall protrude - that's why the plaster job is so terrible here. The original walls seem to have been as flat, plumb and level as any old house gets, but subsequent "repairs" made them look like random field stone walls. On one hand I actually like that bumpy look, on the other hand I think it might be handier to get the walls closer to their original state again. The patches didn't hold up anyway, the cement plaster pulled them down in a death grip.
The exterior wall (left) has already been repaired or rebuilt using real brick so it didn't suffer any real damage, it just needs to dry out. We were told by several people that there had been a second entrance on that wall but opinions on the exact location differed. The bathroom window has already been ruled out, while it doesn't appear to be original it definitely wasn't a door - there is original adobe brickwork below. The small room seemed more likely for several reasons. A) if the back two rooms were once a separate "apartment" this would likely have been the kitchen and an entrance into the kitchen makes more sense than into the living/bedroom. B) The window is squeezed into a corner which looks really odd - however, if there were a door next to it it would look perfectly normal! C) the side alley slopes towards the street. The bathroom is above grade, whereas the small room is pretty much at grade level. Whacking down the plaster confirmed my suspicions.
You can see a straight joint run vertically to the right of that outlet box. It's weird to see how that outlet would be perfectly centred between the door and window if there were a door, even though the door can't have been there any more when the socket was installed!
Where the exterior wall meets the bathroom wall on the right the plaster had a big crack ever since the damp-proof course was installed. Now I know why. When I got close to that wall the leverage of the hard plaster made that interior wall move! Basically it's no longer connected to the exterior wall and pretty wobbly. While the bathroom side of the adobe bricks still looks pretty good, this side suffered and is crumbling. More masonry repair! Worst case we can still take down that section of wall (it's not load-bearing) and rebuild it.
Next to the window you can see some discoloured plaster. This is where they left the older lime plaster in place. Now for some odd reason moisture condensates on this part of the wall in winter (and only on this section) and of course stains the surface. Seeing this actually got us to remove the entire plaster here (for the purists who cringe at reading that (I definitely would if I did without any background info): NONE of the plaster in this room was original! The lime plaster is probably 1930s or something like that and the cement plaster is 1976. We are going to replace all this plaster, either with lime or clay plaster, so in the end it's going to be more original than before).
Pretty early on I suddenly saw the chisel fall and hit the floor. Initially I suspected a faulty SDS+ chuck but in fact the chisel had snapped right off! The break is perfectly smooth, almost like a saw cut and I suspect a production fault (this wasn't exactly a quality tool). Getting the broken chisel out just by gravity (i.e. releasing the chuck holding the machine upside down) didn't work, so I put it aside and used the other hammer, a dirt cheap Chinese Hitachi ripoff (in fact I think they bought the rights for a 1970s design and just kept building it forever, these things are heavy but lack a few core features - they are not designed for continuous operation, so you have to hold the trigger all the time and you can't lock the chisel - you can turn off the motor but the chisel will twist on its own so you occasionally have to bring it back into the ideal operating position which is annoying). When I finally called it a day I took the good Bosch hammer to a nicer place (my grandmother's house across the street) where I could sit down and surgically remove the chisel remnants under good light. I ended up pushing two small flat screwdrivers into the grooves of the bit, then squeezing them together (needle nose pliers were too big to get in there).
The next day we went back to the wall. We could actually borrow a proper saw designed for that purpose (with very big, hardened teeth) which sped up things considerably. We are ALMOST done.
This section between hallway and bathroom (looking through the doorway into the bathroom) is done.The section above the WC door is almost done, the two top right blocks are cut to size but not yet mortared. That's about 5-10 minutes of work though.
Between the bathroom and WC there are another 2 blocks missing that need to be cut but in total we'Re very close to getting done. We still need to tie up some loose ends on the drains, but then the concrete subfloor can go in! (right now the whole house has dirt floors except for a leftover section of plank flooring in the big room).
Then it's time for plumbing and wiring!
Looking into the bathroom:
The window can be seen at the far right side of the picture. Tub is going in along the left-hand wall, sink between tub and window. Before any of that can happen a lot of work has to be done.
Subscribe to:
Posts (Atom)