Did I mention first week of November? The second week passed... and the only visible sign of progress? A few slaps of whitewash on the walls. I assume they were painted to provide some contrast for a level line yet to come. Now that's what I call real progress!
We did get to move some reclaimed wood flooring from Vienna up into the attic, as we need to empty out the wood shed in Vienna soon. It's in the way when construction for the new wood pellet storage room starts.
On a tangent: the wood shed contains: reclaimed oak flooring, reclaimed sleepers from said flooring (ranging from the usual 2x3s to real sturdy 2x6s), reclaimed subflooring and bunches of oak and beech herringbone parquet sticks (solid 1" thick wood). The beech is a total loss, it has been something like C grade to begin with, improperly milled tongues and grooves and everything, and wood-broring insects had their share of it too (sometimes invisible until you sand the floor). It's going to end up as firewood. Everything else will need a different place to store.
After carrying a bunch of floor boards up into the attic and stacking them onto the floor I reached for one of the low collar ties to get up. Only the collar tie didn't want me to do that - it simply broke. Rot of some kind. Great. A 3x4 that breaks like a toothpick.
Last Wednesday I could have slept in... if it hadn't been for a phone call at 7AM. It just kept ringing and ringing for more than a minute until Is tumbled out of bed to answer it.
"This is XY, we want to deliver the dumpster today!"
"Great, and what am I supposed to do now? Our mason ordered the dumpster, I didn't!"
"That's the only phone number I've got!"
"Alright, I don't have the slightest idea but I think the mason mentioned he wanted it in the driveway. Just put it there."
"Alright, we'll try to finde the address!"
"The house is real easy to find!" (this is what I was actually saying, what I was THINKING at that very moment was more like "How the f*ck could anyone possibly be dumb enough not to find THAT house?!? Let alone a local!")
"We'll try."
Then I went back to bed and slept until 10. At least it's a sign of progress... *sigh*
On a lighter note, in early december the outside of our windows in Vienna will be painted (at least those that need it, I already did a few myself). Of course early december is about the most stupid time to do something like that in a climate with high risk of frost in winter, but the guy in charge claims that for some financial voodoo reasons the money need sto be spent this year. Ah well... at least it finally gets done.
Other than that I'm currently pretty much out of commission from a bad cold.
Tuesday, November 23, 2010
Tuesday, October 26, 2010
Phew...
Last Sunday was spent cleaning out the house again... well actually we moved all our tools and materials as well as the remaining 3 pieces of furniture into the front room. It looks a bit crowded now, especially with two big piles of debris on the floor (mostly broken adobe bricks and mud mortar, result of moving a doorway).
The first week of November our mason/concrete guy is going to fix one pretty bad wall and then pour a base slab of 2" concrete (non-reinforced) in all rooms except the front room. That means we finally get a sturdy, level floor to work on! Yay! Currently the whole house has dirt floors that are just soft enough to swallow ladder feet and nowhere near level or flat.
We also want to getsome estimates on several replacement casements or repair of the existing ones (the bathroom outers/storms are in seriously bad shape, probably served their time). In fact except for the two front windows seem to need more or less extensive wood repair (this opinion is likely to change as soon as we start to actually work on the front windows, they always look the worse the closer you look). Of course every single window needs to be reglazed, likely stripped and repainted. Currently not even the oolours match... the inside is mostly white with two reddish-browns strewn in, the exterior is a two-tone ochre-brown scheme (fugly!) on the front windows and reddish-brown on the side windows.
The next important step is getting the plumber to finish the plumbing and lay all gas pipes. Once they're in the wiring can be finished, two more door frames built and installed and we're ready for plaster!!! Then it's really going to look like a house again!
At least in some rooms that is. the original kitchen ceiling needs extensive repairs before we can close up anything there.
You can't imagine how happy I am now, expecting some real visible progress soon!
Friday, September 24, 2010
July was mostly spent traveling and relaxing, but August saw some serious work getting done. Unfortunately it was mostly restricted to tasks where it's really hard to see progress. In order to raise the door frames to a useful level we had to install new lintels. Installing those properly is a very time-consuming process, but we got it done.
In addition to that, the plumber finally got started on the hot and cold water lines. By now they should be done I hope, with the exception of the exterior hose connection which will have to run on top of the concrete subfloor. The drains need to be done too, the plumber apparently expected us to do that ourselves (we got started since we had intended to lay concrete much earlier, so we needed all drains in the floor done). He wanted to do some fancy PVC system, but we insisted on copper since every manufacturer of plastic pipes has his own patented system - what if you want to add onto the plumbing or repair 20 years down the road and the company no longer exists? Copper pipe ist standardised in the whole metric part of the globe and fittings will likely be around for quite a while.
Now for some pictures.
The original cold water line came up from the cellar in the back hall, next to the door leading into the kitchen. There is a good 1m of dirt between the cellar ceiling and the hall floor at that point. The water meter sits in a niche on the side of the cellar. What the original plumbers did in 1976 was to simply hammer the pipe down through the dirt until it bottomed out into the cellar. Unfortunately, at a later point, the cellar was partially rebuilt (that specific section now has a vaulted brick ceiling instead of being dug into the clay, an ancient way of building cellars that occasionally collapse), and the niche now has a concrete lintel above. So far this isn't really a problem, we could unscrew the old pipe from above, pull it out and use to hole to get the new copper pipe down. Unfortunately, there is more to the pipe than it seems. Before it goes through the lintel it bends twice and has a horizontal section. That makes it impossible to get out without digging deep down in the hall. After 25cm of rock hard clay we ditched that idea and decided to drill down into the cellar in the bathroom where it is much easier to get to.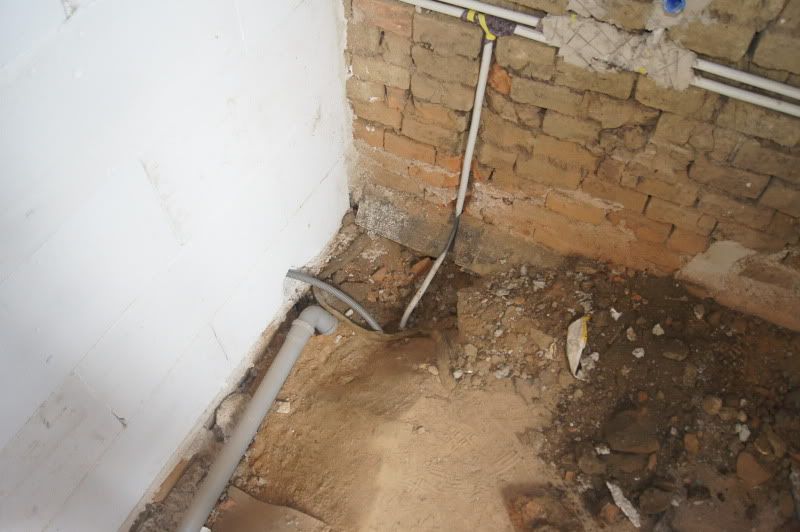
As you can see while we were at it we also installed conduit for a future light in the cellar.
So far there is none. Seriously!
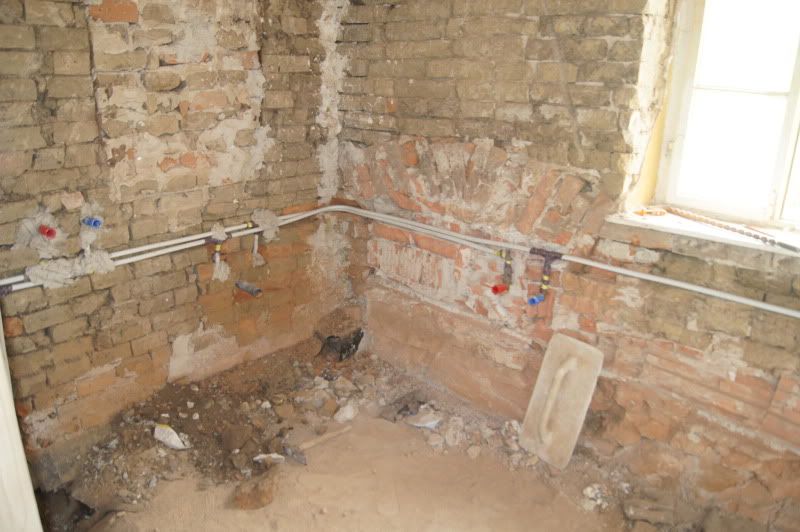
The spot you're looking at is just below the tub, near the drain. All this is going to be covered with concrete, waterproofing and insulation, so technically this isn't really part of the bathroom (important because of the electric code).
All other plumbing is in too, sink, washing machine, toilet and small sink in the WC.

Oh, and of course the first final door frame and door got installed (even though it's not done so far)!
Unfortunately it seems like I forgot to take a picture of that! Will be corrected the next time I get out there, promised!
In addition to that, the plumber finally got started on the hot and cold water lines. By now they should be done I hope, with the exception of the exterior hose connection which will have to run on top of the concrete subfloor. The drains need to be done too, the plumber apparently expected us to do that ourselves (we got started since we had intended to lay concrete much earlier, so we needed all drains in the floor done). He wanted to do some fancy PVC system, but we insisted on copper since every manufacturer of plastic pipes has his own patented system - what if you want to add onto the plumbing or repair 20 years down the road and the company no longer exists? Copper pipe ist standardised in the whole metric part of the globe and fittings will likely be around for quite a while.
Now for some pictures.
The original cold water line came up from the cellar in the back hall, next to the door leading into the kitchen. There is a good 1m of dirt between the cellar ceiling and the hall floor at that point. The water meter sits in a niche on the side of the cellar. What the original plumbers did in 1976 was to simply hammer the pipe down through the dirt until it bottomed out into the cellar. Unfortunately, at a later point, the cellar was partially rebuilt (that specific section now has a vaulted brick ceiling instead of being dug into the clay, an ancient way of building cellars that occasionally collapse), and the niche now has a concrete lintel above. So far this isn't really a problem, we could unscrew the old pipe from above, pull it out and use to hole to get the new copper pipe down. Unfortunately, there is more to the pipe than it seems. Before it goes through the lintel it bends twice and has a horizontal section. That makes it impossible to get out without digging deep down in the hall. After 25cm of rock hard clay we ditched that idea and decided to drill down into the cellar in the bathroom where it is much easier to get to.
As you can see while we were at it we also installed conduit for a future light in the cellar.
So far there is none. Seriously!
The spot you're looking at is just below the tub, near the drain. All this is going to be covered with concrete, waterproofing and insulation, so technically this isn't really part of the bathroom (important because of the electric code).
All other plumbing is in too, sink, washing machine, toilet and small sink in the WC.
Oh, and of course the first final door frame and door got installed (even though it's not done so far)!
Unfortunately it seems like I forgot to take a picture of that! Will be corrected the next time I get out there, promised!
Thursday, May 27, 2010
Progress and destruction
The walls grew again. And yes, they still aren't done! Typical 80% project I guess. The top section requires endless cuts which slow down things badly. Besides, the saw was dull again and after my dad tried to resharpen it with a file it didn't cut straight any more (in fact it never did, it was already bent when we found it, it was an awfully cheap saw from the PO who left it outside to rust) so things went from bad to worse. Given that you mortar those blocks using thinset cuts need to be pretty precise - you can't have large joints with that mucky stuff. Now try to make precise cuts using such a bad saw! Hours and hours went by and I got more and more annoyed.
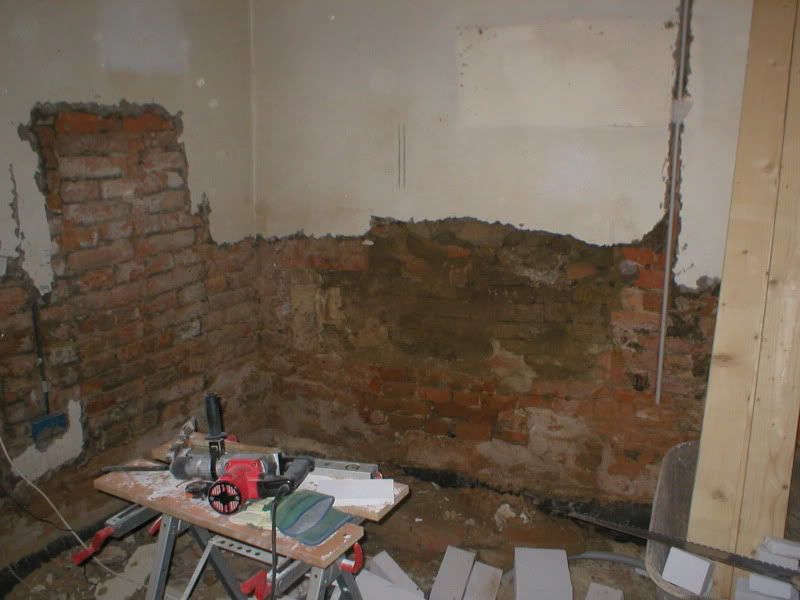
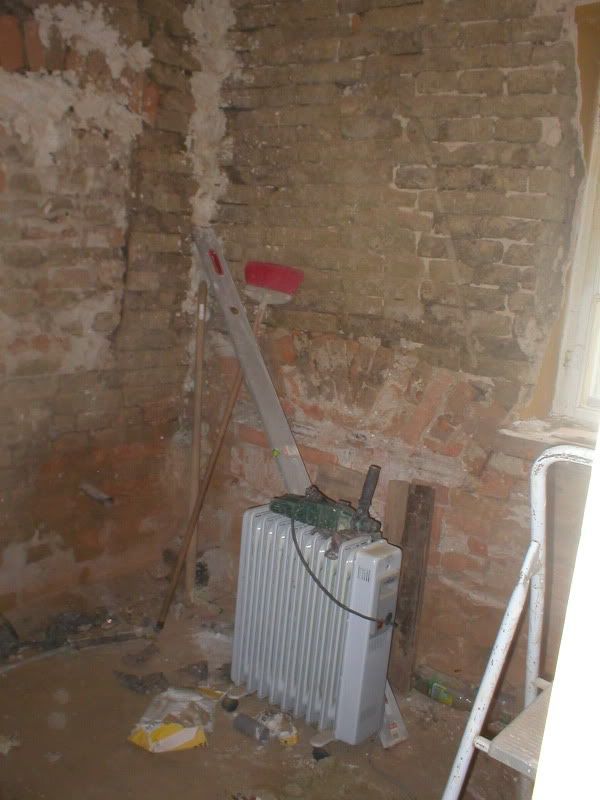
Eventually I decided to take a break and do something else. What could be better for getting rid of frustration than some good old fashioned destruction? So I grabbed the electric hammer and chipped away at the cement plaster in the small room which needs to go - it's seriously bumpy, the surface is rough (apparently they couldn't be bothered using a finish coat, so they just troweled the base coat which is pretty coarse) and I don't care for scraping my skin when I happen to brush along a wall.
The wall across the door is the worst. The clay bricks disintegrate (actually some animals built burrows in there as though it were soil!) and the wall is moist. Cement plaster is awfully close to waterproof, so any moisture that got into the walls prior to the damp-proof course install was trapped. Probably that was actually the original intent, keep the room dry (it actually worked, this room never had any real musty smell), but apparently the 1970s construction guys didn't realise that this would ruin the walls - some of the clay bricks just crumble away. This will need extensive brickwork repair. On this wall the plaster is reinforced with chicken wire which makes demolition even harder. I did get the whole bottom section cleared out which is all I can do before the first stage of brick repair. Apparently the wall was in bad shape even before it was covered up with cement as the bottom was covered with a layer of upright bricks (I guess the front of the original clay bricks had just crumbled away). Whoever did that overdid it though and made the bottom part of the wall protrude - that's why the plaster job is so terrible here. The original walls seem to have been as flat, plumb and level as any old house gets, but subsequent "repairs" made them look like random field stone walls. On one hand I actually like that bumpy look, on the other hand I think it might be handier to get the walls closer to their original state again. The patches didn't hold up anyway, the cement plaster pulled them down in a death grip.
The exterior wall (left) has already been repaired or rebuilt using real brick so it didn't suffer any real damage, it just needs to dry out. We were told by several people that there had been a second entrance on that wall but opinions on the exact location differed. The bathroom window has already been ruled out, while it doesn't appear to be original it definitely wasn't a door - there is original adobe brickwork below. The small room seemed more likely for several reasons. A) if the back two rooms were once a separate "apartment" this would likely have been the kitchen and an entrance into the kitchen makes more sense than into the living/bedroom. B) The window is squeezed into a corner which looks really odd - however, if there were a door next to it it would look perfectly normal! C) the side alley slopes towards the street. The bathroom is above grade, whereas the small room is pretty much at grade level. Whacking down the plaster confirmed my suspicions.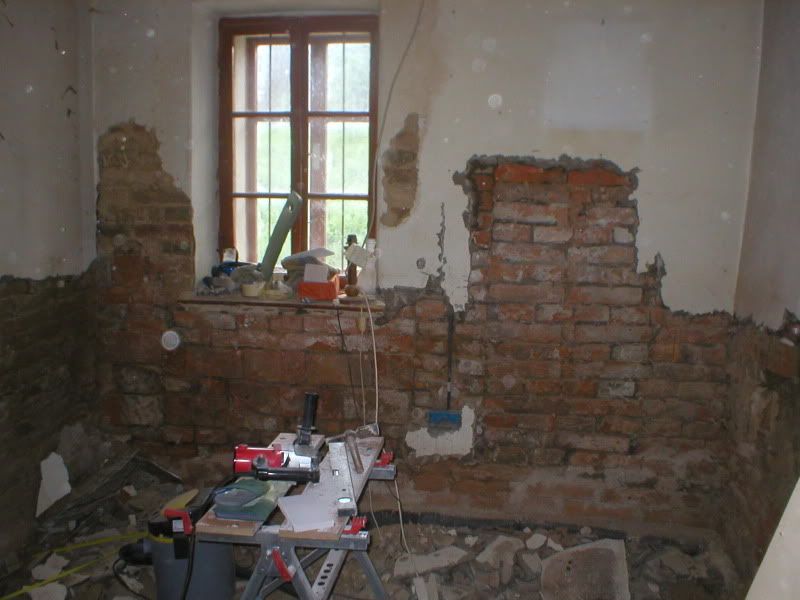
You can see a straight joint run vertically to the right of that outlet box. It's weird to see how that outlet would be perfectly centred between the door and window if there were a door, even though the door can't have been there any more when the socket was installed!
Where the exterior wall meets the bathroom wall on the right the plaster had a big crack ever since the damp-proof course was installed. Now I know why. When I got close to that wall the leverage of the hard plaster made that interior wall move! Basically it's no longer connected to the exterior wall and pretty wobbly. While the bathroom side of the adobe bricks still looks pretty good, this side suffered and is crumbling. More masonry repair! Worst case we can still take down that section of wall (it's not load-bearing) and rebuild it.
Next to the window you can see some discoloured plaster. This is where they left the older lime plaster in place. Now for some odd reason moisture condensates on this part of the wall in winter (and only on this section) and of course stains the surface. Seeing this actually got us to remove the entire plaster here (for the purists who cringe at reading that (I definitely would if I did without any background info): NONE of the plaster in this room was original! The lime plaster is probably 1930s or something like that and the cement plaster is 1976. We are going to replace all this plaster, either with lime or clay plaster, so in the end it's going to be more original than before).
Pretty early on I suddenly saw the chisel fall and hit the floor. Initially I suspected a faulty SDS+ chuck but in fact the chisel had snapped right off! The break is perfectly smooth, almost like a saw cut and I suspect a production fault (this wasn't exactly a quality tool). Getting the broken chisel out just by gravity (i.e. releasing the chuck holding the machine upside down) didn't work, so I put it aside and used the other hammer, a dirt cheap Chinese Hitachi ripoff (in fact I think they bought the rights for a 1970s design and just kept building it forever, these things are heavy but lack a few core features - they are not designed for continuous operation, so you have to hold the trigger all the time and you can't lock the chisel - you can turn off the motor but the chisel will twist on its own so you occasionally have to bring it back into the ideal operating position which is annoying). When I finally called it a day I took the good Bosch hammer to a nicer place (my grandmother's house across the street) where I could sit down and surgically remove the chisel remnants under good light. I ended up pushing two small flat screwdrivers into the grooves of the bit, then squeezing them together (needle nose pliers were too big to get in there).
The next day we went back to the wall. We could actually borrow a proper saw designed for that purpose (with very big, hardened teeth) which sped up things considerably. We are ALMOST done.
 This section between hallway and bathroom (looking through the doorway into the bathroom) is done.
The section above the WC door is almost done, the two top right blocks are cut to size but not yet mortared. That's about 5-10 minutes of work though.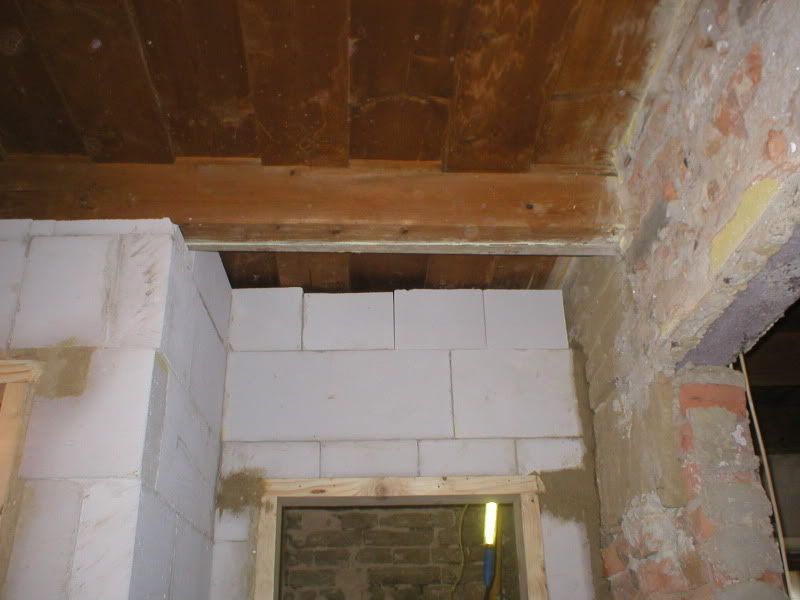
Between the bathroom and WC there are another 2 blocks missing that need to be cut but in total we'Re very close to getting done. We still need to tie up some loose ends on the drains, but then the concrete subfloor can go in! (right now the whole house has dirt floors except for a leftover section of plank flooring in the big room).
Then it's time for plumbing and wiring!
Looking into the bathroom:
The window can be seen at the far right side of the picture. Tub is going in along the left-hand wall, sink between tub and window. Before any of that can happen a lot of work has to be done.
Eventually I decided to take a break and do something else. What could be better for getting rid of frustration than some good old fashioned destruction? So I grabbed the electric hammer and chipped away at the cement plaster in the small room which needs to go - it's seriously bumpy, the surface is rough (apparently they couldn't be bothered using a finish coat, so they just troweled the base coat which is pretty coarse) and I don't care for scraping my skin when I happen to brush along a wall.
The wall across the door is the worst. The clay bricks disintegrate (actually some animals built burrows in there as though it were soil!) and the wall is moist. Cement plaster is awfully close to waterproof, so any moisture that got into the walls prior to the damp-proof course install was trapped. Probably that was actually the original intent, keep the room dry (it actually worked, this room never had any real musty smell), but apparently the 1970s construction guys didn't realise that this would ruin the walls - some of the clay bricks just crumble away. This will need extensive brickwork repair. On this wall the plaster is reinforced with chicken wire which makes demolition even harder. I did get the whole bottom section cleared out which is all I can do before the first stage of brick repair. Apparently the wall was in bad shape even before it was covered up with cement as the bottom was covered with a layer of upright bricks (I guess the front of the original clay bricks had just crumbled away). Whoever did that overdid it though and made the bottom part of the wall protrude - that's why the plaster job is so terrible here. The original walls seem to have been as flat, plumb and level as any old house gets, but subsequent "repairs" made them look like random field stone walls. On one hand I actually like that bumpy look, on the other hand I think it might be handier to get the walls closer to their original state again. The patches didn't hold up anyway, the cement plaster pulled them down in a death grip.
The exterior wall (left) has already been repaired or rebuilt using real brick so it didn't suffer any real damage, it just needs to dry out. We were told by several people that there had been a second entrance on that wall but opinions on the exact location differed. The bathroom window has already been ruled out, while it doesn't appear to be original it definitely wasn't a door - there is original adobe brickwork below. The small room seemed more likely for several reasons. A) if the back two rooms were once a separate "apartment" this would likely have been the kitchen and an entrance into the kitchen makes more sense than into the living/bedroom. B) The window is squeezed into a corner which looks really odd - however, if there were a door next to it it would look perfectly normal! C) the side alley slopes towards the street. The bathroom is above grade, whereas the small room is pretty much at grade level. Whacking down the plaster confirmed my suspicions.
You can see a straight joint run vertically to the right of that outlet box. It's weird to see how that outlet would be perfectly centred between the door and window if there were a door, even though the door can't have been there any more when the socket was installed!
Where the exterior wall meets the bathroom wall on the right the plaster had a big crack ever since the damp-proof course was installed. Now I know why. When I got close to that wall the leverage of the hard plaster made that interior wall move! Basically it's no longer connected to the exterior wall and pretty wobbly. While the bathroom side of the adobe bricks still looks pretty good, this side suffered and is crumbling. More masonry repair! Worst case we can still take down that section of wall (it's not load-bearing) and rebuild it.
Next to the window you can see some discoloured plaster. This is where they left the older lime plaster in place. Now for some odd reason moisture condensates on this part of the wall in winter (and only on this section) and of course stains the surface. Seeing this actually got us to remove the entire plaster here (for the purists who cringe at reading that (I definitely would if I did without any background info): NONE of the plaster in this room was original! The lime plaster is probably 1930s or something like that and the cement plaster is 1976. We are going to replace all this plaster, either with lime or clay plaster, so in the end it's going to be more original than before).
Pretty early on I suddenly saw the chisel fall and hit the floor. Initially I suspected a faulty SDS+ chuck but in fact the chisel had snapped right off! The break is perfectly smooth, almost like a saw cut and I suspect a production fault (this wasn't exactly a quality tool). Getting the broken chisel out just by gravity (i.e. releasing the chuck holding the machine upside down) didn't work, so I put it aside and used the other hammer, a dirt cheap Chinese Hitachi ripoff (in fact I think they bought the rights for a 1970s design and just kept building it forever, these things are heavy but lack a few core features - they are not designed for continuous operation, so you have to hold the trigger all the time and you can't lock the chisel - you can turn off the motor but the chisel will twist on its own so you occasionally have to bring it back into the ideal operating position which is annoying). When I finally called it a day I took the good Bosch hammer to a nicer place (my grandmother's house across the street) where I could sit down and surgically remove the chisel remnants under good light. I ended up pushing two small flat screwdrivers into the grooves of the bit, then squeezing them together (needle nose pliers were too big to get in there).
The next day we went back to the wall. We could actually borrow a proper saw designed for that purpose (with very big, hardened teeth) which sped up things considerably. We are ALMOST done.
This section between hallway and bathroom (looking through the doorway into the bathroom) is done.The section above the WC door is almost done, the two top right blocks are cut to size but not yet mortared. That's about 5-10 minutes of work though.
Between the bathroom and WC there are another 2 blocks missing that need to be cut but in total we'Re very close to getting done. We still need to tie up some loose ends on the drains, but then the concrete subfloor can go in! (right now the whole house has dirt floors except for a leftover section of plank flooring in the big room).
Then it's time for plumbing and wiring!
Looking into the bathroom:
The window can be seen at the far right side of the picture. Tub is going in along the left-hand wall, sink between tub and window. Before any of that can happen a lot of work has to be done.
Thursday, May 20, 2010
Small update
Not much going on right now. The walls grew a bit taller but still aren't finished. The next steps are removing plaster in the small room and the remaining wood floor in the big room, finish up the wiring in the big room. Then that's ready for plaster. One room at least...
As far as the bathroo is concerned we need to get the plumbing done quickly. Before the gas and water pipes are in I can't really do any more wiring as I don't want to interfere with the wiring. Once plumbing and wiring are done we are ready for plaster. Yay!
As far as the bathroo is concerned we need to get the plumbing done quickly. Before the gas and water pipes are in I can't really do any more wiring as I don't want to interfere with the wiring. Once plumbing and wiring are done we are ready for plaster. Yay!
Saturday, April 3, 2010
Bathroom
The one and only original bathroom was built in 1976. Prior to that, the house had a pump in the front yard and an outhouse in the back. When the POs bought the house, they split one of the back rooms into a bathroom and hallway. The bathroom was long, narrow and ugly, roughly 3.2x1.7m (10'6"x5'6"), featuring grey wall tiles, yellow and brown floors and bright orange paint above. The only heat source consisted of two electric quartz heaters. COmbeined with the shot window it was COLD in there.
The tub was on the right, next to the toilet, the sink across the door, on the left of the window. Left of the door: a huge 150l (not quite 40 gallon) wall mounted electric water heater.
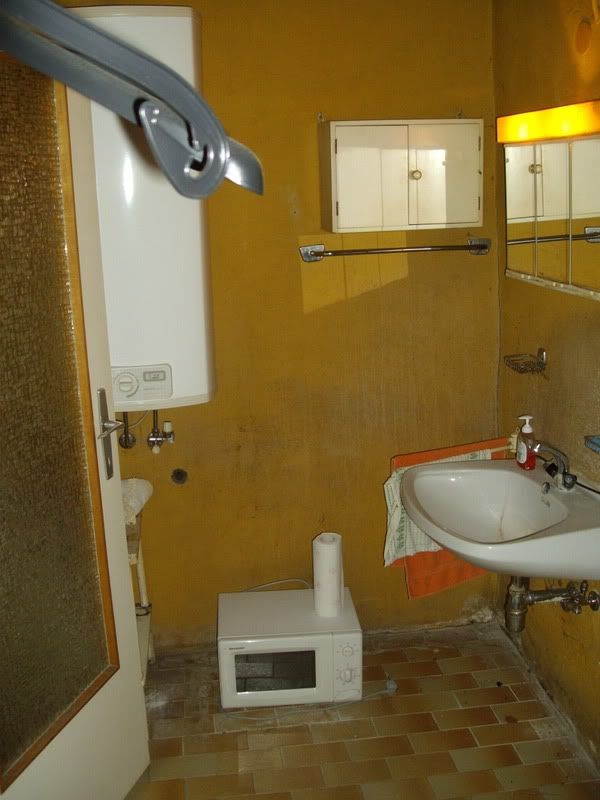
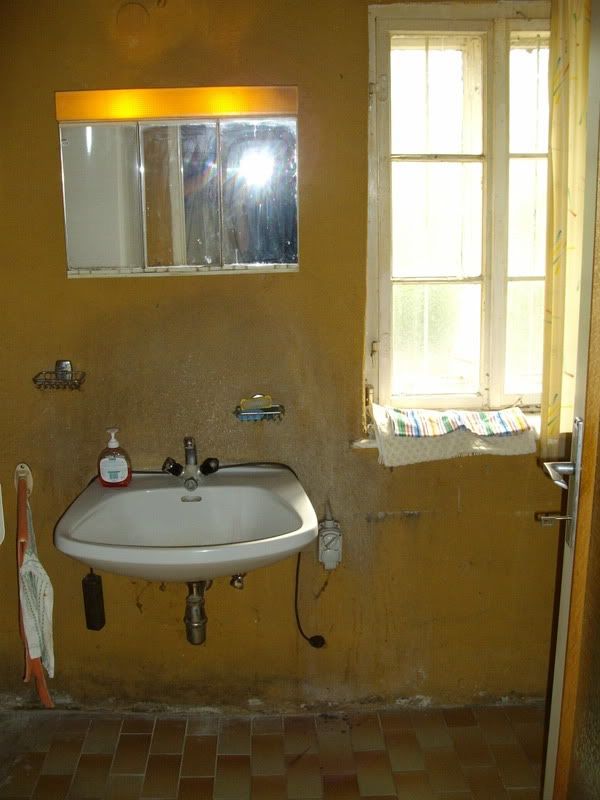
The medicine cabinet with two 25W bulbs was the only light, making the room even creepier at night. In fact the only nice feature is the old (I don't write original, since in this house it's absolutely impossible to tell what might be original, and the ceiling probably isn't as the beams are sawn rather than hewn).
We pretty soon decided to make the bathroom a bit more compact by rotating the tub 90 degrees and closing off a water closet around the current toilet location. That gives us an almost square bathroom and resolves any family quarrels (I mean who likes to be in the tub while someone is sitting on the toilet and vice versa? We're an open family raised in hippie spirit, but that's too much!). A standard tub barely fits the old bathroom, but we'd like a clawfoot or larger modern tub, both of which wouldn't (most clawfoots here are about 5cm longer than modern standard tubs). As soon as we discovered that the wall sits on top of the screed (which has a 5cm step in the hallway making a lovely tripping hazard and is seriously damp) it was clear that it had to go. We expected hollow block bricks, but alas, the wall was built of concrete block with cement mortar. As you can see the mortar was even stronger than the block. Took us two days with a sledge hammer to get rid of it.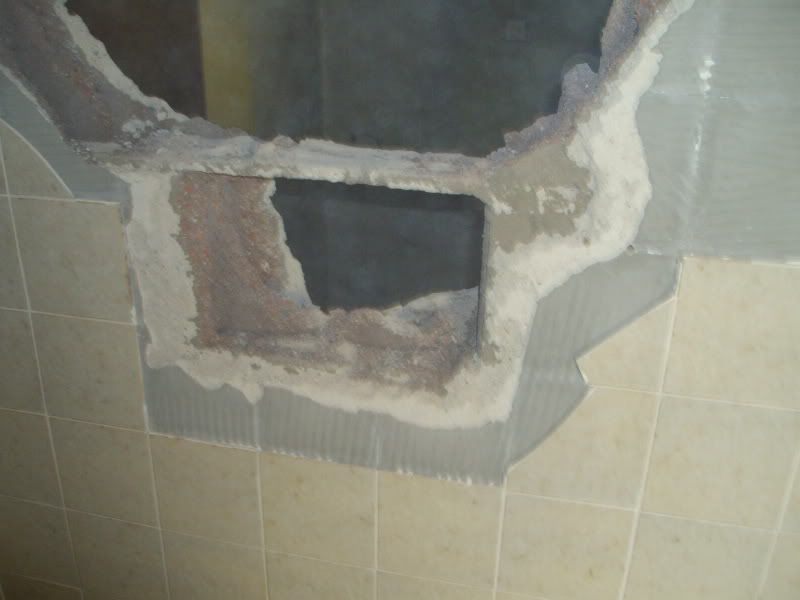 "ThereIfixedit.com" as my brother called it... as we still needed water for the construction, we left the galvanised plumbing in place, the tub feed hanging in mid air.
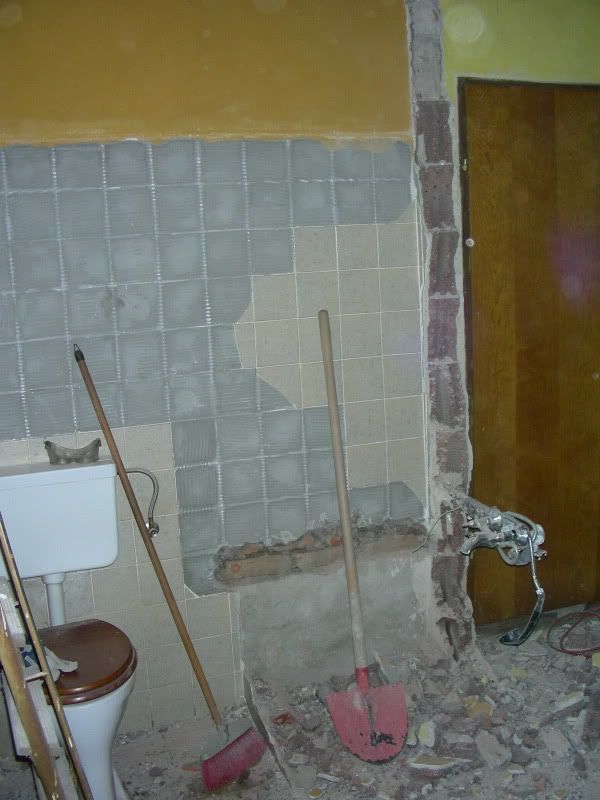
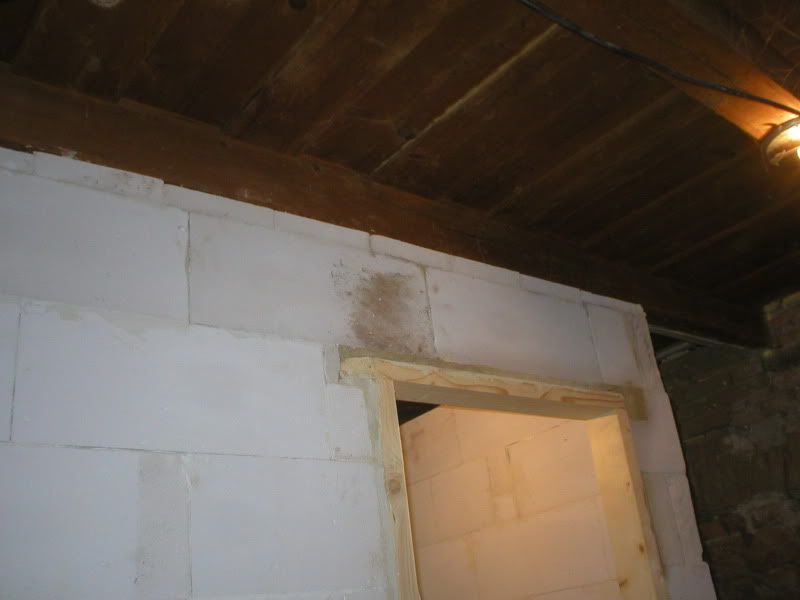
Around Christmas we started the rebuild. First we laid a brick foundation, then tar paper. We didn't get started on the actual walls though because we ran out of time. This week we could finally start laying the aerated concrete block. The first glory shot shows you the approximate layout minus the doors (the blocks just sit there to weight down the tar paper).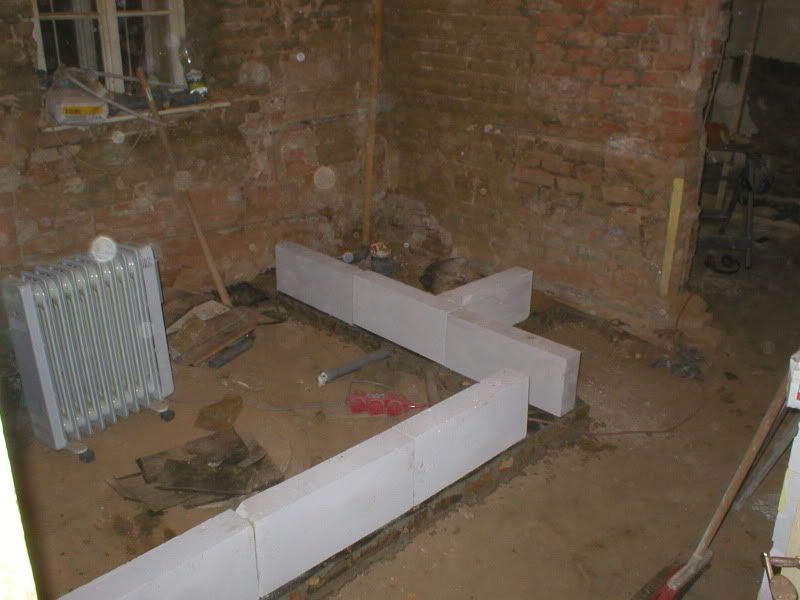 Once we started laying the block, we needed to get the door frames in place as the wall is built around them (were this a brick wall, the frames would be installed after the wall is done, but with those blocks it's easier to put up the frame first). The frames we built after Christmas are solid pine 2x5 to match our salvaged panel doors.
 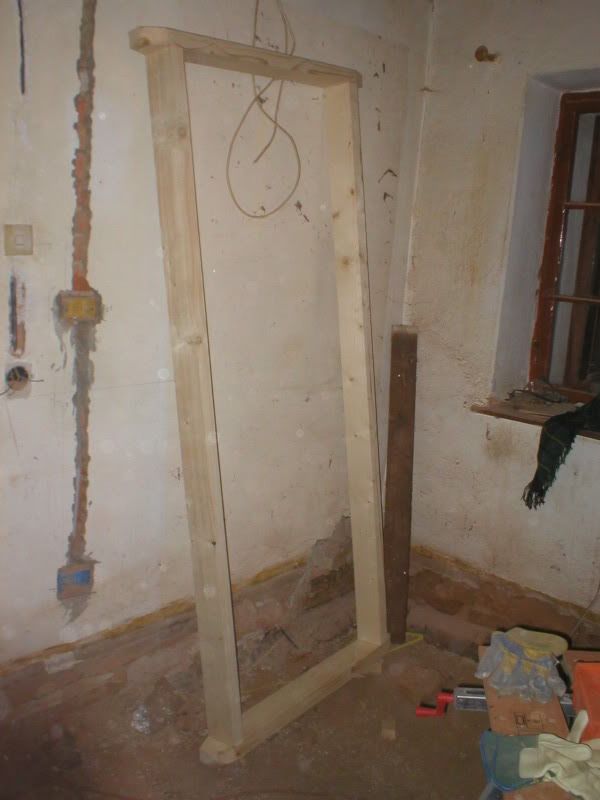 Of course they won't stand on their own, so we needed to get creative again.
 As soon as this was done, the walls realy started going up. Since the block is lightweight and very smooth things should go pretty fast (one block is 60x25x10cm, 24x10x4" and they're mortared using thinset applied with a notched trowel) but since we actually have to build three walls with two door frames the cutting slowed down things considerably. In spite of the name "concrete" the blocks can be cut using a regular wood saw (it goes dull though, so we used an old cheap one that came with the house). With two work days we got about half done as most of the time I was working alone or with very little help. With 1 guy cutting full time and 2 mortaring things would have gone considerably faster. In the bathroom, looking out into the new hallway:
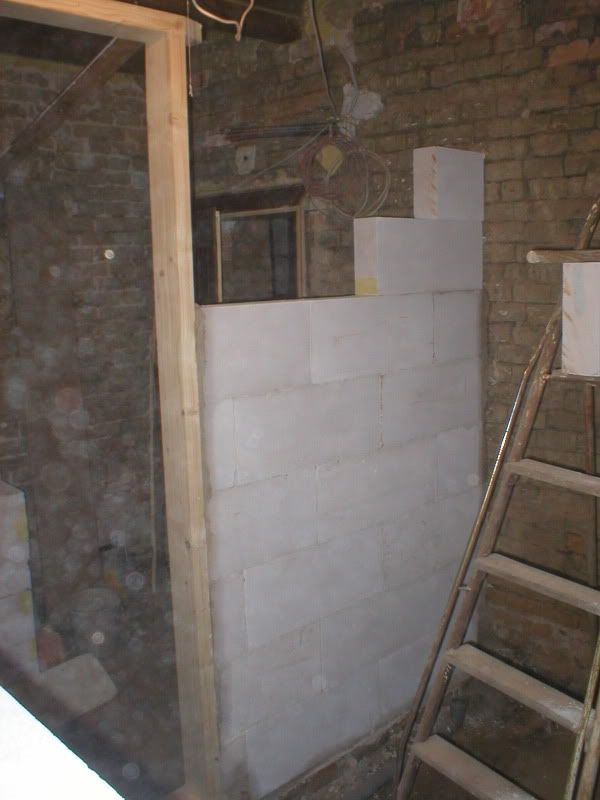
A second plumber gave us a quote for the central heat and plumbing which came in at only half of the first quote. He wants to sell us a Baxi boiler though, and online reviews were seriously bad. Besides, Vaillant gives you a 5 year warranty against scaling if you live in a hard water area, and that's exactly what we need! However, even if a Vaillant boiler increases the bill by about €1000 we'Re still much cheaper than with the first quote. Once the hot and cold water lines and drains are done it's time for subfloors and plaster!
As usual, there are still a few things left before that though, at least the plaster part. The wiring isn't anywhere near done yet and more than half of the door frames are still missing (at least 3 need to be built from scratch and installed and one has to be modified and installed). Once this is done, plaster can go up. Once the plastering is done, the heating pipes and radiators can be installed, followed by the floors. That leaves the 10 dozen other jobs like painting, tile, etc.
The tub was on the right, next to the toilet, the sink across the door, on the left of the window. Left of the door: a huge 150l (not quite 40 gallon) wall mounted electric water heater.
The medicine cabinet with two 25W bulbs was the only light, making the room even creepier at night. In fact the only nice feature is the old (I don't write original, since in this house it's absolutely impossible to tell what might be original, and the ceiling probably isn't as the beams are sawn rather than hewn).
We pretty soon decided to make the bathroom a bit more compact by rotating the tub 90 degrees and closing off a water closet around the current toilet location. That gives us an almost square bathroom and resolves any family quarrels (I mean who likes to be in the tub while someone is sitting on the toilet and vice versa? We're an open family raised in hippie spirit, but that's too much!). A standard tub barely fits the old bathroom, but we'd like a clawfoot or larger modern tub, both of which wouldn't (most clawfoots here are about 5cm longer than modern standard tubs). As soon as we discovered that the wall sits on top of the screed (which has a 5cm step in the hallway making a lovely tripping hazard and is seriously damp) it was clear that it had to go. We expected hollow block bricks, but alas, the wall was built of concrete block with cement mortar. As you can see the mortar was even stronger than the block. Took us two days with a sledge hammer to get rid of it.
"ThereIfixedit.com" as my brother called it... as we still needed water for the construction, we left the galvanised plumbing in place, the tub feed hanging in mid air. Around Christmas we started the rebuild. First we laid a brick foundation, then tar paper. We didn't get started on the actual walls though because we ran out of time. This week we could finally start laying the aerated concrete block. The first glory shot shows you the approximate layout minus the doors (the blocks just sit there to weight down the tar paper).
Once we started laying the block, we needed to get the door frames in place as the wall is built around them (were this a brick wall, the frames would be installed after the wall is done, but with those blocks it's easier to put up the frame first). The frames we built after Christmas are solid pine 2x5 to match our salvaged panel doors. Of course they won't stand on their own, so we needed to get creative again. As soon as this was done, the walls realy started going up. Since the block is lightweight and very smooth things should go pretty fast (one block is 60x25x10cm, 24x10x4" and they're mortared using thinset applied with a notched trowel) but since we actually have to build three walls with two door frames the cutting slowed down things considerably. In spite of the name "concrete" the blocks can be cut using a regular wood saw (it goes dull though, so we used an old cheap one that came with the house). With two work days we got about half done as most of the time I was working alone or with very little help. With 1 guy cutting full time and 2 mortaring things would have gone considerably faster. In the bathroom, looking out into the new hallway: A second plumber gave us a quote for the central heat and plumbing which came in at only half of the first quote. He wants to sell us a Baxi boiler though, and online reviews were seriously bad. Besides, Vaillant gives you a 5 year warranty against scaling if you live in a hard water area, and that's exactly what we need! However, even if a Vaillant boiler increases the bill by about €1000 we'Re still much cheaper than with the first quote. Once the hot and cold water lines and drains are done it's time for subfloors and plaster!
As usual, there are still a few things left before that though, at least the plaster part. The wiring isn't anywhere near done yet and more than half of the door frames are still missing (at least 3 need to be built from scratch and installed and one has to be modified and installed). Once this is done, plaster can go up. Once the plastering is done, the heating pipes and radiators can be installed, followed by the floors. That leaves the 10 dozen other jobs like painting, tile, etc.
Thursday, March 4, 2010
Re-installing a sink and fixing a boiler
The place where we live in Vienna is an old house too, and while we did an extensive renovation in 2004, a few things have remained untouched and need attention every once in a while. That is, the bathroom and the kitchen. The bathroom is still in its full 1978 glory and has only been repainted ever since (the last time in 1998 I think). The tiles were cheap leftovers back when they were bought, only matching in color but not pattern, and we had many pipe leaks in the meantime since they were installed. In fact that means there are now 5 different tile patterns used there, one of which is totally off (light beige instead of brown/green). The kitchen had new-ish white Ikea cabinets fitted in 1987 (they were about 10 years old back then I think, having come from my mom's old apartment, sitting in storage for 2 years after I was born) but other than that and paint... nothing happened. Both rooms are in dire need of a full renovation. The bathroom is likely going to get it after the new whole-house heating system is installed (currently every apartment has it's own gas boiler).
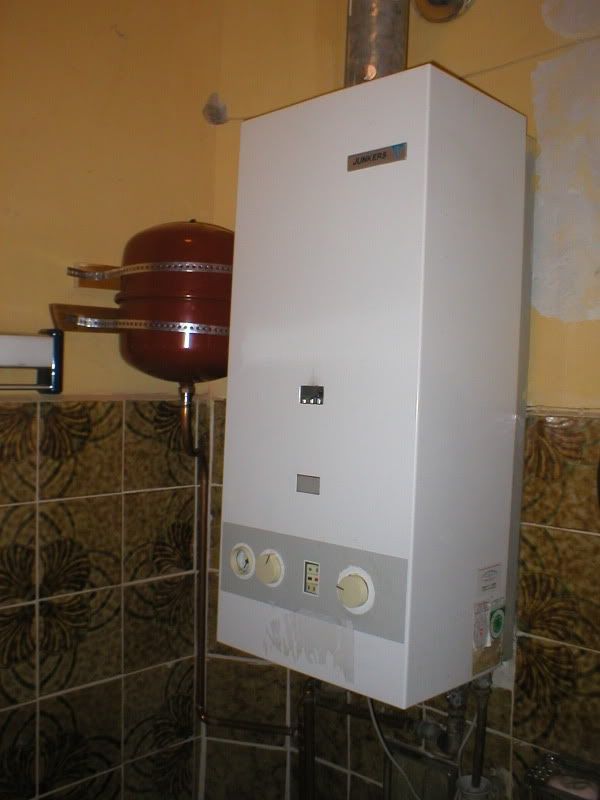
Our combi boiler (a wall-mount unit that is both a central heating boiler and tankless water heater) is as old as the whole bathroom, late 1977 vintage. The manufacturer suggested a likely life span of 15 years for that model. For the last three years we have been losing water from the system and had to refill every couple of weeks sometimes. Our regular plumbing/heating guy who checks the unit every year told us to live with it or get a new boiler. There is one company that bought all spare parts when Junkers dropped support for those dinosaurs. We called them and he confirmed my suspicions - broken expansion vessel - and claimed the boiler wasn't worth the repair.
We are talking about a closed, pump fed pressurised system here. When heated, water expands (like pretty much every other substance) and the presure in the system increases. Since water cannot be compressed (like air in a tire) a rise in water pressure eventually leads to exploding pipes, which is why a pressure relief valve is fitted to every system as an emergency relief feature. In normal operation, the pressure needs to be relieved differently or you ned to refill periodically. This is what the diaphragm expansion vessel is made for. A steel calinder with a rubber membrane, one part filled with water, the other with nitrogen or air. The gas compresses as the water gains pressure and balances the whole system. If the membrane tears from age, the vessel is shot.
A freind suggested simply installing an external expansion vessel. After some research I decided he was right. €40 in materials later and a day of help from my uncle the plumber, the system was up and running again. While he refileld the system he also found a loose connection that dripped. After he retightened that slip nut, the system held pressure perfectly. Now why were two service technicians incapable of finding and stopping that leak?!?
The red vessel next to our boiler (above the bath tub) looks borderline ugly, but it works again! I certainly value heat over looks and even my mom, the main style watchdog in the family, approved!
However, our sink that had already been a little loose for a while must have taken a beating during the process and now threatened to fall off the wall. At the time of one of the many plumbing leak repairs (we some lead cold water pipes until 1998) the plumber had to move the sink (which is bolted to the brick wall) up by 10cm to avoid drilling into his new pipe. He drilled several holes and finally claimed "now it should work".
When I took down the sink (close both shutoff valves, disconnect braided hoses from valves to sink, get someone to hold the sink while you're crouching underneath and undo the nuts, pull the sink off the walll including the trap which is only pushed into the drain pipe with a rubber o-ring, thanks heaven not soldered into a lead drain any more) it became soon clear why it hadn't really worked.
A) When my dad redid that bathroom he wanted it done fast and cheap. Thus the plumber friend of his, named Gustl (famous for his dodgy plumbing by now, like solder joints that held merely by chance and fell apart as soon as the pipe was touched or reversing the hot and cold at the boiler, with the result that the radiators took ages to get warm) tiled over the old white tiles. Where they were removed for plumbing work the void was simply filled up with plaster to the surface of the old tiles, eventually resulting in an almost 5cm (2") thick layer of plaster.
The bolts that hold the sink were 150mm (ca. 6") long, half machine thread and half wood screw. That means 5 out of the 7.5 cm supposed to go into the wall were in plaster rather than brick. Very very soft plaster, modern lime-cement mix with a very high perlite content, which is even softer than the cheapest old plaster. You can crumble it away with your fingers.
Furthermore, drilling 14mm diameter holes into the brick and inserting large screws caused both bricks to crack, weakening the hold of the bolts even more. Normally this is prevented by the bond of the bricks and the mortar joints that evenly distribute the pressure of the screw across the wall but in this case there was a deep hole below from some old plumbing, putting the whole stress on one brick.
 This picture shows you the whole sorry mess with most of the plaster removed but the old bolts still in place. Lots of unused old plumbing as well as some new. The white and red stuff is plastic and foam pipe insulation, serving two purposes. First of all it makes sense to keep your hot water lines from heating your walls, then around cold water lines moisture can condensate in summer and cause trouble, and lastly copper needs to be protected from caustic mortar and plaster. The red section is from when we moved the hot water supply to the kitchen (originally exposed on the walls below the ceiling) under the hallway floor. That was in 2004 and we never replaced the plaster and tile to the right of the sink (well, that's behind the washing machine, so who cares...). The two yellow objects at the bottom are the taped shutoff valves, the thing with an old sock is the drain (it stank badly without the trap).
My first attempt was to reseat the bolts by using new plastic wall plugs and repairing the cracked brick, supporting it with plenty of mortar in the hole below. The I squeezed plenty of spackle into the holes, inserted the plugs, plastered the whole section (not bothering with tiles since this is again a temporary job and hidden below the sink/behind the washing machine) waited overnight and re-installed the bolts. Since most of the bolts ended up embedded in plaster I left holes around them and only closed up everything when the bolts were fully screwed into the wall.
First coat of plaster: I used lime plaster because we had a bucket of lime putty and a bag of sand left over from the WC project. When I ran out of lime plaster on the right, I used up a leftover bag of perlite plaster. Finish coat with one hole already filled in:
Once this had cured enough I tried to install the sink, only to find that the bolts were too deep into the wall or too short, depending on perspective. Clearly, a new plan was necessary. First I asked around for 200mm long bolts. "Yeah, they make them, but we don't have any in stock!" was the reply of one of our local plumbers. OTOH he gave me two shiny new 150mm ones for free. Off to the big box store. "Wall bolts M14? We have 80mm and 100mm!" Yeouch! 150mm are too short and they try to sell me 80mm ones? Off to the painting supplies, grab a box of quick-setting concrete (useable for 3 minutes once mixed with water according to the instructions). Pull out old plugs using pliers and an old screwdriver, clean out holes and insert new plugs, flush with the wall surface. Fill holes with concrete rather than plaster. Wait an hour just to make sure. Insert bolts and hang sink. Done!
Just need to caulk where it meets the wall, with the old tiles being laid so bumpy there is a sizeable gap there.
After that experience I don't want to touch any plumbing again soon, at least not without wearing wellingtons (rubber boots)! The serious advantage of electricity (my learned trade) over water and gas is that it absolutely won't come shooting out of the wire and puddle on the floor!
Our combi boiler (a wall-mount unit that is both a central heating boiler and tankless water heater) is as old as the whole bathroom, late 1977 vintage. The manufacturer suggested a likely life span of 15 years for that model. For the last three years we have been losing water from the system and had to refill every couple of weeks sometimes. Our regular plumbing/heating guy who checks the unit every year told us to live with it or get a new boiler. There is one company that bought all spare parts when Junkers dropped support for those dinosaurs. We called them and he confirmed my suspicions - broken expansion vessel - and claimed the boiler wasn't worth the repair.
We are talking about a closed, pump fed pressurised system here. When heated, water expands (like pretty much every other substance) and the presure in the system increases. Since water cannot be compressed (like air in a tire) a rise in water pressure eventually leads to exploding pipes, which is why a pressure relief valve is fitted to every system as an emergency relief feature. In normal operation, the pressure needs to be relieved differently or you ned to refill periodically. This is what the diaphragm expansion vessel is made for. A steel calinder with a rubber membrane, one part filled with water, the other with nitrogen or air. The gas compresses as the water gains pressure and balances the whole system. If the membrane tears from age, the vessel is shot.
A freind suggested simply installing an external expansion vessel. After some research I decided he was right. €40 in materials later and a day of help from my uncle the plumber, the system was up and running again. While he refileld the system he also found a loose connection that dripped. After he retightened that slip nut, the system held pressure perfectly. Now why were two service technicians incapable of finding and stopping that leak?!?
The red vessel next to our boiler (above the bath tub) looks borderline ugly, but it works again! I certainly value heat over looks and even my mom, the main style watchdog in the family, approved!
However, our sink that had already been a little loose for a while must have taken a beating during the process and now threatened to fall off the wall. At the time of one of the many plumbing leak repairs (we some lead cold water pipes until 1998) the plumber had to move the sink (which is bolted to the brick wall) up by 10cm to avoid drilling into his new pipe. He drilled several holes and finally claimed "now it should work".
When I took down the sink (close both shutoff valves, disconnect braided hoses from valves to sink, get someone to hold the sink while you're crouching underneath and undo the nuts, pull the sink off the walll including the trap which is only pushed into the drain pipe with a rubber o-ring, thanks heaven not soldered into a lead drain any more) it became soon clear why it hadn't really worked.
A) When my dad redid that bathroom he wanted it done fast and cheap. Thus the plumber friend of his, named Gustl (famous for his dodgy plumbing by now, like solder joints that held merely by chance and fell apart as soon as the pipe was touched or reversing the hot and cold at the boiler, with the result that the radiators took ages to get warm) tiled over the old white tiles. Where they were removed for plumbing work the void was simply filled up with plaster to the surface of the old tiles, eventually resulting in an almost 5cm (2") thick layer of plaster.
The bolts that hold the sink were 150mm (ca. 6") long, half machine thread and half wood screw. That means 5 out of the 7.5 cm supposed to go into the wall were in plaster rather than brick. Very very soft plaster, modern lime-cement mix with a very high perlite content, which is even softer than the cheapest old plaster. You can crumble it away with your fingers.
Furthermore, drilling 14mm diameter holes into the brick and inserting large screws caused both bricks to crack, weakening the hold of the bolts even more. Normally this is prevented by the bond of the bricks and the mortar joints that evenly distribute the pressure of the screw across the wall but in this case there was a deep hole below from some old plumbing, putting the whole stress on one brick.
 This picture shows you the whole sorry mess with most of the plaster removed but the old bolts still in place. Lots of unused old plumbing as well as some new. The white and red stuff is plastic and foam pipe insulation, serving two purposes. First of all it makes sense to keep your hot water lines from heating your walls, then around cold water lines moisture can condensate in summer and cause trouble, and lastly copper needs to be protected from caustic mortar and plaster. The red section is from when we moved the hot water supply to the kitchen (originally exposed on the walls below the ceiling) under the hallway floor. That was in 2004 and we never replaced the plaster and tile to the right of the sink (well, that's behind the washing machine, so who cares...). The two yellow objects at the bottom are the taped shutoff valves, the thing with an old sock is the drain (it stank badly without the trap).
My first attempt was to reseat the bolts by using new plastic wall plugs and repairing the cracked brick, supporting it with plenty of mortar in the hole below. The I squeezed plenty of spackle into the holes, inserted the plugs, plastered the whole section (not bothering with tiles since this is again a temporary job and hidden below the sink/behind the washing machine) waited overnight and re-installed the bolts. Since most of the bolts ended up embedded in plaster I left holes around them and only closed up everything when the bolts were fully screwed into the wall.
First coat of plaster:
 I used lime plaster because we had a bucket of lime putty and a bag of sand left over from the WC project. When I ran out of lime plaster on the right, I used up a leftover bag of perlite plaster. Finish coat with one hole already filled in:
Once this had cured enough I tried to install the sink, only to find that the bolts were too deep into the wall or too short, depending on perspective. Clearly, a new plan was necessary. First I asked around for 200mm long bolts. "Yeah, they make them, but we don't have any in stock!" was the reply of one of our local plumbers. OTOH he gave me two shiny new 150mm ones for free. Off to the big box store. "Wall bolts M14? We have 80mm and 100mm!" Yeouch! 150mm are too short and they try to sell me 80mm ones? Off to the painting supplies, grab a box of quick-setting concrete (useable for 3 minutes once mixed with water according to the instructions). Pull out old plugs using pliers and an old screwdriver, clean out holes and insert new plugs, flush with the wall surface. Fill holes with concrete rather than plaster. Wait an hour just to make sure. Insert bolts and hang sink. Done!
Just need to caulk where it meets the wall, with the old tiles being laid so bumpy there is a sizeable gap there.
After that experience I don't want to touch any plumbing again soon, at least not without wearing wellingtons (rubber boots)! The serious advantage of electricity (my learned trade) over water and gas is that it absolutely won't come shooting out of the wire and puddle on the floor!
Subscribe to:
Posts (Atom)