Last time I showed you pictures of our beautiful new wood floor in the hallway. We left proper expansion gaps around the perimeter when we installed the floor but as the wood had been stored outdoors we didn't expect it to expand much anyway. WRONG!
The next time we got there, the 15mm gap between one wall and the floor had shrunk to zero and the floor was buckled. So far we haven't done anything about it. We could try to cut the floor where it hits the wall using the MultiTool (Fein Multimaster knockoff) but the boards are screwed in place and I'm not sure if the screws allow for enough movement to stop the buckling and creaking once we cut the board. The only other option is redoing everything.
Right now I'm working on something completely different. A close friend's mom asked me to help her renovate a 1960 flat. The last people moved in there when it was built and moved out feet first. Needless to say there is some updating to be done. They did occasionally re-paper the rooms (including the ceilings) but always in very old-fashioned patterns. The rooms have 10x10cm parquet tile (probably solid oak), the bathroom is tiled, the kitchen, hall and WC have/had dark green vinyl. Instant depression!
The bathroom was redone in 1971 (we found leftover tiles in a box wrapped in newspaper) and looks it - rose patterned tiles and a bath worn almost through the glazing down to the cast iron plus dripping taps and drain on the sink. The only light was provided by an 18W fluorescent batten with completely yellowed plastic cover.
The WC was even worse - dusty pink PVC tiles and yellow wall paint never(!) repainted in 50 years.
We also replaced or fixed about half the wiring in order to bring it up to modern standards and make it safe. However, heating is a disaster. There were two gas stoves, one of which was removed because it scared my friend's mom. The larger of the two bedrooms has/had an electric storage heater, a solid tiled monstrosity. Yesterday I discovered that the boss started to rip it apart and quit when she found it to be lined with asbestos. Told her that right from the beginning *sigh*
Wednesday, June 6, 2012
Saturday, April 7, 2012
Hibernation is over
Winter was brutally cold, inside temperatures were only slightly above freezing. The two coal stoves improved things a little, but not much. During the X-mas break I did some wiring but not much else. In February we started on the floors but like everything it took us much longer than expected.
We started with concrete slab over pea gravel 10cm (4") below our desired floor level. The slab was of course cold and not perfectly dry (most likely condensation). Now of course we asked around what to do with that floor. If you know experts you can probably guess the result. We got at least as many different answers as questions. One guy recommended plastic and mineral wool, another highly recommended sealing the floor with tar paper and some eco-friendly insulation on top, the third recommended putting down rigid foam insulation and maintaining an air space below the floor and the fourth guy told us just to keep an air space.
Now if there's something I know then it's that mineral wool and moisture don't mix, so there's no way on earth I'd put it underneath a floor! Option 1 out. Option 2 had a serious flaw: the tar paper was supposed to be sealed with heat using a big propane burner. Can't exactly do that once the central heating pipes are down! *sigh* Then we seriously considered the rigid foam especially as we could get it for free. However, having grown up with solid packed floors we were worried that wood floors on sleepers without any solid fill underneath would sound hollow underfoot and make a lot of noise. In classic construction (pre-WWII) the floors are multi-layer. First there's the actual load-bearing subfloor nailed on top of the joists. Then there's a 4" sand or dirt fill in which 2x3 sleepers rest. The finished floor is nailed to the sleepers, so it rests both on the sleepers and the dirt fill, there aren't any cavities.
Eventually we decided on our own method and hope it won't cause any trouble. First we put down heavy landscape felt as the concrete was fairly rough. Then we topped it off with the heaviest plastic we could find to waterproof the whole thing. The sleepers are supported by blocks of wood with thin scraps of cork underneath. You can see we really wanted to make sure the plastic won't get damaged!
Then we filled the whole space underneath the floor with perlite.
The biggest trouble spot was near the main door. The wall next to the camera is load-bearing and triple wythe brick, i.e. nearly 60cm thick. The brickwork continues under the door. Unfortunately it's higher than the slab and extremely uneven, so we had to cut and shim the living crap out of the sleepers there.

Now the real fun started! Things you'd actually see! For the back hall I wanted to use salvaged oak planks. A good 10 years ago I happened to pass a dumpster nearby and saw some kind of flooring. Of course I got curious and had a closer look! Turned out to be a mix of 8 and 9cm wide T&G oak planks, most of them nearly 2.5m (8') long, others about half that. The boards were in fairly bad shape, but I hoped they could be saved. Apparently the original floor had huge gaps and was extremely worn and splintery, so someone decided to screw down large sheets of 5mm pressboard and install vinyl. Some boards had a screw every 10cm. Maybe half the boards were in terrible shape, dull grey, deeply worn and splintering along the edges, but we discovered that they could in fact be planed down to good and beautiful wood. So I started removing the screws and old nails as well as cleaning up the tongues and grooves.
This does look bad, doesn't it?

The first thing we realised was that we had considerably fewer boards than I'd estimated earlier. Back when we found them I thought we had about 18sq.m., while in fact it was closer to 6, barely enough for the small hallway. Trouble really started as we began installation. The tongues and grooves didn't really fit and I had to use considerably brute force to get the boards together without huge gaps (emphasis on huge, I did get some gaps anyway).

Once we got out of the narrow section in front of the WC to the long part of the hall things quickly went from bad to worse. We discovered that the boards weren't exactly the same width (a few mm off) and some of the longer ones had nasty curves in them. Around the second or third long course we discovered big gaps that would only keep adding up as we progressed.

At that point I really started to wonder if we should continue or give up. After a lot of thinking we decided to rip out what we'd already installed and buy a new floor. It's a pity, I'm sure the wood itself would have looked terrific once sanded and oiled, but the boards were such a poor fit it wouldn't have been worth the hassle. Initially I wanted to go to the next larger town and buy wood in the big box store because they usually have anything you need in stock but then I decided to give a local lumberyard a call because it was much closer (6km rather than 25) and they most likely had better quality wood than the DIY store. They had nice larch t&g flooring in stock for a decent price and we got there barely in time to pick it up. I'm not sure if I've mentioned this before, but store opening hours are extremely restricted in most Central European countries. Supermarkets, DIY stores and other large chains are usually open from 8 or 9 AM to 7:30 or 8 PM Mon-Fri and 8 or 9 AM to 6 PM on Saturdays, closed on Sundays (ANYTHING is closed on Sundays except mini-markets in railway stations and airports). Stores that mostly cater to professionals are usually open 7 AM to 5 PM with a 2 hour lunch break around noon, Friday afternoon closed, Saturday too. If they're in a rural region Wednesday afternoons are usually closed too. So, we barely made it there until 5 and picked up our new flooring. 19 11cm wide 4m long and 18mm thick Siberian larch planks.
The large part of the room is 3.35m x 1.72m (the latter being the median as one wall is angled) so we had two options - buy 3m planks and piece them together or buy 4m planks and have some leftovers. Since we heat with wood we decided to get 4m.
Installing the new floor went considerably smoother, but it was still very time consuming. We worked until 11 that night and got the large part almost done, except for the boards right next to the angled wall. Finishing the two little "alcoves" took us another 3 hours though.
Here you can see the weird shape of this room. At the far end the gap between the last board and the wall on the right is almost non-existant but near the door it's already fairly wide.
On the other side of the room it's more than a full board.


And now the completed result!
We still need to sand or scrape the floor a little as the boards aren't perfectly the same thickness and then we have to oil the floor of course.


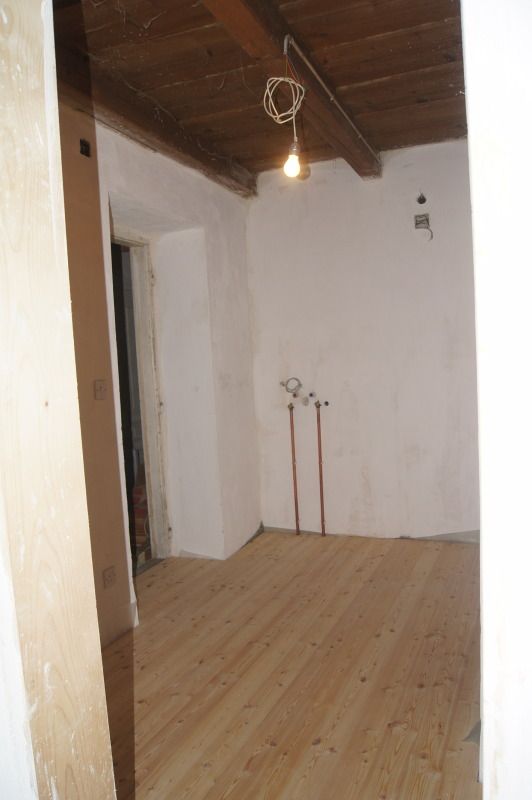
Once we finished installing the floor I immediately started on the next room putting down the felt and plastic. At that point I stopped because we wanted to go home and my muscles were extremely sore. Hopefully next time we can get the floor done in there which would give us one nearly finished room (minus door trim, painting and installing switches and outlets).
Oh, and still no decision on the tile... *sigh*
I like this floor tile but it's 20x20cm and doesn't go too well with 15x15cm wall tiles.

We might go for black and white 15x15 floor tile (think chess board) and white wall tile. I did manage to find black 15cm wide trim pieces for a decent price but unfortunately in what appears to be a small tile store at the other end of the country. In Vienna we can only get 2.5x20 and 5x20 border tiles. Then of course there's my personal favourite, replica art-nouveau tile in all colours of the rainbow but that's insanely expensive. Last time I asked it was €144/sq. m. Plain white 15x15 or 20x20 at the DIY store is €5.99. Even Villeroy&Boch tiles don't really go beyond €100.
We started with concrete slab over pea gravel 10cm (4") below our desired floor level. The slab was of course cold and not perfectly dry (most likely condensation). Now of course we asked around what to do with that floor. If you know experts you can probably guess the result. We got at least as many different answers as questions. One guy recommended plastic and mineral wool, another highly recommended sealing the floor with tar paper and some eco-friendly insulation on top, the third recommended putting down rigid foam insulation and maintaining an air space below the floor and the fourth guy told us just to keep an air space.
Now if there's something I know then it's that mineral wool and moisture don't mix, so there's no way on earth I'd put it underneath a floor! Option 1 out. Option 2 had a serious flaw: the tar paper was supposed to be sealed with heat using a big propane burner. Can't exactly do that once the central heating pipes are down! *sigh* Then we seriously considered the rigid foam especially as we could get it for free. However, having grown up with solid packed floors we were worried that wood floors on sleepers without any solid fill underneath would sound hollow underfoot and make a lot of noise. In classic construction (pre-WWII) the floors are multi-layer. First there's the actual load-bearing subfloor nailed on top of the joists. Then there's a 4" sand or dirt fill in which 2x3 sleepers rest. The finished floor is nailed to the sleepers, so it rests both on the sleepers and the dirt fill, there aren't any cavities.
Eventually we decided on our own method and hope it won't cause any trouble. First we put down heavy landscape felt as the concrete was fairly rough. Then we topped it off with the heaviest plastic we could find to waterproof the whole thing. The sleepers are supported by blocks of wood with thin scraps of cork underneath. You can see we really wanted to make sure the plastic won't get damaged!
Then we filled the whole space underneath the floor with perlite.
The biggest trouble spot was near the main door. The wall next to the camera is load-bearing and triple wythe brick, i.e. nearly 60cm thick. The brickwork continues under the door. Unfortunately it's higher than the slab and extremely uneven, so we had to cut and shim the living crap out of the sleepers there.

Now the real fun started! Things you'd actually see! For the back hall I wanted to use salvaged oak planks. A good 10 years ago I happened to pass a dumpster nearby and saw some kind of flooring. Of course I got curious and had a closer look! Turned out to be a mix of 8 and 9cm wide T&G oak planks, most of them nearly 2.5m (8') long, others about half that. The boards were in fairly bad shape, but I hoped they could be saved. Apparently the original floor had huge gaps and was extremely worn and splintery, so someone decided to screw down large sheets of 5mm pressboard and install vinyl. Some boards had a screw every 10cm. Maybe half the boards were in terrible shape, dull grey, deeply worn and splintering along the edges, but we discovered that they could in fact be planed down to good and beautiful wood. So I started removing the screws and old nails as well as cleaning up the tongues and grooves.
This does look bad, doesn't it?

The first thing we realised was that we had considerably fewer boards than I'd estimated earlier. Back when we found them I thought we had about 18sq.m., while in fact it was closer to 6, barely enough for the small hallway. Trouble really started as we began installation. The tongues and grooves didn't really fit and I had to use considerably brute force to get the boards together without huge gaps (emphasis on huge, I did get some gaps anyway).

Once we got out of the narrow section in front of the WC to the long part of the hall things quickly went from bad to worse. We discovered that the boards weren't exactly the same width (a few mm off) and some of the longer ones had nasty curves in them. Around the second or third long course we discovered big gaps that would only keep adding up as we progressed.

At that point I really started to wonder if we should continue or give up. After a lot of thinking we decided to rip out what we'd already installed and buy a new floor. It's a pity, I'm sure the wood itself would have looked terrific once sanded and oiled, but the boards were such a poor fit it wouldn't have been worth the hassle. Initially I wanted to go to the next larger town and buy wood in the big box store because they usually have anything you need in stock but then I decided to give a local lumberyard a call because it was much closer (6km rather than 25) and they most likely had better quality wood than the DIY store. They had nice larch t&g flooring in stock for a decent price and we got there barely in time to pick it up. I'm not sure if I've mentioned this before, but store opening hours are extremely restricted in most Central European countries. Supermarkets, DIY stores and other large chains are usually open from 8 or 9 AM to 7:30 or 8 PM Mon-Fri and 8 or 9 AM to 6 PM on Saturdays, closed on Sundays (ANYTHING is closed on Sundays except mini-markets in railway stations and airports). Stores that mostly cater to professionals are usually open 7 AM to 5 PM with a 2 hour lunch break around noon, Friday afternoon closed, Saturday too. If they're in a rural region Wednesday afternoons are usually closed too. So, we barely made it there until 5 and picked up our new flooring. 19 11cm wide 4m long and 18mm thick Siberian larch planks.
The large part of the room is 3.35m x 1.72m (the latter being the median as one wall is angled) so we had two options - buy 3m planks and piece them together or buy 4m planks and have some leftovers. Since we heat with wood we decided to get 4m.
Installing the new floor went considerably smoother, but it was still very time consuming. We worked until 11 that night and got the large part almost done, except for the boards right next to the angled wall. Finishing the two little "alcoves" took us another 3 hours though.
Here you can see the weird shape of this room. At the far end the gap between the last board and the wall on the right is almost non-existant but near the door it's already fairly wide.
On the other side of the room it's more than a full board.


And now the completed result!
We still need to sand or scrape the floor a little as the boards aren't perfectly the same thickness and then we have to oil the floor of course.


Once we finished installing the floor I immediately started on the next room putting down the felt and plastic. At that point I stopped because we wanted to go home and my muscles were extremely sore. Hopefully next time we can get the floor done in there which would give us one nearly finished room (minus door trim, painting and installing switches and outlets).
Oh, and still no decision on the tile... *sigh*
I like this floor tile but it's 20x20cm and doesn't go too well with 15x15cm wall tiles.

We might go for black and white 15x15 floor tile (think chess board) and white wall tile. I did manage to find black 15cm wide trim pieces for a decent price but unfortunately in what appears to be a small tile store at the other end of the country. In Vienna we can only get 2.5x20 and 5x20 border tiles. Then of course there's my personal favourite, replica art-nouveau tile in all colours of the rainbow but that's insanely expensive. Last time I asked it was €144/sq. m. Plain white 15x15 or 20x20 at the DIY store is €5.99. Even Villeroy&Boch tiles don't really go beyond €100.
Subscribe to:
Posts (Atom)